

SMSEagle features
Below you will find a detailed description of all the features offered by the SMSEagle software. The order of the descriptions matches that of the SMSEagle web GUI.
Compose SMS
Here we show the various ways of sending an SMS form your device.
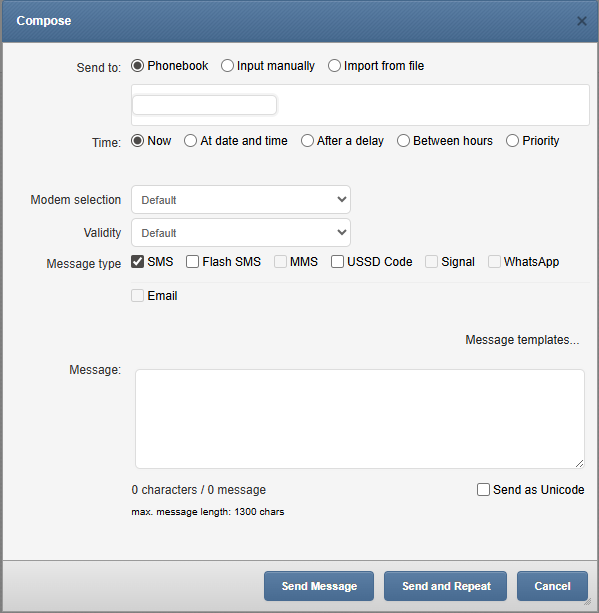
Screenshot of default Compose SMS view
In Compose SMS users can:
Send SMS to contact from phonebook, input manually or import from file
When importing from file each column can be used as a placeholder in the message. During sending the placeholder will be replaced by a unique value for each imported row from CSV file. This allows you to send a personalized message to each recipient.
Set send date to now, at a date and time, after a delay, between selected hours or with high priority
Set duration validity of SMS
Select a type of message: normal SMS, flash SMS, MMS, USSD Code, Email, Signal or WhatsApp
Set a message template to be saved and used at another time
Send as Unicode (for special character use)
Send message or Send and Repeat (window remains open, allowing modifications to next message)
Importing SMS from CSV and using placeholders
SMSEagle software allows you to import SMS text from CSV file and (optionally) use special placeholders in a message body. Placeholders are special fields which are replaced with unique values for each message. First a .csv file is needed like in the example below. Columns can be added and named as needed.
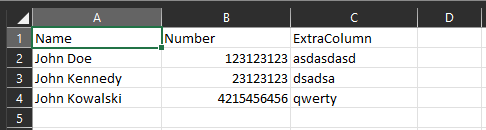
When composing an SMS using .csv file as a source, each column in the uploaded .csv file becomes a placeholder that will fill in the information from your file. Placeholders can be added to the message body by clicking the column name in the “Select field” as seen below.
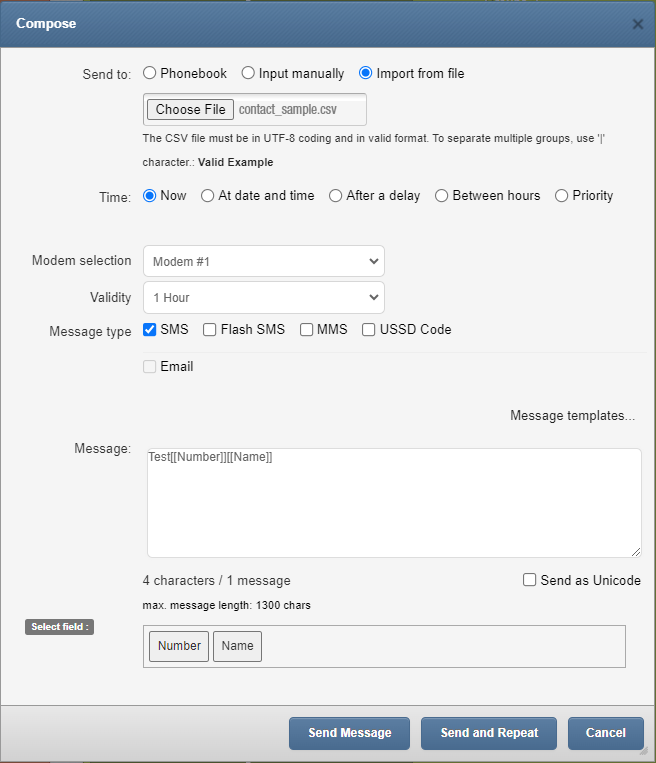
Screenshot of “Compose SMS” with imported .csv file.
Calls (Voice feature)
Available only to users who have purchased the VOICE add-on for their SMSEagle device.
The Calls feature allows making wake-up calls (ring only), text-to-speech calls and audio file calls to a single phone number or group of recipients. This feature is ideal for delivering urgent messages or announcements, such as alerts, emergency notifications, or other time-sensitive information. A call request can be created via SMSEagle web-GUI or API.
Wake Up Calls (Ring only)
Wake-up call is a ring-only call that can be used to capture a recipient’s attention. This feature allows for example to wake up someone during the night to draw attention to SMS containing a critical alert. When a wake-up call is made SMSEagle device will ring to a specified phone number or phonebook entry for a specified number of seconds.
Text-To-Speech (TTS) Calls
Available only on NXS hardware Rev.4 and MHD-8100-4G devices, due to technical limitations.
There are 3 modes of text-to-speech function:
Text to Speech Simple: faster method, but only supports English language.
Text to Speech Advanced: supports multiple languages, provides better voice quality, but is slower for longer texts. Works offline.
Elevenlabs TTS: multiple languages, excellent, natural-sounding voices. Requires an Elevenlabs account and internet access for text-to-speech conversion
Audio file calls
The Audio File Call feature allows you to make voice calls using recorded audio (wave) files. This feature is ideal for those who prefer a personal touch for customized announcements or specific alerts. You can upload a pre-defined file in the Calls > Audio files menu. The file must meet the following requirements: Wave file format, 8 kHz or 16 kHz, mono, 16-bit PCM.
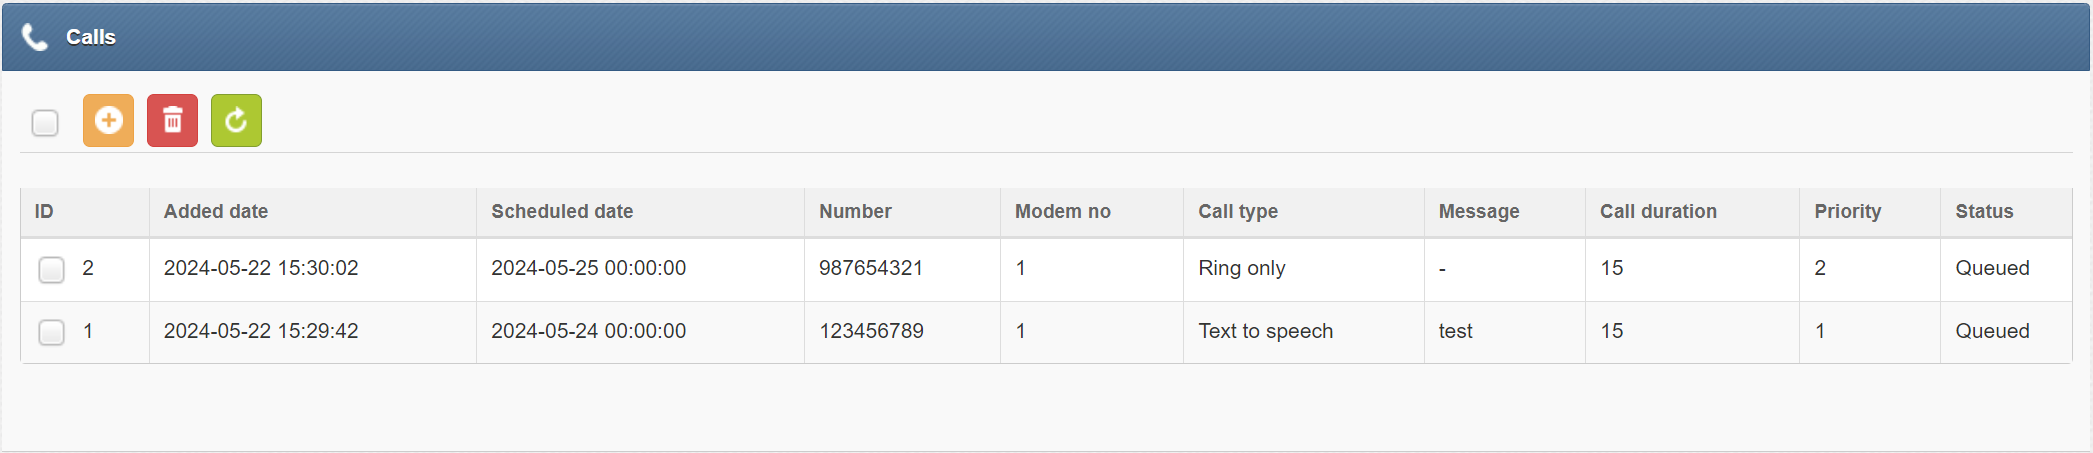
Screenshot with examples from “Calls” menu
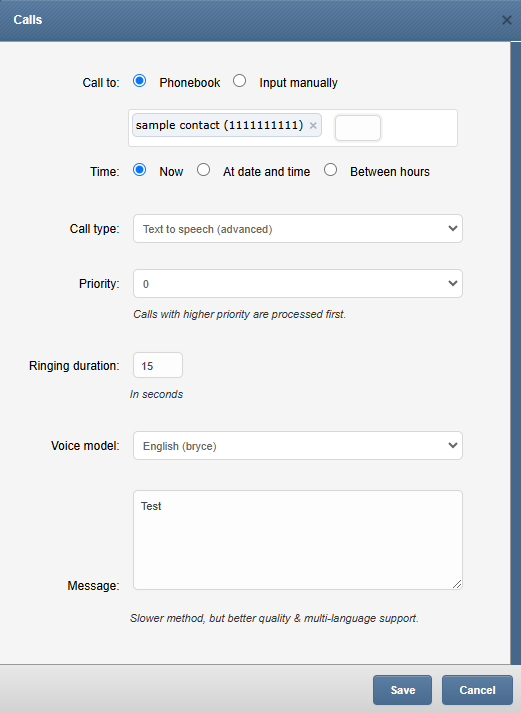
Screenshot from New Call window
In New call window you can set:
Contact or group from Phonebook or manual input
Select if a call should be made immediately, at a specified date/time, or between hours
Which modem to call from (when using a multi-modem device)
Set call priority from 0-5
Select call type, Ring only, Text to Speech Simple, Text to Speech Advanced, Audio File, ElevenLabs TTS
For Text to Speech Advanced you can select language and voice model
For Audio File you may select an existing file or upload a file from your computer
Input message when Text-to-speech call type is selected. For “Text-to-Speech Simple” the length of the text message is limited to 950 characters.
Retry attempts
If a call attempt fails, it will be automatically retried up to 2 more times.
TTS offline voice models
Text to Speech Advanced feature has 2 pre-uploaded language models: English, German. You can upload additional voice models via the Calls > TTS voice models menu. The voice model library currently contains 36 languages and multiple voices for some of the languages. Refer to the page Voice Models to compare various voice models and listen to voice samples.
New voice models can be added semi-automatically (the device downloads files from the repository on github.com) or manually (the files must be downloaded to the computer and uploaded using the dialog window). Once the voice model is uploaded, the TTS conversion works offline.
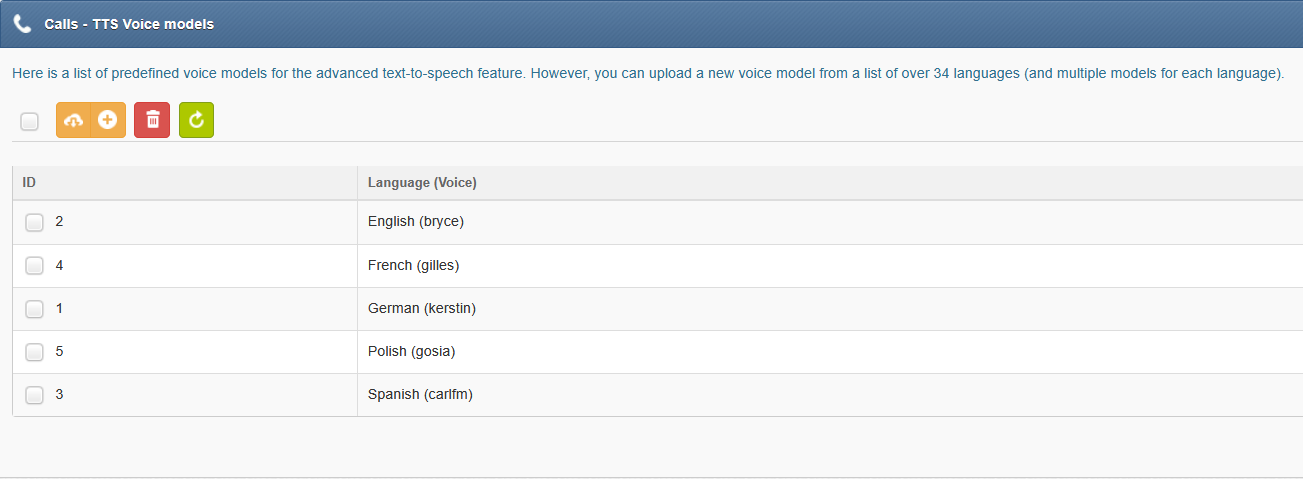
Screenshot from menu Calls>TTS Voice models
TTS online Voice models
Online voice models use the ElevenLabs API for text-to-speech conversion to deliver excellent, natural-sounding voices. However, you will need an ElevenLabs account to use this feature. Your SMSEagle device must also be connected to the internet for this feature to work.
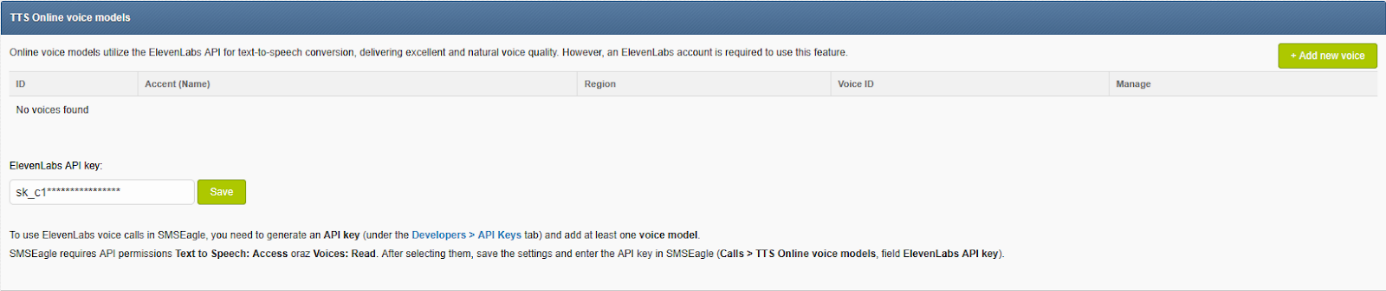
Screenshot from menu Calls>TTS Online Voice models
To use ElevenLabs voice calls in SMSEagle, you need to generate an ElevenLabs API key (under the Developers > API Keys tab). SMSEagle requires the following ElevenLabs API permissions:
*Text to Speech: Access
Voices: Read. *
After selecting them, save the settings and enter the ElevenLabs API key in SMSEagle web-GUI (menu Calls > TTS Online voice models > ElevenLabs API key).
Temporary files cleanup
The Temporary voice files cleanup feature helps save storage space on the SMSEagle device by automatically removing unused temporary files created during Text‑to‑Speech (TTS) processing.
In the default configuration the process runs every Monday at 02:00. For systems that generate a large number of calls, it is recommended to increase the cleanup frequency to prevent excessive disk usage and ensure stable device operation. Files that are still required for scheduled or pending calls are not removed and remain fully protected.
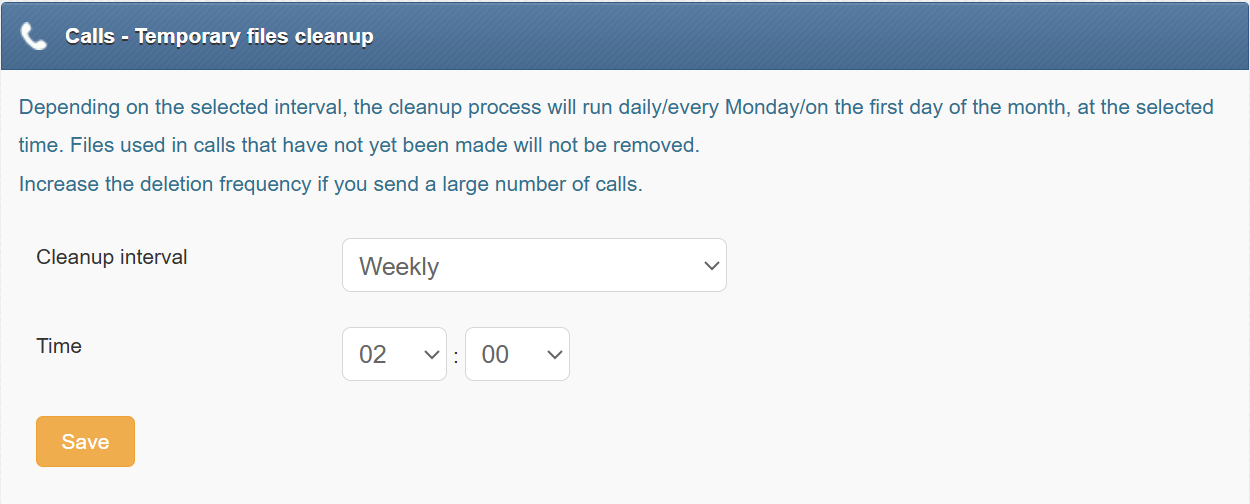
Screenshot from menu Calls>Temporary files cleanup
Folders
Folders contain your SMS/MMS messages. Folders are conveniently grouped into 5 categories:
Inbox
Outbox
Sent Items
Inbox rules
Trash
The view of conversations can be either of type “Balloons” (smartphone like conversation) or “Table” (tabular view). The view type can be changed in menu Settings > Application.
Balloons view type:
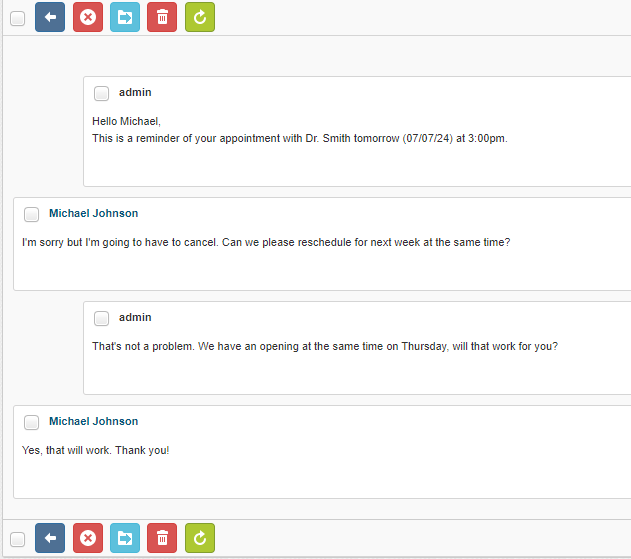
Table view type:

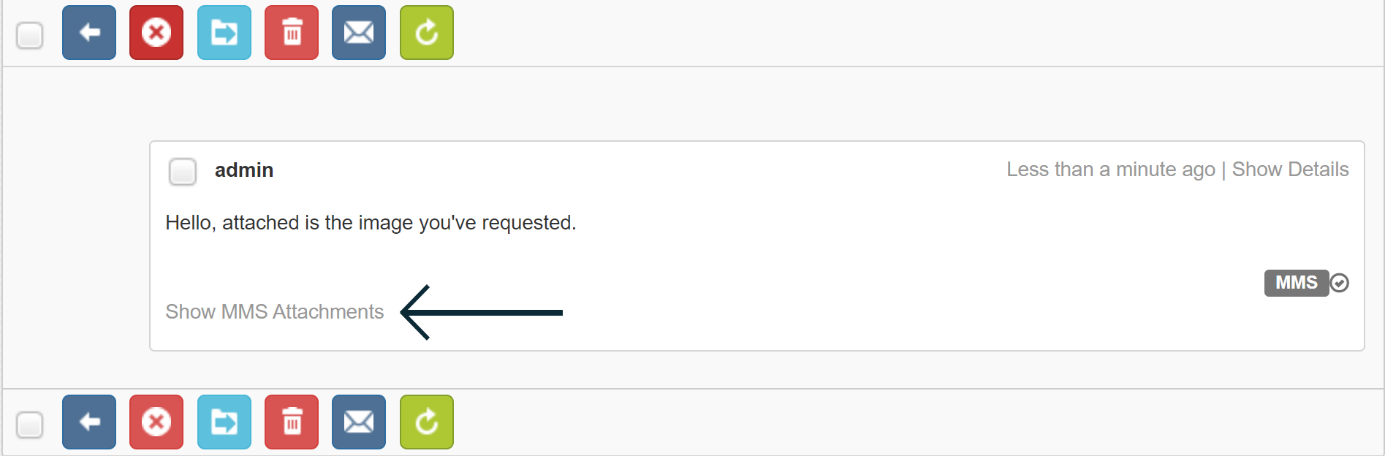
MMS
To view an MMS attachment, you need to click “show MMS attachment” in the inbox message.
Sent items status
The status of a sent message can be seen in Folders>Sent Items>in selected message. There are 2 places where the sending status is displayed: status icon in the right bottom corner of each message and status text in message details (button “Show Details”).
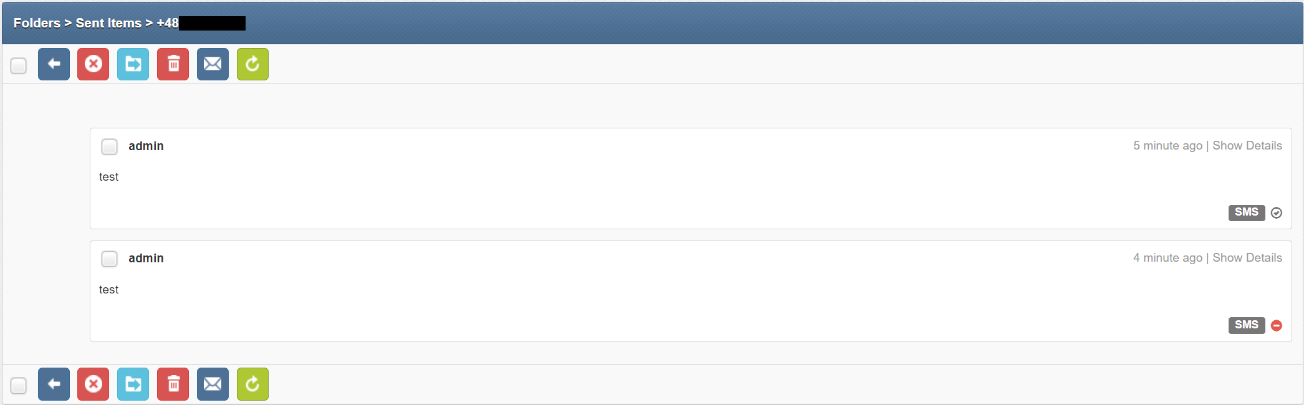
Screenshot with examples from Folders>Sent Items>message example
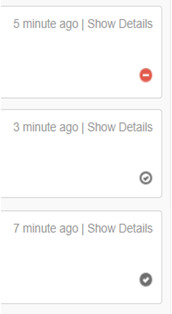
There are 3 different icons indicating the sending status:
Sending Error
Message Sent
Message Delivered (only available when Delivery Reports are enabled)
Inbox rules
You can create rules to automatically move incoming messages to your custom folders (My Folders). You can adjust the activation order of the rules by dragging them up or down. To move a rule, use the black dots next to its ID. Rules placed higher in the list have greater priority and will be checked first.
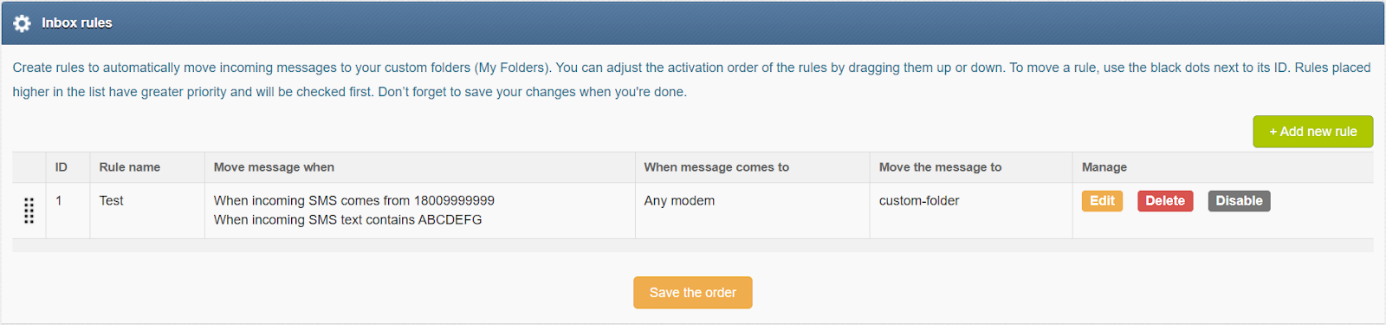
Screenshot taken from “Inbox > Inbox rules”
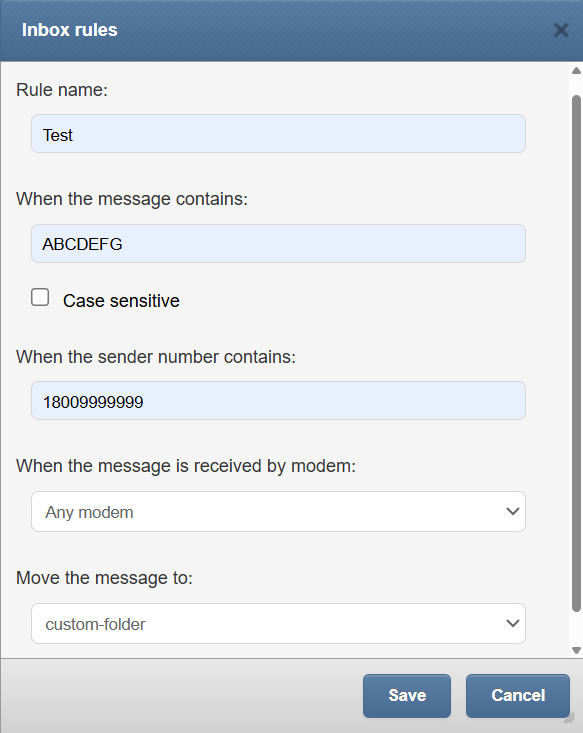
*Screenshot of “Add new inbox rule” *
In adding a new rule you can set:
Rule name
What the message contains
What the sender number contains
Which modem the message is received from
Which custom folder the message should be moved to
Cleanup Folders
This function allows you to add rules on when to automatically clean up messages & logs in selected folders.
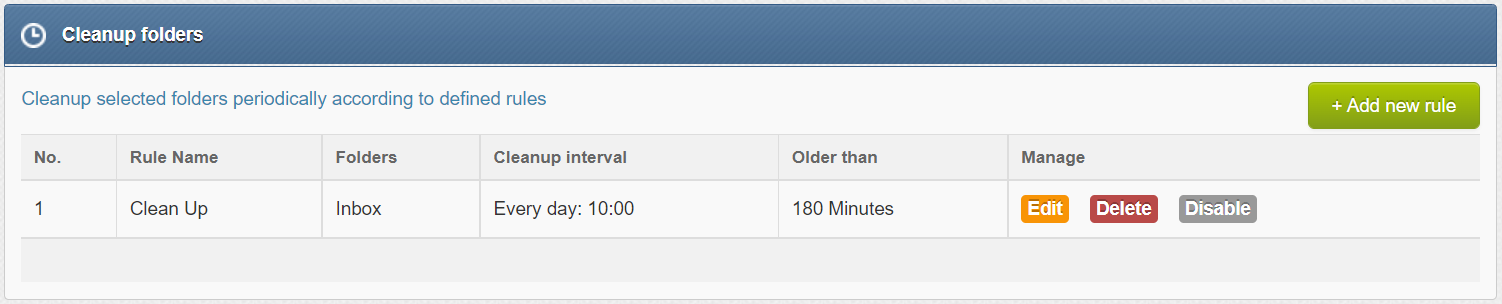
Screenshot with example from Cleanup folders screen
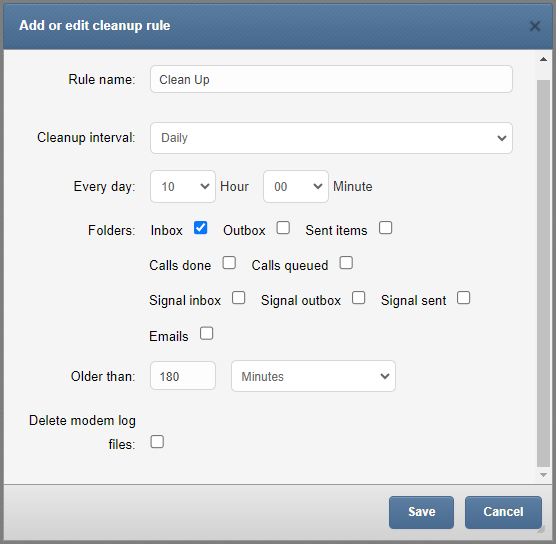
Screenshot from Add or edit purging rule
In adding or editing a cleanup rule you can set:
Rule name
Purging interval (daily, weekly, monthly or annually)
Set the time
Select the folder (Inbox, Outbox, Sent Items, Call done, Calls queued, Signal inbox, Signal outbox, Signal sent or Emails)
Set time span of messages
Select to delete modem log files
Phonebook
Web-GUI of SMSEagle device is equipped with Phonebook for managing contacts, groups and shifts. Each user can create private and public contacts, gather contacts in private and public groups. Contacts can also be optionally assigned to working shifts. Contacts and groups from Phonebook allows users efficient sending of messages.
Phonebook Contacts
Below we present a main Phonebook view, where user manages his Contacts.
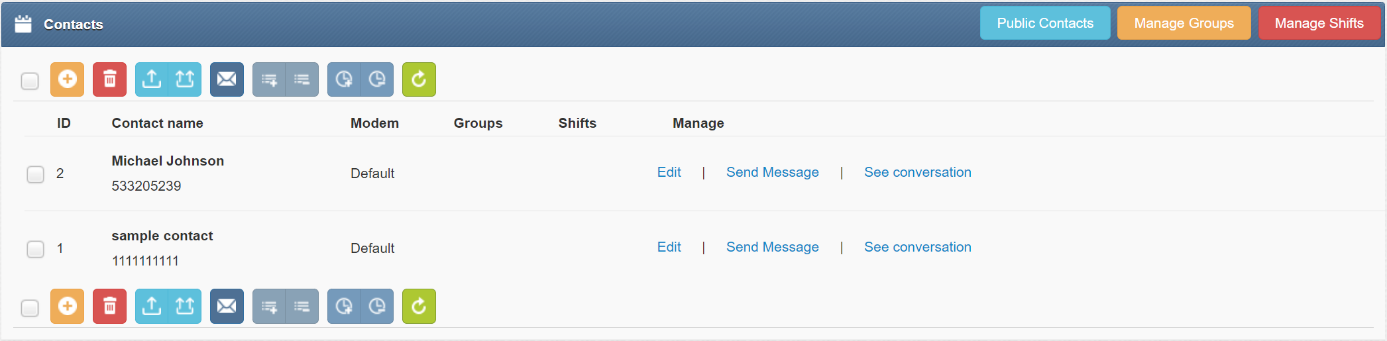
Screenshot of default phonebook view
In Phonebook Contact Management users can:
Add/edit/delete contacts via web-gui
Import contacts from CSV file
Set contact to public or private visibility
Add contacts to groups
Add contacts to working shifts
Set vacation mode (time range or permanent)
Send message to a contact
Export selected contact or all contacts
View message conversation of a contact
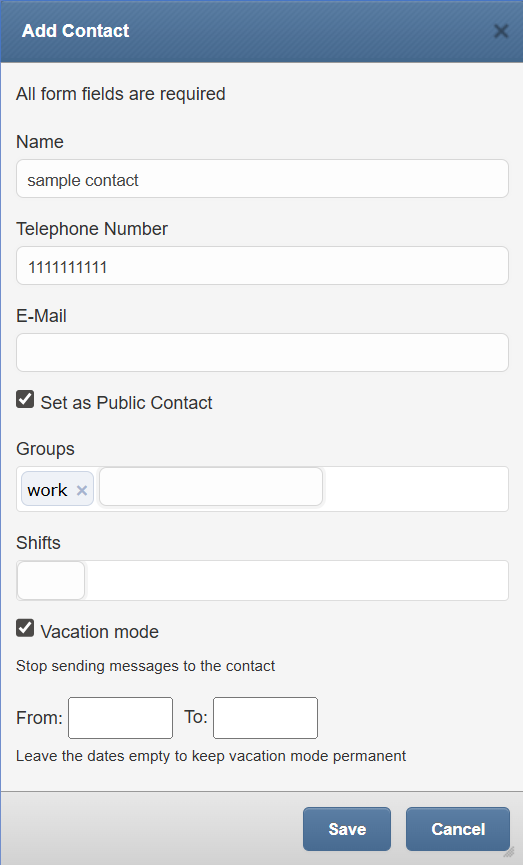
Screenshot of Edit/Add Contact window
In Phonebook Contact Edit/Add window users can:
Define Contact name and Telephone number
Choose if contact is Private/Public
Assign a selected modem to the contact or leave default modem choice (according to global settings)
Add contact to a Group
Add contact to a Working Shift
Enable/disable Vacation mode (messages are not sent when Vacation mode is enabled)
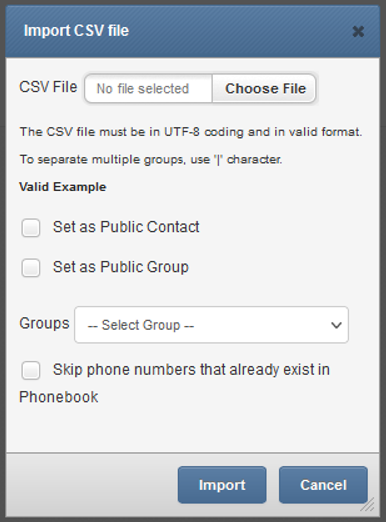
Screenshot of Import CSV file
In the Import CSV file window users can:
Choose a CSV file to upload
Set the uploaded contacts as a Public Contact
Set the uploaded contacts as a Public Group
Select which group to add the uploaded contacts to
Choose to skip phone numbers that already exist in the Phonebook
Phonebook Groups
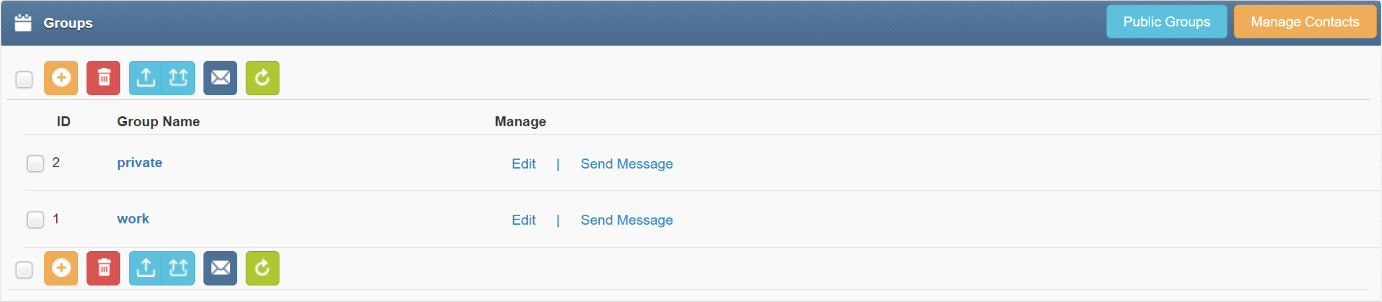
Screenshot taken from phonebook groups
In Phonebook Group Management view users can:
Add/edit/delete groups
Set groups to public or private visbility
View group content (contacts belonging to the group)
Send message to a group
Export selected group or export all
Add or remove contacts directly within the group view (without navigating to individual contact settings)
Remove contacts from search results
Public and Private Contacts/Groups
Public contacts/groups are visible to all users on the device. A public contact/group may only be edited by the owner (the user who created the contact/group) . Private contacts/groups are visible to a single user (the owner).
Phonebook Escalation Groups
Escalation group is a special version of a Phonebook group. When a group is set as an “Escallation group” a single message sent to the group will be escalated to the group members. The message will be escalated with given time interval until a set STOP word is received.
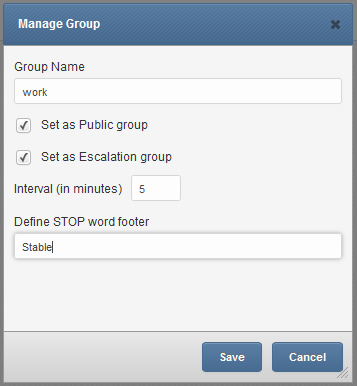
Screenshot from Manage Group view
You can change the escalation order by dragging contacts up or down.
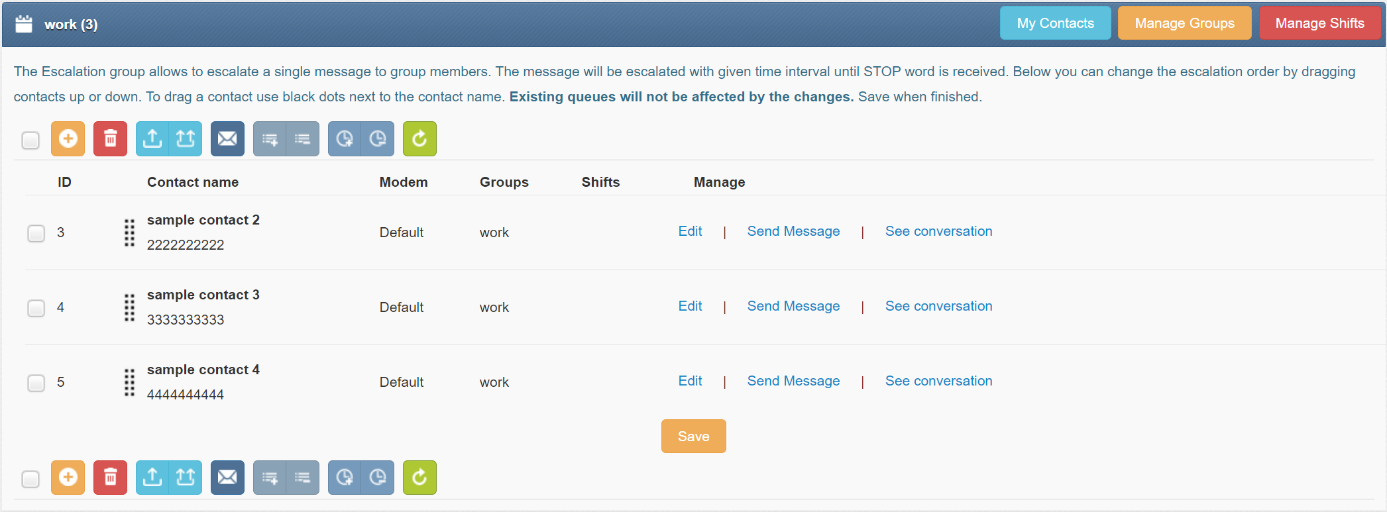 Screenshot from Manage Groups with set escalation
Current escalation queue can be viewed and managed via menu Folders>Outbox>Escalation queues

Screenshot with example from Folders>Outbox>Escalation queues window
Phonebook Working Shifts
The Shift management feature allows to assign Phonebook contacts to work in shifts. If a contact is assigned to any working shift, before sending a message the device will check if the contact is on a working shift. If the contact is not on shift the message will be skipped or moved to beginning of a next shift. To start using working shifts define shifts here and add contact to a shift in contact details.
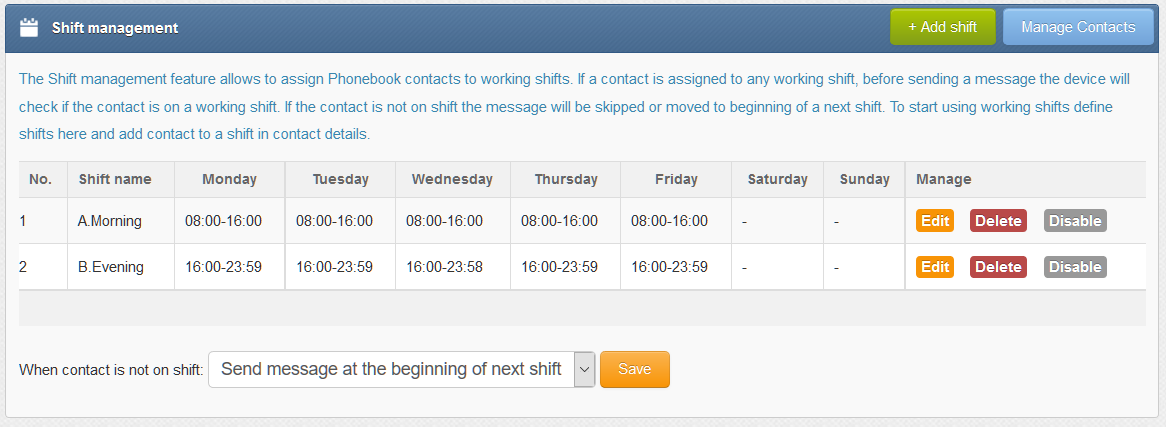
Screenshot of shift management in phonebook
Users
The Users function allows you to manage access to your device. It allows you to add, edit and remove users and set their permissions. There are two access levels for a user:
User role “Administrator”:
Allows full access & control of the device including settings and User management.
User role “User”:
Limits access only allowing to Compose, Folders, Phonebook and Reporting module.
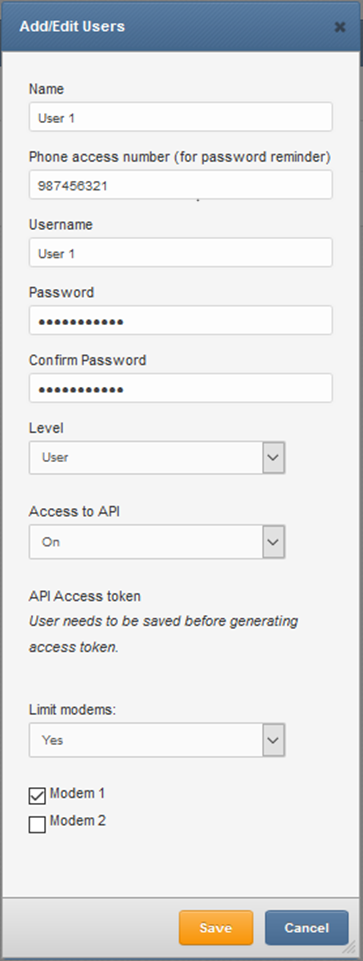
Screenshot of Edit/Add User window
Multi-User Capabilities
As described in the “Users” chapter, SMSEagle software allows to create multiple users with different access levels (Administrator or User). Those users may access the device simultaneously via Web-GUI or API. The following set of features is available in multi-user work scenario:
Multiple users may acess the device simultaneously via webGUI or API
Each user can create private or public (shared) Phonebook contacts and groups (see details in “Phonebook” chapter)
Administrator may restrict a user with “User” role to use only selected modems to send messages (see details in “Users” chapter)
Users with “User” role has its own private sent items folder (they cannot see messages sent by other users). Users with “Administrator” role can see messages sent by all users.
the content of inbox folder (incoming messages) may be visible: for everybody/only for “Administrator” role/only for modems assigned to a user (see details in “Application settings” chapter)
User Settings
The User Settings menu allows each user to manage their personal preferences, authentication options, and interface behavior within the SMSEagle web UI. These settings apply only to the currently logged‑in user and do not affect other accounts.
The menu is divided into three tabs:
Personal data
Password
MFA
Personal Data
The Personal data tab is used to configure user identity details, message preferences, and interface behavior. Available settings:
Language: Selects the display language of the SMSEagle web interface for the current user.
Name: Defines the user’s display name. This name may be used in internal views and message‑related contexts.
Login: Shows the user’s login name. This field is informational and cannot be modified.
Telephone Number: Specifies the user’s phone number. The number is used for password reminder.
Signature: Allows the user to define a personal message signature:
Signature Off: no signature is added
Signature On: the entered text is appended to messages sent from Compose menu.
Default e‑mail subject in Compose menu: Defines a default subject line that is automatically prefilled when sending messages via the Compose menu.
Default SMS encoding in Compose menu: Specifies the preferred SMS encoding method that will be set in Compose menu. Available options: Standard, Unicode or Automatic.
Play notification sound on incoming SMS: Enables or disables an audible notification when a new SMS message is received in the web interface.
Conversation sort: Determines the order in which conversations are displayed
Conversation view type: Defines how message threads are visually presented (e.g. balloon/chat‑style view).
Data per Page: Sets the number of items displayed per page in message lists and the phonebook. This affects pagination throughout the interface.
Password
The Password tab allows the user to change their account password.
Multi-Factor Authentication (MFA)
Multifactor Authentication (MFA) adds a layer of protection to the sign-in process. When accessing web-GUI accounts, users provide a username and a password plus additional identity verification, such as a code received via SMS text or a token from authenticator application.
Enable MFA from User Settings
MFA can be enabled by each user in User Settings menu > MFA tab.
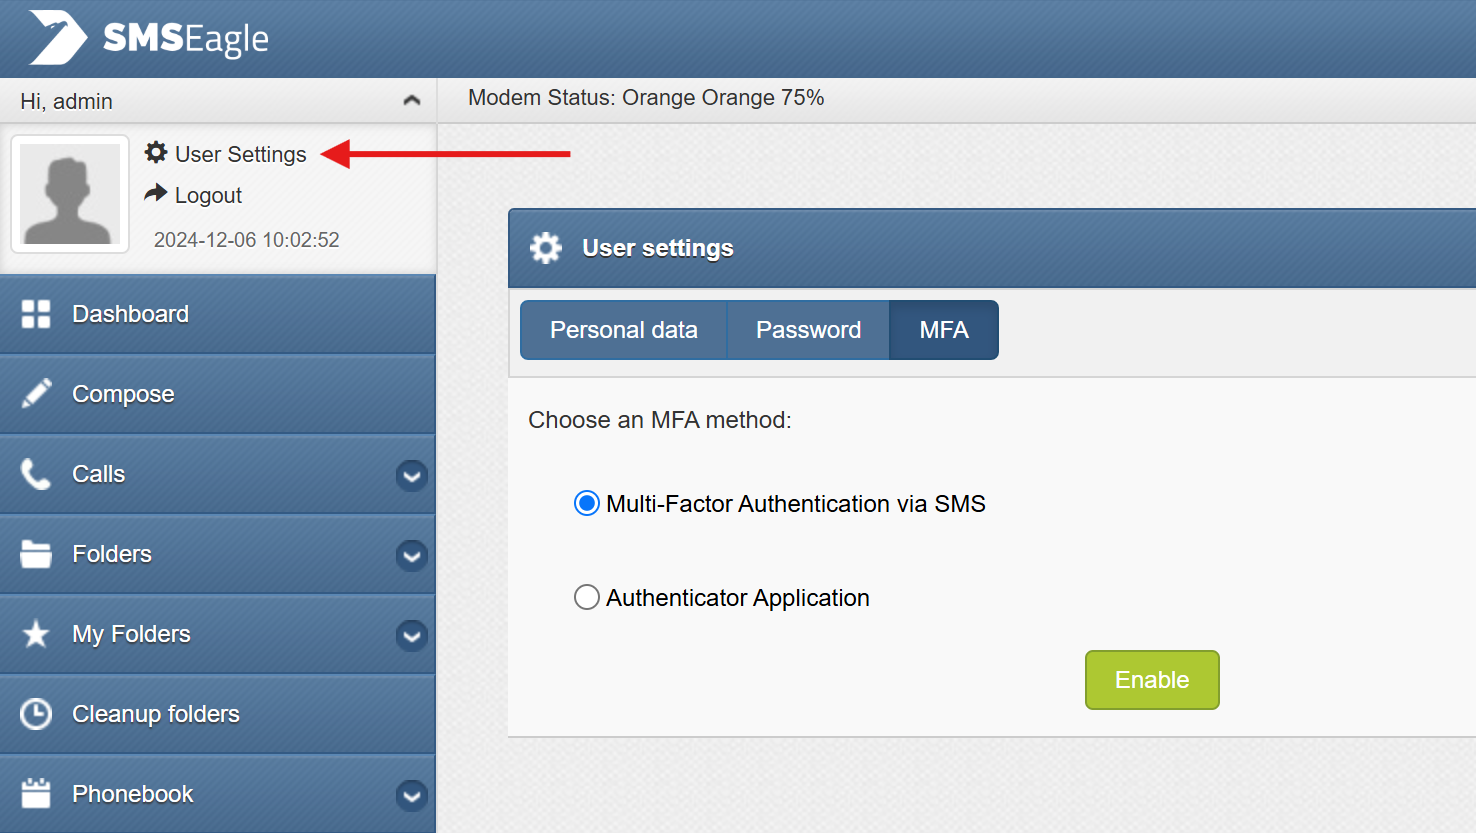
Screenshot from User Settings > MFA.
You may choose authentication method from: SMS or Authenticator App (like Google Authenticator, MS Authenticator, Authy, FreeOTP, Aegis, etc.)
When SMS is selected as the authentication method, a verification code is sent via SMS (text) to the number specified in Personal data tab. The SMS OTP code must be entered in to complete the process.
When Authenticator app is selected, a user password must be entered to display a QR code for the authenticator app. QR code must be scanned in the app, and then OTP from the app must be entered in web-GUI to complete the process.
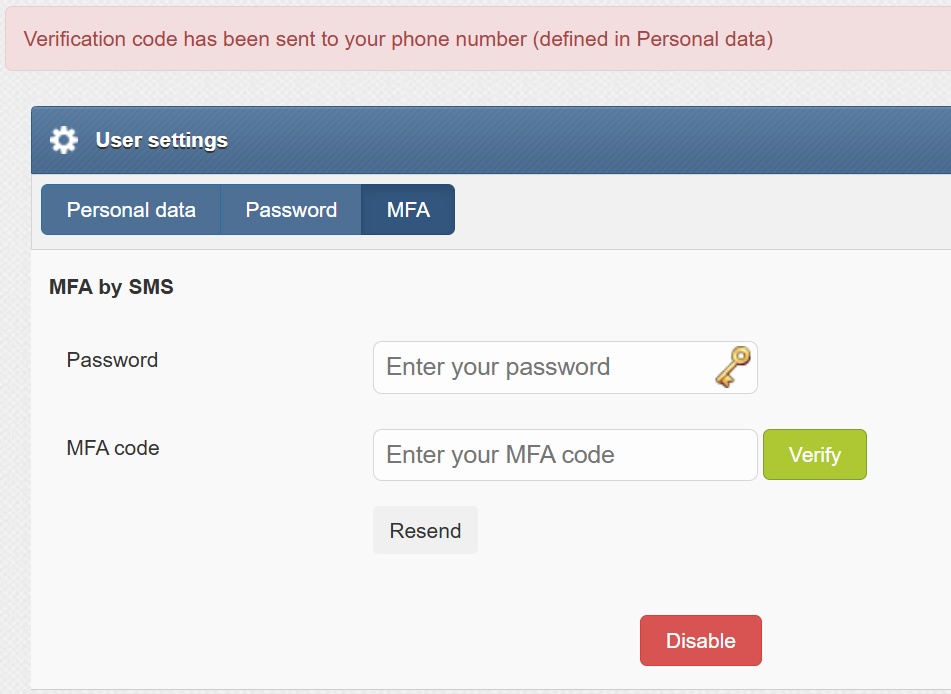
Screenshot from User Settings > MFA. Verification code request.
User login with MFA
Once MFA is activated, the user must provide two factor authentication (user and password + one-time SMS token) every time he logs in to Web-GUI. One-time SMS token is valid for 10 minutes.
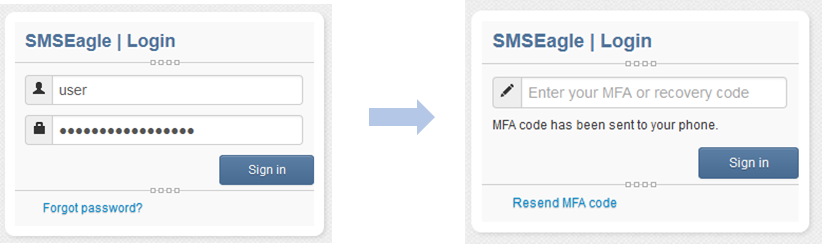
Screenshot from login process with enabled MFA.
Recovery code
If for some reason a user can’t receive a text message or don’t have access to his phone, a recovery code can be used. The recovery code can be found in User Settings > MFA tab. Remember to save the single-use recovery code in a safe place. Recovery code is recreated after use.
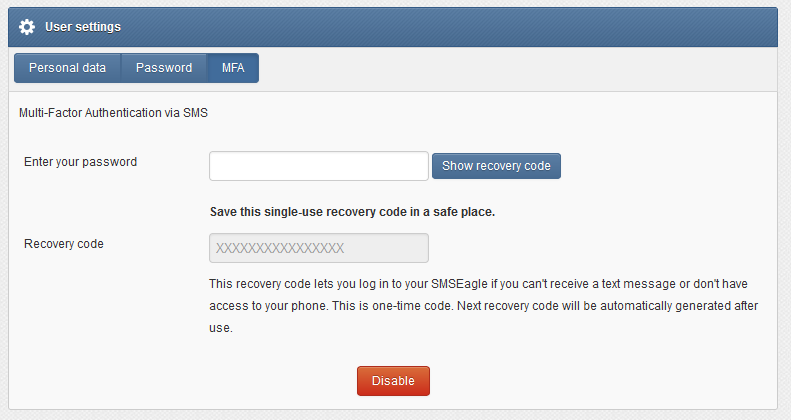
Screenshot from User Settings > MFA. Recovery code is revealed after entering password
Enable MFA by administrator
MFA can also be enabled by an administrator role for selected users. This is done in the menu Users > Edit User.
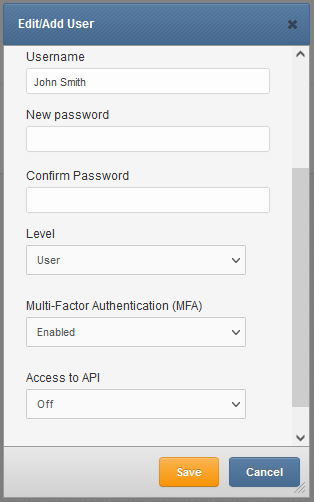
Screenshot from Edit/Add User
Reporting module
Reporting module is an extension of basic search feature. The module allows users to filter messages from Inbox/Sent items folders based on custom criteria and display filtered messages. Filtered list of messages can be exported to PDF or CSV file.
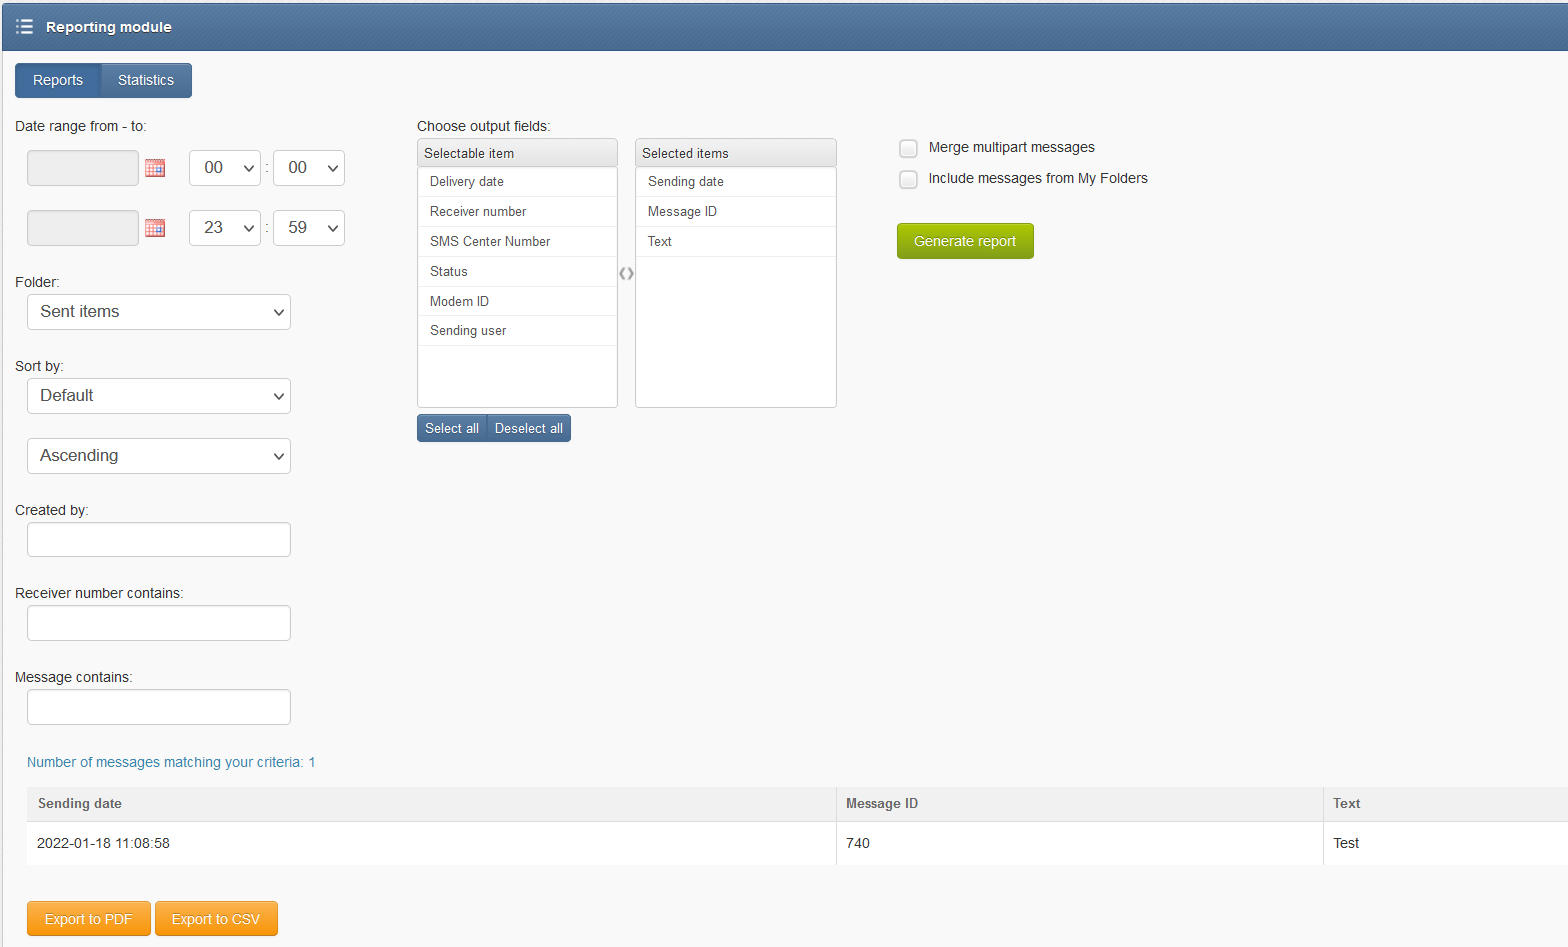
Screenshot of Reporting module
Statistics view
The reporting module allows also to view daily statistics of sent/received messages. The statistics view displays number of messages per day and sender/receiver number.
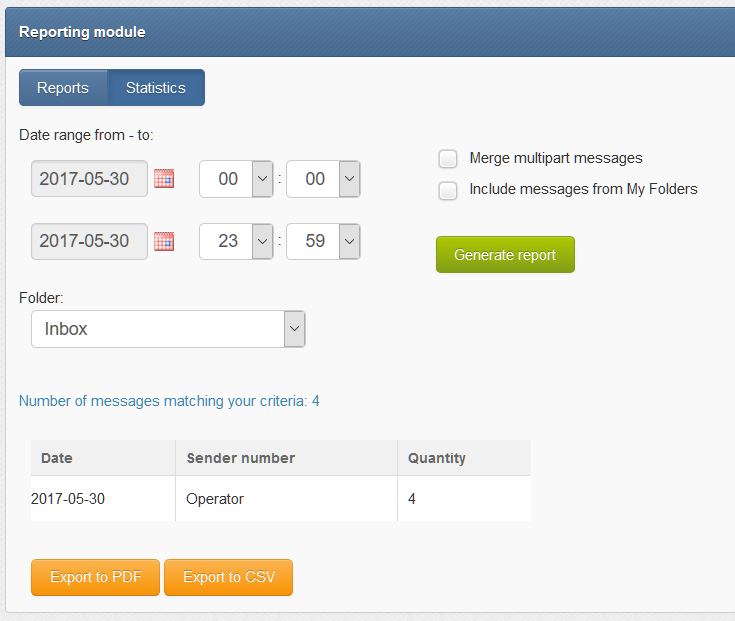
Screenshot of Statistics view in Reporting module
Periodic reports/statistics
You can choose to send automatic reports daily, weekly, or monthly. Mails will be sent out at the exact end of the chosen interval and will include all the data from it (from the 00:00 hour of the first day to 23:59 of the last one or during one day for the daily option).
Important
For Periodic reports/statistics, remember that you must configure the SMTP settings for sending emails in the ‘Emails’ > ‘SMTP Configuration’ menu and assign them to the ‘Reporting module’.
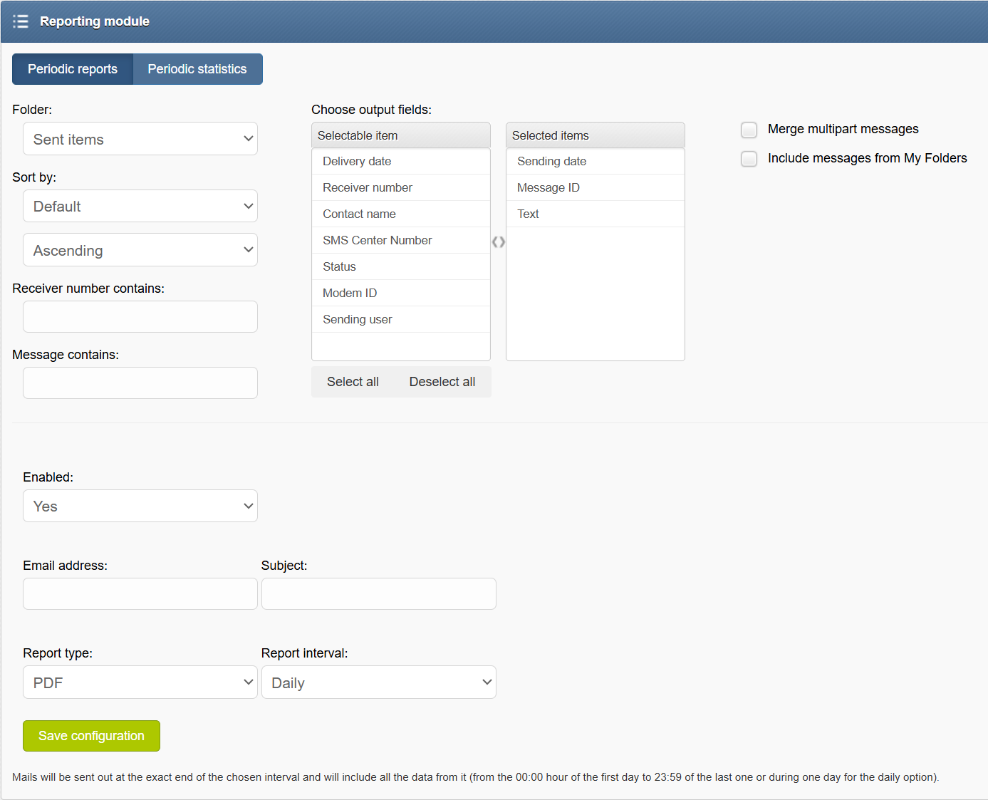
Screenshot of Periodic reports in Reporting module
Network Monitoring
SMSEagle is equipped with network monitoring features. With that features you can monitor any device or service that operates ICMP, TCP, UDP or SNMP protocol. SMSEagle Network Monitoring plugin sequentially controls availability of defined hosts/services in Network Monitoring feature and sends defined SMS alert when host/service is unavailable/goes back to life or when SNMP return value reaches required criteria. Below you will find a brief overview of plugin capabilities.
Control status of all your defined tasks
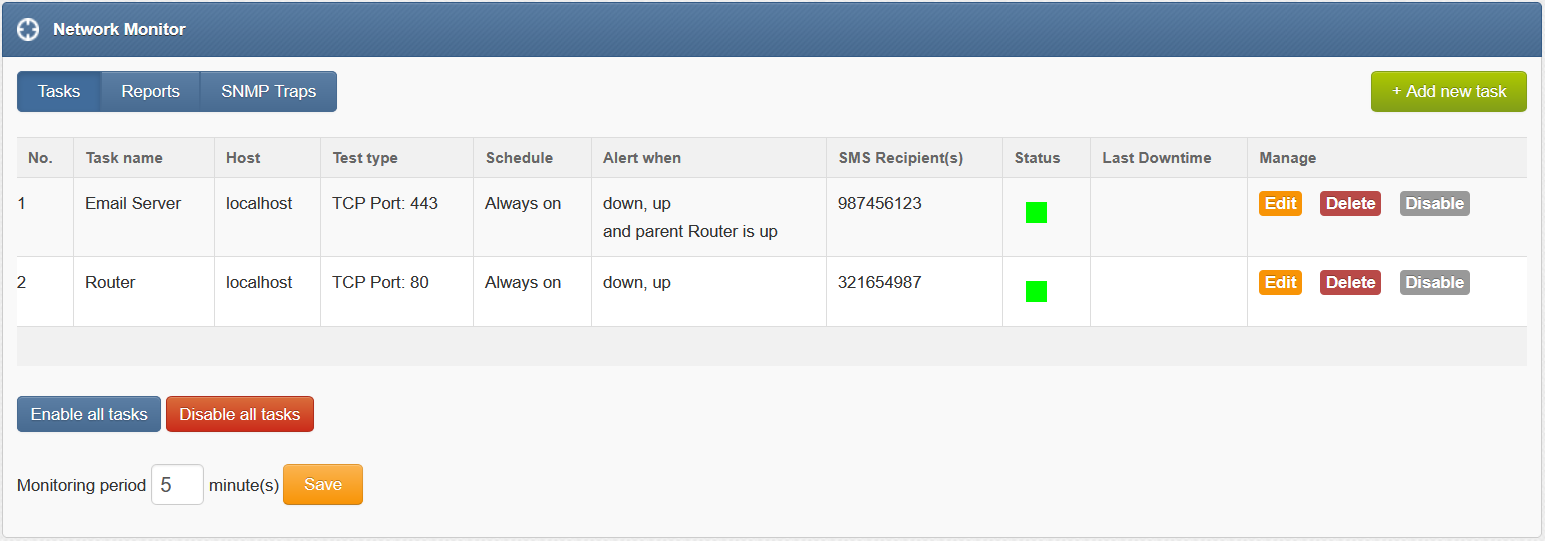
see a settings’ overview for all of your tasks
check which server/service is currently unavailable
see when a specific server/service was last down (last downtime)
check what happened at last downtime (see server/service response)
edit/delete your tasks
disable tasks when needed (e.g. when doing a machine upgrades)
Define what you want to monitor in each task
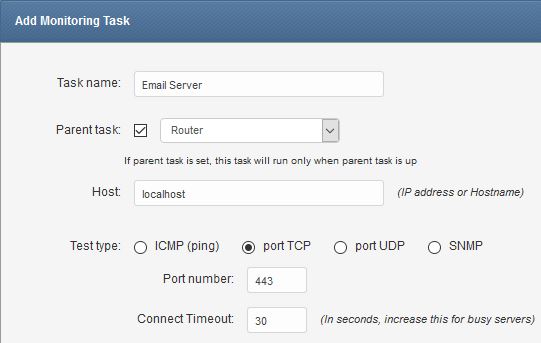
choose a name for the task
set parent task. If parent task is defined, network monitor will monitor child task health only if parent task is healthy
enter a host (IP address or Hostname)
choose ICMP (ping) to monitor a server with ICMP protocol
or PORT (TCP/UDP) to monitor your service on a selected port (SMSEagle will check if port is open)
or SNMP to monitor objects via SNMP protocol (supported return types: numeric, string)
increase a default timeout value for busy servers (by default we set it to 30 seconds)
test the connection of server
Define a schedule
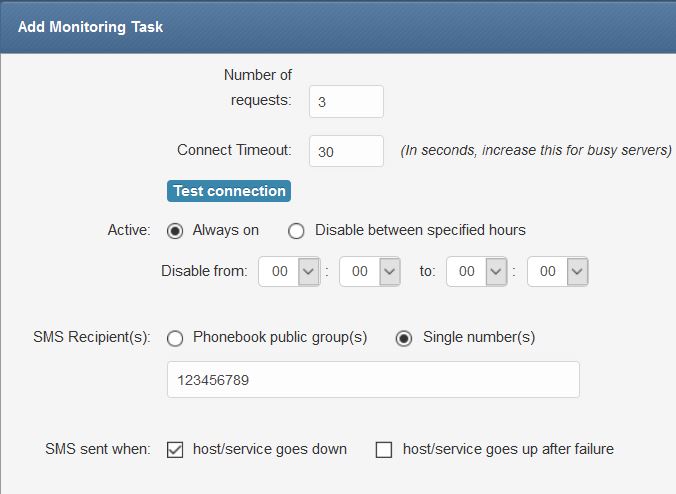
choose if task should be always enabled…
…or disable it at chosen times
(during a night, when a machine goes through planned restarts, during resource intensive backups, etc.)enter a phone number or choose a group of users to send your SMS alert to
select when to send SMS alert (when host/service goes down, when host/service goes up after failure)
choose if the SMS alert should be sent once or repeated every X-minutes
Define a SMS alert message
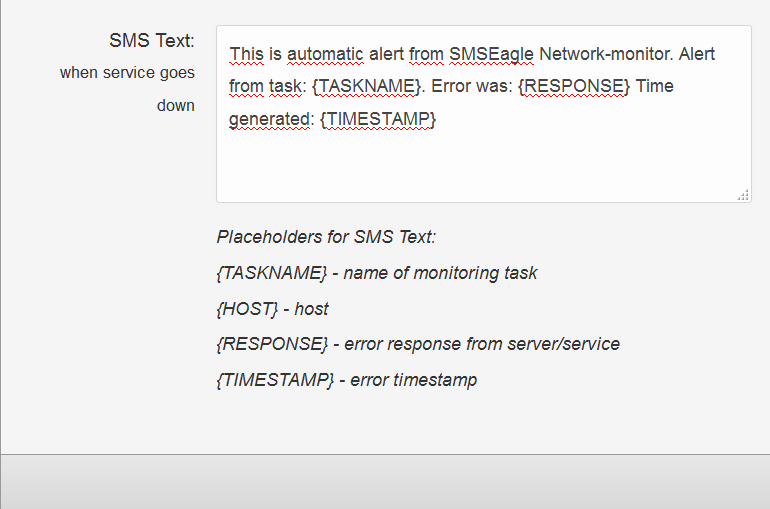
Define your SMS messages when host or service becomes unavailable/comes back to life. Choose field placeholders for your SMS text:
{TASKNAME} – puts a taskname inside SMS text
{HOST} – hostname or IP address
{RESPONSE} – message received (in case of no response from server/service)
{TIMESTAMP} – timestamp of an error
Receive SMS alerts
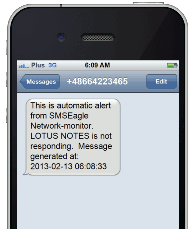
be alerted when your services/servers go down (or go up after failure)
give yourself a chance to react quickly
Voice Call
An SMS message can be optionally followed by a wake-up call or text-to-speech call. This can be enabled in the rule definition. The feature requires a device with an active Voice-Call add-on.
Network Monitoring Probes
The Network Monitoring feature in SMSEagle devices allows you to continuously supervise the availability and health of network devices, services, and industrial systems. Each monitoring task is based on a test type, which defines how the target is checked. When a problem is detected, SMSEagle can immediately send SMS alerts (and optionally voice calls), ensuring fast reaction to incidents.
ICMP (Ping)
The ICMP (Ping) verifies basic network reachability of a host by sending ICMP echo requests.
Available parameters:
Host (IP or hostname)
Number of requests
Connect Timeout
Typical use cases:
Checking whether a server, router, firewall, or network device is online
Detecting total connectivity loss or device outages
TCP Port
The TCP Port probe checks whether a specific TCP service is accessible by attempting to establish a TCP connection to a defined port.
Available parameters:
Host: IP address or hostname
Port number
Connect Timeout
Typical use cases:
Monitoring services such as HTTP/HTTPS, SMTP, SSH, FTP, databases, or application servers
Verifying not only that a host is online, but that a service is actually running
UDP Port
The UDP Port probe monitors availability of services that rely on the UDP protocol.
Available parameters:
Host: IP address or hostname
Port number
Connect Timeout
Typical use cases:
DNS services
Custom or proprietary UDP-based applications
SNMP Probe
The SNMP (Simple Network Management Protocol) probe allows SMSEagle to monitor specific parameters exposed by SNMP‑enabled devices.
Available parameters:
Host: IP address or hostname
Protocol version: v1/v2
Object ID
Community
Return value type (numeric/string)
Connect Timeout
SMS sent when: defines a condition when an SMS alert should be triggered (e.g. value is equal to / not equal to/ greater than / less than a defined threshold)
Typical use cases:
Monitoring routers, switches, UPS systems, servers, and network appliances
Tracking metrics such as temperature, CPU load, memory usage, link status, or power conditions
Modbus TCP
The Modbus TCP probe is designed for monitoring industrial and OT environments. This allows you to read values directly from PLCs, sensors, controllers, and other industrial equipment that support Modbus TCP/IP communication, and trigger SMS alerts when a register value meets defined criteria.
Available parameters:
Host: IP address or hostname of the Modbus device
Port: TCP port of the Modbus server (default: 502)
Unit ID: Modbus unit identifier
Function code: type of register to read: Read Coils (1), Read Discrete Inputs (2), Read Holding Registers (3) or Read Input Registers (4)
Register: address of the register to be monitored
SMS sent when: defines a condition when an SMS alert should be triggered (e.g. value is equal to / not equal to/ greater than / less than a defined threshold)
Typical use cases:
PLCs,
SCADA systems
Industrial sensors and automation equipment
Monitoring frequency
Monitoring tasks are performed in a parallel mode. Software automatically optimizes number of parallel tasks and frequency of tasks taking into account the performance of the device and adjusts monitoring period when needed.
You can manually increase/decrease monitoring period in Network Monitor settings:
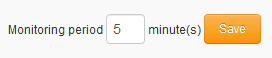
If monitoring period value is too small (there are too many monitoring tasks to perform in parallel), the software will adjust the value to ensure optimal workload and performance of your device.
Reports
This tab allows you to view reports of task errors in the Network Monitor for a selected period of time.
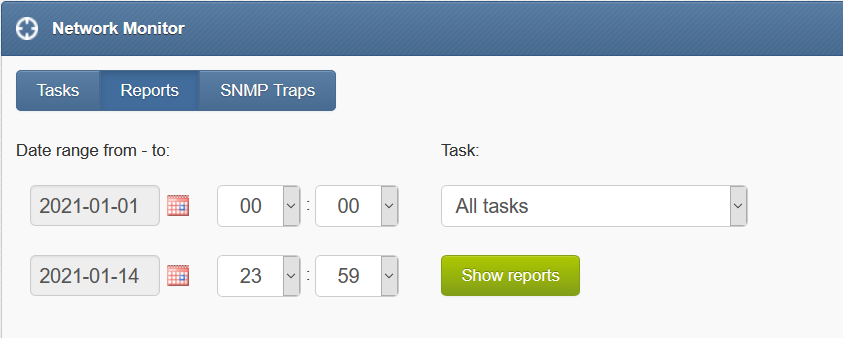
Screenshot from Network Monitor > Reports window.
SNMP Traps
SNMP trap is a popular mechanism used to manage and monitor devices’ activities via SNMP protocol. What makes the Trap unique is that they are triggered instantaneously by an agent, rather than waiting for a status request from SNMP get query.
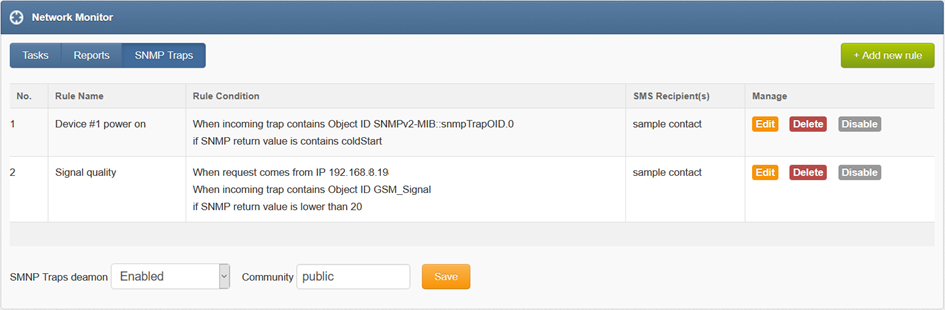
Screenshot from Network Monitor > SNMP TRAPS window.
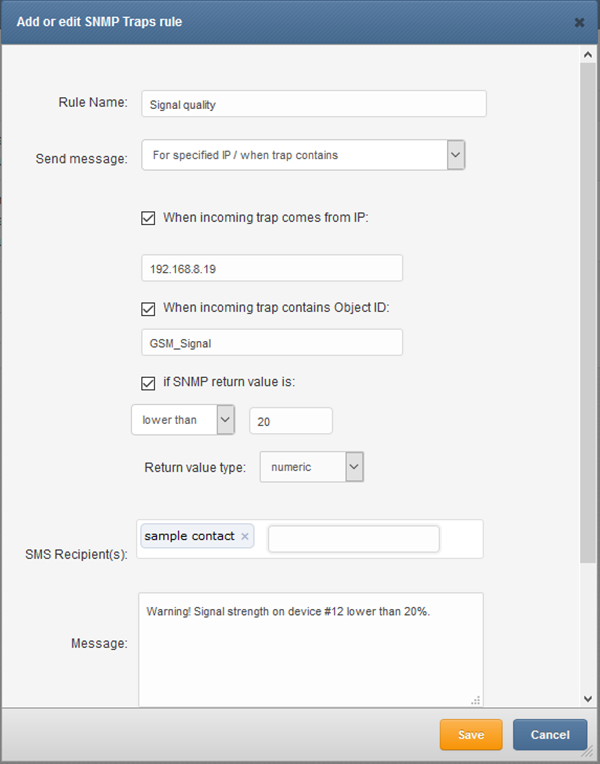
Screenshot from Network Monitor > SNMP TRAPS Add or Edit window.
Emails
Email to SMS
Email to SMS feature allows you to convert an email to SMS message.
Basic usage
If the feature is enabled, email sent to the email address:
PHONE_NUMBER@IP_ADDRESS_OF_SMSEAGLE will be converted to SMS message.
Where:
PHONE_NUMBER - is a destination phone number
IP_ADDRESS_OF_SMSEAGLE - is the IP address of your device.
The text of the email is the text of the SMS message (optionally you can append email subject at the beginning of SMS message).
Example: email message sent to the address: 123456789@192.168.0.101 will be converted to SMS message and delivered to phone number 123456789.
Send to username/group
Email sent to the email address:
NAME_IN_PHONEBOOK@IP_ADDRESS_OF_SMSEAGLE will be converted to SMS message and will be sent to a user or users’ group from SMSEagle’s phonebook.
Where:
NAME_IN_PHONEBOOK - is a username or group name (must be a public group) from SMSEagle’s phonebook
IP_ADDRESS_OF_SMSEAGLE - is the IP address of your device.
The text of the email is the text of the SMS message (optionally you can append email subject at the beginning of SMS message).
Example: email message sent to the address: db-admins@192.168.0.101 will be converted to SMS message and delivered to all members of db-admin group. The db-admin group must be defined in your SMSEagle phonebook.
Send to Ldap contacts/groups
If your company uses LDAP (Active Directory or OpenLDAP) for contacts management, you may use LDAP Contacts or Groups to send email to SMS text message.
Example: email message sent to the address: myldap-admins1@192.168.0.101 will be converted to SMS message and delivered to all members of myldap-admins1 group. The myldap-admins1 group must be defined in your LDAP directory and LDAP plugin must be configured on your SMSEagle device.
Voice Call
An SMS message converted from email can be optionally followed by a wake-up call or text-to-speech call. This can be enabled in the rule definition. The feature requires a device with an active Voice-Call add-on.”
Using FQDN in email address
It is also possible to use Fully Qualified Domain Name in an email address sent to SMSEagle box (eg.: 123456789@mydomain.com). Please refer to our FAQ article: How do I configure Email2SMS plugin to accept FQDN email addresses for more details.
Email subject - additional parameters (optional)
It is possible to set additional flags for single converted message using email subject. Currently the following flags are available:
date - date and time in format YYYYmmDDHHMM (YYYY – year, mm – month, DD – day, HH – hour, MM – minute). If this parameter is not null SMS will be scheduled for sending at the given date and time
modemno - sets sending modem number (available only for multimodem devices)
If you send email with subject containing FLAG=VALUE the flag will be set for this particular email2SMS message.
Example 1: email message with subject containing modemno=2 will be converted to SMS message and sent via modem number 2.
Example 2: email message with subject containing date=201801010005&modemno=2 will be converted to SMS message and sent on 2018-01-01 00:05 via modem number 2.
Feature configuration
The feature “Email To SMS” allows to add many forwarding rules. Each rule can be enabled or disabled by user.

Screenshot from Email To SMS > Rules window
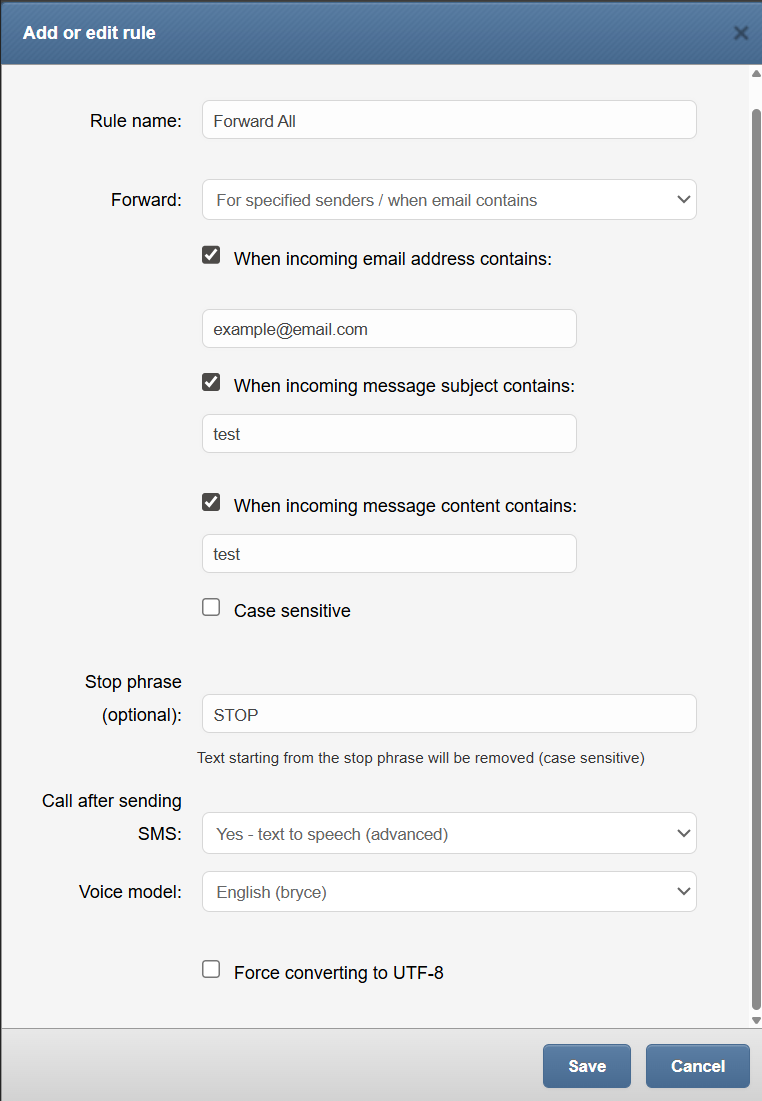
Screenshot from Email to SMS > Add new rule
You can name your rule
You can set forwarding to Always or For specified senders / when email contains
You can set when subject contains and message content (choose to be case sensitive or not)
You can define “Stop phrase”. Text starting from the stop phrase will be removed (case sensitive) from the message
You can select if to call after sending SMS ( No/Ring only/TTS or TTS advanced)*
You can choose the voice model (English or German)*
You can set message priority (0–9). Messages with higher priority will be processed earlier in the outbound queue
*Call options are only available when purchasing the Voice (Calls) feature for your device
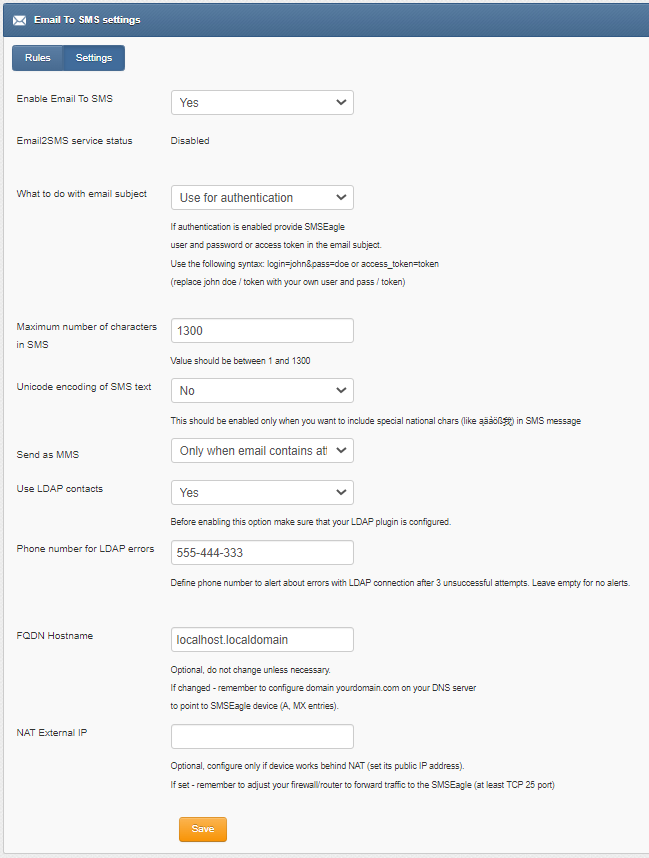
Screenshot from Email to SMS settings
if you want to use the plugin, set ‘Email2SMS active’ to ‘Yes’
if you want to include a subject of an email in SMS message, set ‘What to do with email subject’ setting to ‘Include in SMS’. The email subject will be appended at the beginning of SMS message
if you want to use user authentication, set ‘What to do with email subject’ setting to ‘Use for authentication’. If user authentication is enabled, provide in a subject of an email your login and password in the following form: login=john&pass=doe OR provide API access token in the following form: access_token=token
if you want to include only a subject of an email in SMS message, set ‘What to do with email subject’ setting to ‘Send only subject without email body’. Only the email subject will be inserted in the SMS message
the text of an email will be cropped to the value ‘Maximum number of characters. Maximum allowed length of SMS message is 1300 characters
if you want to include in SMS message special national characters (like ąäàöß我) set “Unicode encoding of SMS text” to ‘Yes’’
if you want to send as MMS you can set as always or only when an email contains an attachment
Choose if you want to use contacts from LDAP directory (Yes/No). LDAP plugin must be first configured to use this feature
If you enabled contacts from LDAP, define Phone number for LDAP errors. Alerts about errors with LDAP connection will be sent to this phone number after 3 unsuccessful LDAP connection attempts. Leave this field empty for no alerts
FQDN: Email2SMS Plugin can be configured to utilize alternative FQDN address instead of working with only device’s IP in the email address. This requires configuring proper domain and DNS entries at your DNS server - both A and MX entries, pointing to the SMSEagle’s IP. With this configured email sent to newly configured domain will reach the SMSEagle, and be properly processed by the plugin.
NAT: If your device works in LAN behind NAT, and you want to be able to send emails to it from public internet, you need to configure here the public IP where it would be reachable. Have in mind that this would require additional configuration of your LAN/firewall, to forward traffic to the SMSEagle (at least forward TCP port 25).
Email to SMS Poller
Email2SMS Poller is an alternative for Email2SMS feature for converting emails to SMS messages. This feature should be used when you need to fetch emails from an existing mailbox on your mail server. The Email2SMS Poller connects to a configured email account and polls it in specified periods of time for new emails. Once a new email is received, it is automatically converted to an SMS message.
The feature supports POP3 and IMAP accounts and supports basic authentication for all mailboxes and Oauth2 for Office365 mailboxes.
To send an SMS using Email2SMS Poller you have to send an email to a specified email account, with the email subject containing a mobile number (or multiple phone numbers separated with comma) or phonebook contact/group name.
Basic example
For example, such email message:
TO: smseagle@mycompany.com
FROM: john.doe@mycompany.com
SUBJECT: +48333444555
BODY: Hello world!
In this case SMSEagle gateway will fetch an incoming email from smseagle@mycompany.com account and send its body as SMS message to +48333444555 mobile number.
Send to username/group
If you want to send SMS to a contact or group from SMSEagle phonebook, put the contact/group name in SUBJECT field.
Send to Ldap contacts/groups
If your company uses LDAP (Active Directory or OpenLDAP) for contacts management, you may use LDAP Contacts or Groups to send email to SMS text message.
Example: email message sent with the subject myldap-admins will be converted to SMS message and delivered to all members of myldap-admins1 group. The myldap-admins1 group must be defined in your LDAP directory and LDAP plugin must be configured on your SMSEagle device.
Voice Call
An SMS message converted from email can be optionally followed by a wake-up call or text-to-speech call. This can be enabled in the rule definition. The feature requires a device with an active Voice-Call add-on.
Important Notice:
Messages that are processed by Email2SMS Poller (but not deleted) are marked in the mailbox as read. Software is based on flagging messages- Read/Unread. Marking a read message in the mailbox as unread will result in being processed again by Email2SMS Poller. We suggest using a separate email account to avoid a situation with resending the same message (marking unread already processed read message).
Feature configuration
The feature “Email To SMS Poller” allows to add multiple forwarding rules. Each rule can be enabled or disabled by user.

Screenshot from Email to SMS Poller Rules
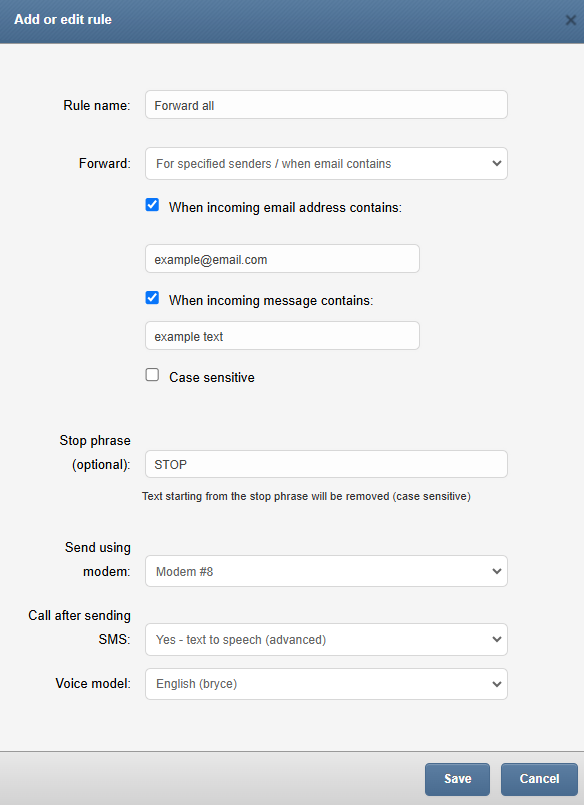
Screenshot from Email to SMS Poller > Add new rule
You can name your rule
You can set forwarding to Always or For specified senders / when email contains
You can choose a sending modem no.
You can define “Stop phrase”. Text starting from the stop phrase will be removed (case sensitive) from the message
You can set message priority (0–9). Messages with higher priority will be processed earlier in the outbound queue
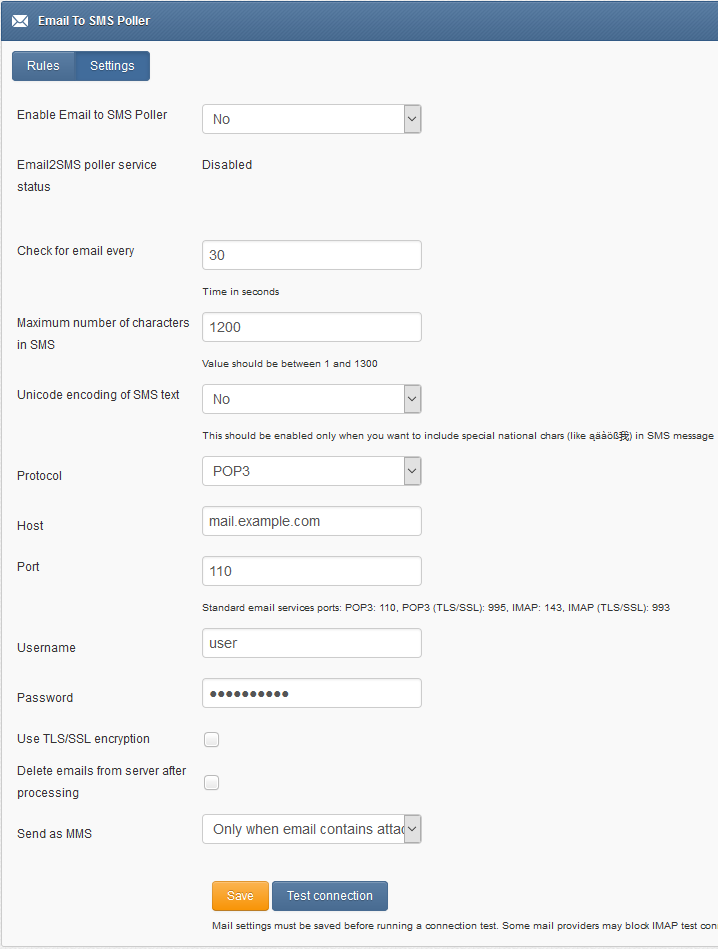
Screenshot from Email to SMS Poller settings
if you want to use the plugin, set ‘Enable Email2SMS Poller’ to ‘Yes’
Set email fetching interval (in seconds)
the text of an email will be cropped to the value ‘Maximum number of characters. Maximum allowed length of SMS message is 1300 characters.
If you want to include special national characters, enable “Unicode encoding of SMS text”
Choose protocol from IMAP or POP3
Provide mailbox configuration (host, port, user, password, encryption settings)
If you want to delete emails from the mailbox after they are fetched by Email2SMS Poller, please mark “Delete emails from server after processing”
If you want to send as MMS, select always or only when email contains an attachment
Feature configuration for Office 365 OAuth2
in Settings tab > parameter “Protocol” choose “IMAP + Oauth2 (Office 365)”
Host: enter IMAP server for Office365 (default: outlook.office365.com)
Username: enter email address of the mailbox which will be used for Email2SMS Poller
follow the instructions in the knowledgebase article: How to setup Office365 for Oauth2? to get values for Client ID, Tenant ID, Client Secret from Microsoft Azure Portal
Enter the values Client ID, Tenant ID, Client Secret in plugin settings
press “Save” button to save settings
press “Authenticate via Oauth” button and login with email and password of the mailbox which will be used for Email2SMS Poller
If the process is completed successfully you should see “Oauth authentication success” message in SMSEagle web GUI

SMS to Email
SMS to Email feature allows you to forward incoming SMS/MMS messages to email address.
The plugin can be used in two modes:
forwarding of incoming SMS/MMS to email of last sender (so called Two-way Email2SMS & SMS2Email)
In this mode, when SMSEagle receives incoming SMS, it checks if earlier anyone was sending SMS to the number from incoming SMS using Emai2SMS. If last sender is found, the incoming SMS is forwarded to the email address of last sender. If no last sender is found, then the incoming message is forwarded to a default email address given in plugin settings.It forwards all the incoming messages to one fixed email address.
In this mode incoming SMS/MMS messages are forwarded to always the same email address.
Feature configuration
The feature uses an external SMTP email server for sending emails. You can configure the email server via menu Emails > SMTP Configuration. Please add at least one configuration and select the configuration in the drop-down parameter “SMS To Email” below.
The “SMS To Email” allows to add multiple forwarding rules. Each rule can be enabled or disabled by a user.

Screenshot from SMS to Email > Rules
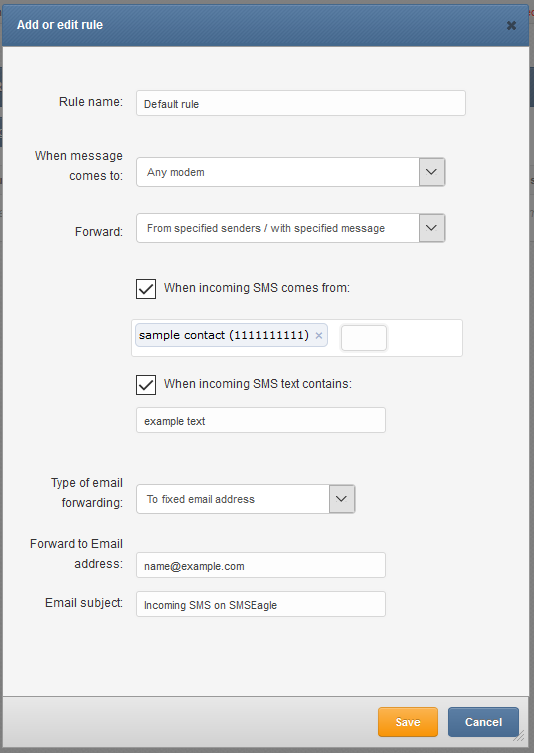
Screenshot from SMS to Email > Rules> Add or Edit rule
In the rule definition you may choose to forward all incoming messages or just messages from specified senders/with specific text. Email subject can be a fixed text or you can use placeholders: {SENDER} - Sender number, {WORDS,X} - First X words from the message, {CHARS,X} - First X characters from the message.
Email text from this feature
Email body from SMS To Email feature contains:
phone number from incoming SMS (and phonebook contact name if found)
Date, time when SMS is received
SMS message
Example email text sent from SMSEagle:
From: +483334455 (John Doe)
Received: 2017-06-01 14:38:12
Message: My SMS message
Email Alerts
The Email Alerts feature allows sending of an email alert message to a selected email address once SMS sending errors occur. When a defined error counter threshold is reached, an alert email is triggered.
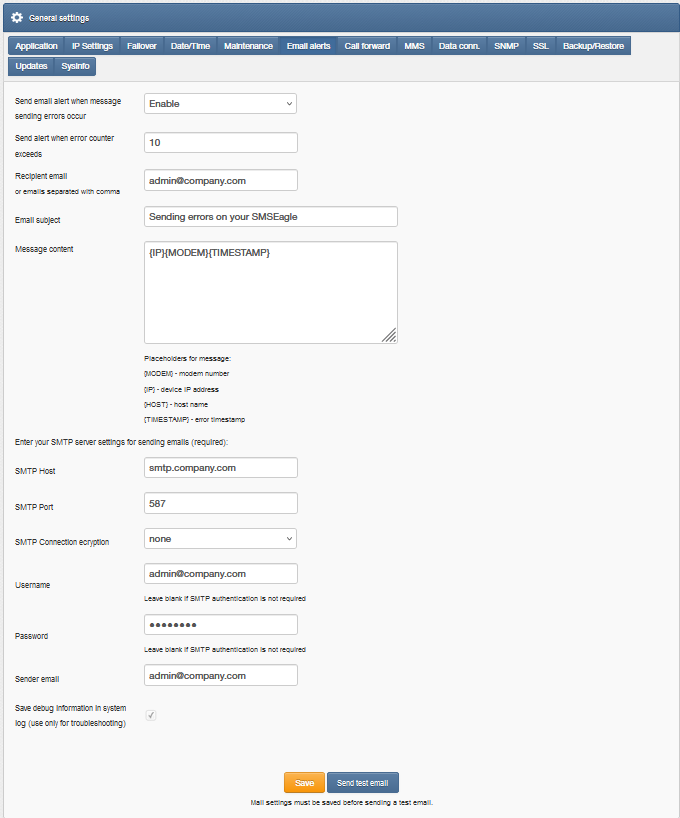
You can Enable/Disable sending of an email alert when message sending occurs
You can set the number of errors before an alert is sent
You can set the email/s of recipients
You can set the email subject and content of the message including placeholders.
You can enter your SMTP server settings for sending emails
You can save debug information in system log (enable this only for troubleshooting)
Notice: To prevent false alarms we recommend to set parameter “Send alert when error counter exceeds” to value > 2.
Email server that is used for SMS to Email is configured via menu Emails > SMTP Configuration. Please add at least one configuration and select it in the drop down parameter below
Email Conversations
The Emails module includes a dedicated Conversations page, which displays incoming and outgoing email messages in a threaded view grouped by sender/recipient. This makes it easy to track the full history of email communication directly from the SMSEagle web GUI.
Incoming and outgoing email messages are automatically saved to the device and accessible from the Conversations page.
Screenshot from menu Emails>Conversations
SMTP Configuration
SMTP Configuration menu is a single point for configuration of SMTP settings. These settings are necessary if you want to send emails from SMSEagle device in various features like SMS to Email, API, Compose menu, Email Alerts.
Here you can have a single configuration for all features or several configurations, one for each feature.
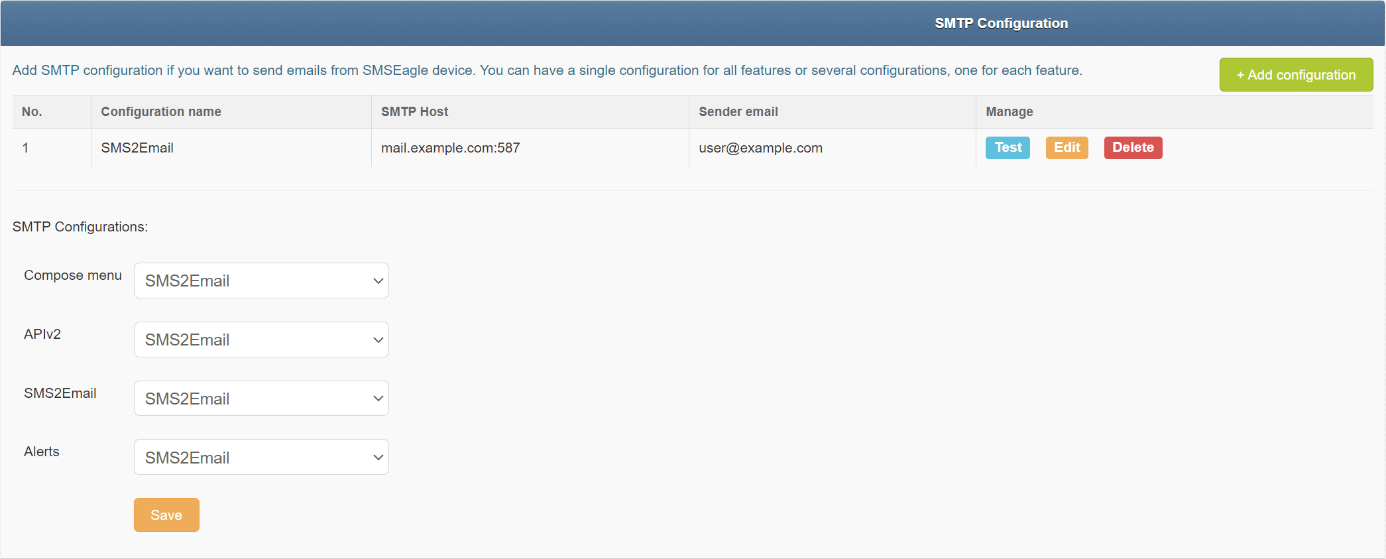
screenshot from menu SMTP Configuration
To start using Email features on your SMSEagle:
1. Create at least one configuration
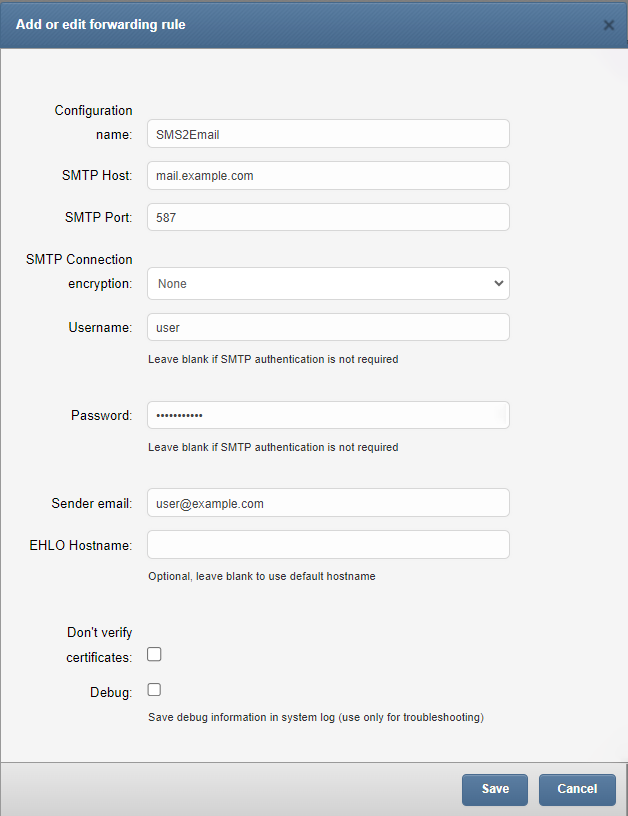
screenshot from SMTP add configuration
Set configuration name
Set SMTP Host
Set SMTP Port
Select SMTP Connection encryption (none, SSL, TLS)
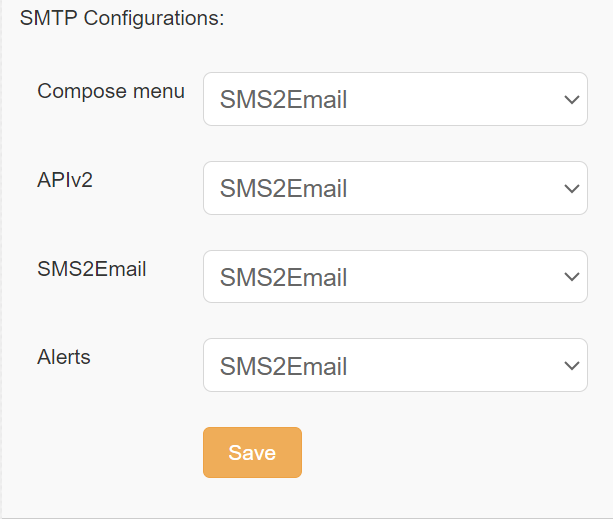
2. Assign configuration to a selected feature
Once a configuration entry is setup, assign it to a selected feature.
Workflows
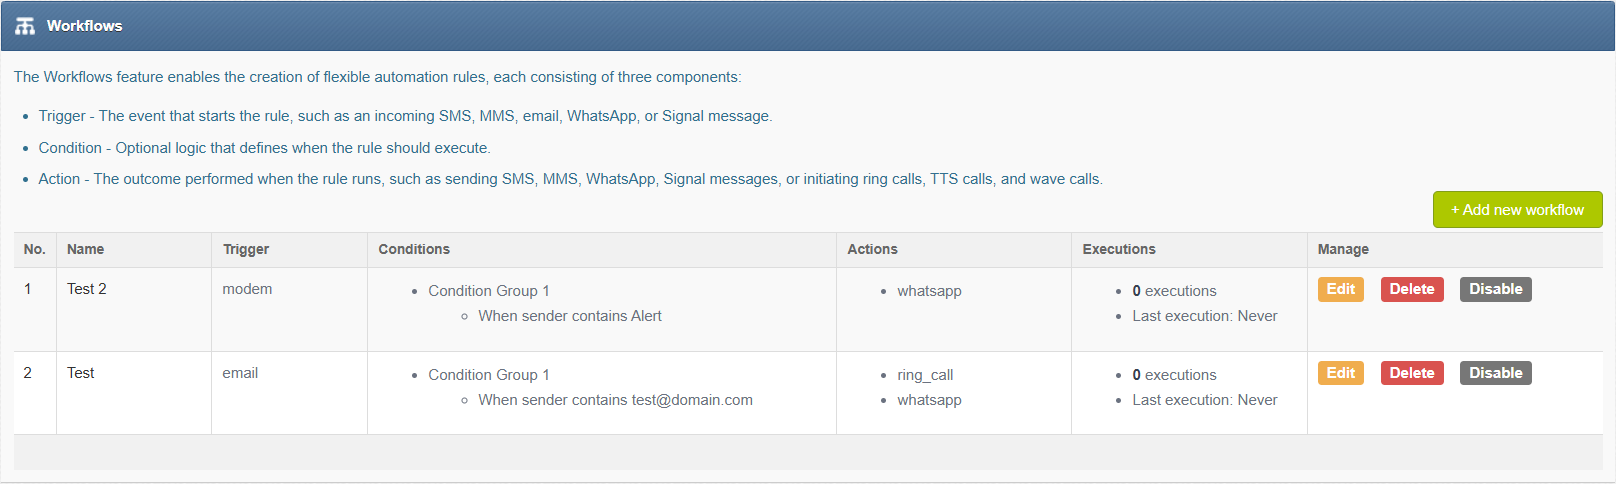
The Workflows feature enables advanced management of inbound and outbound communications by defining rules and actions based on message content and source. It enables the creation of a very flexible automation rules, each consisting of three components:
Trigger - The event that starts the rule, such as an incoming SMS, MMS, email, WhatsApp, or Signal message.
Condition - Optional logic that defines when the rule should execute.
Action - The outcome performed when the rule runs, such as sending SMS, MMS, WhatsApp, Signal messages, or initiating ring calls, Text-To-Speech calls, and wave-file calls.
The Workflows feature allows you to add multiple processing rules. Each rule can be enabled or disabled by a user.
Workflow builder
To create a single Workflow rule, you use the Workflow Builder. This tool allows you to automate the processing of incoming messages (or other events) using point-and-click rules.
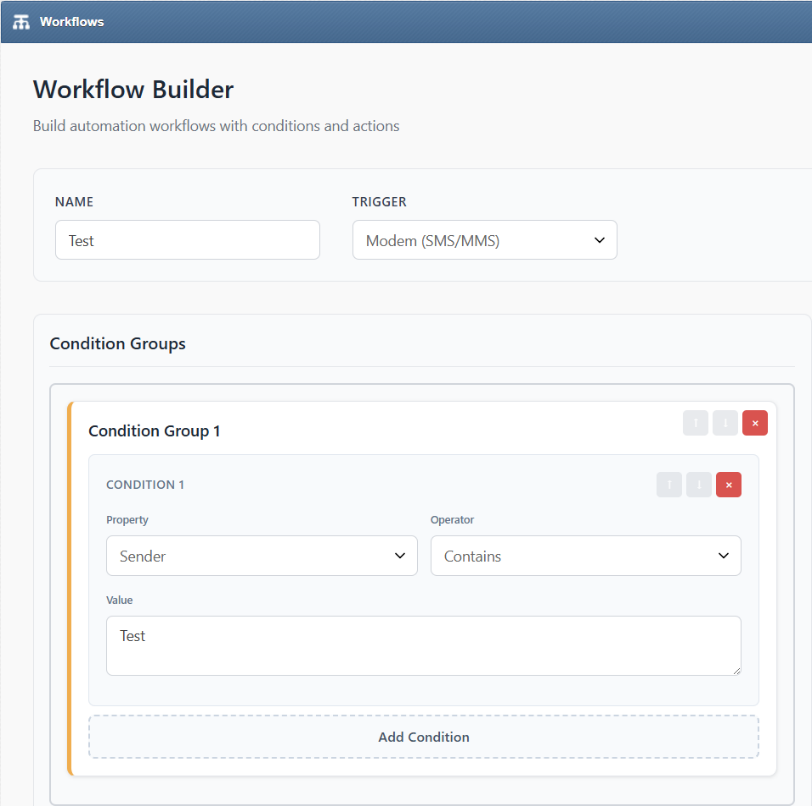
Screenshot from the Workflow Builder
In each workflow, you can configure:
Name
Enter a descriptive name for your rule.
Trigger
The trigger is an event that starts the rule. You can choose from triggers:
Modem (SMS/MMS)
Email
WhatsApp
Signal On Sent (SMS/MMS): triggered when an outgoing message has been sent
On Error (SMS/MMS): triggered when a message sending error occurs
On Delivery Report (SMS/MMS): triggered when a delivery report is received
Condition Groups
Build a logic with groups of conditions. Each condition has:
Property (Sender or Content)
Operator (Contains, Equals, Not Equals, Ends With, Not Contains, Regex Match, Starts With, In Group or In Contact)
Value (free text)
You can add multiple conditions inside a group connected with AND logic. You can add multiple condition groups connected with OR logic.
Actions
An action defines what will happen when the conditions are met. The following actions are available:
SMS
TTS Call
TTS Advanced Call
Ring Call
Wave Call
Email
WhatsApp
Signal
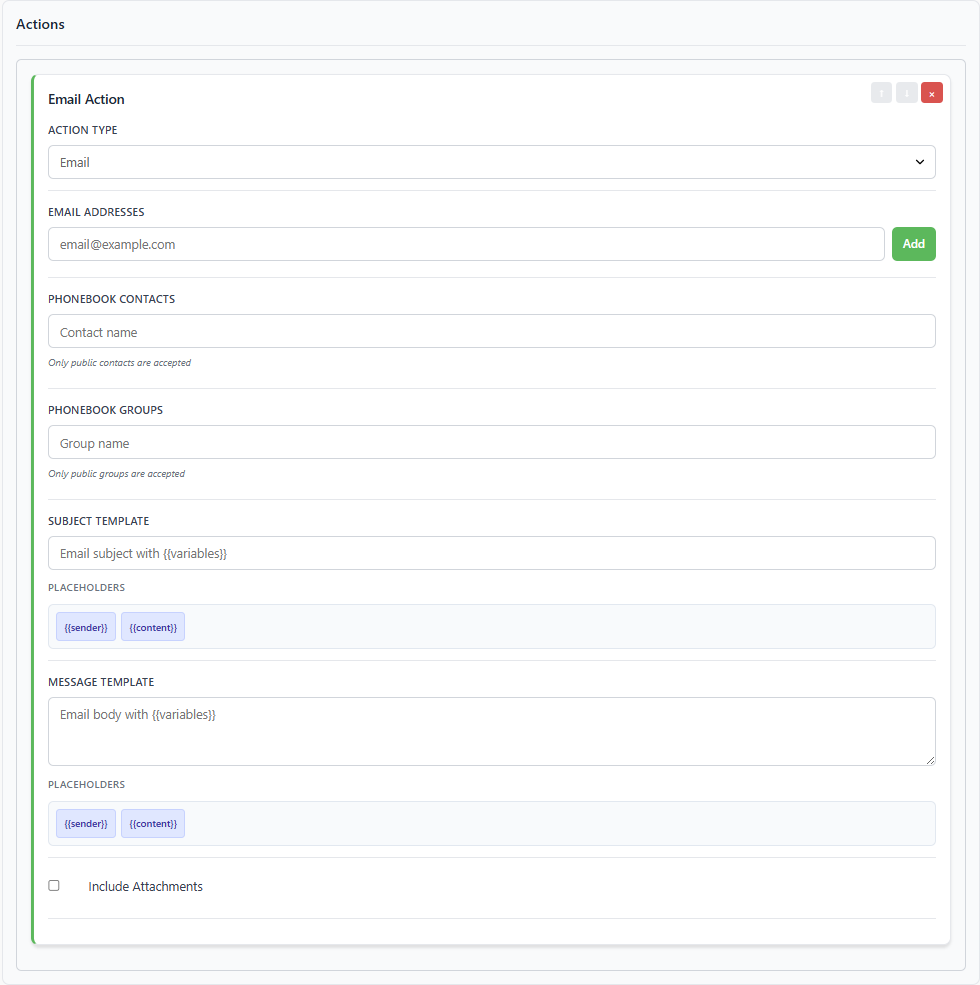
Screenshot from menu > Workflows > +Add new workflow > Email Action
The screenshot above shows an Email Action Example:
Email addresses: Enter one or more recipients and click Add.
Phonebook contacts / groups: Target saved public contacts or public groups (only public entries are accepted).
Subject template and Message template: Compose the outgoing email using placeholders:
Available placeholders (as shown): {{sender}}, {{content}}
Include attachments: Optional checkbox to forward any attachments.
You can add multiple actions within one workflow, for example: send SMS and make a call.
Dynamic recipient placeholders
When the trigger is set to Email, dynamic recipient placeholders are available, allowing the workflow to automatically route the message to recipient derived from the incoming message content. The recipient can be derived from:
email identifier: phone number extracted from to address (eg. from +48123456789@domain.com it takes +48123456789).
subject: uses an email subject to extract a recipient phone number, or phonebook contact id, or phonebook group id
SMS Forward
The feature “SMS forward” allows to forward incoming SMS messages to one/may recipients according to defined rules.
Feature configuration
The feature “SMS Forward” allows to add many forwarding rules. Each rule can be enabled or disabled by user.
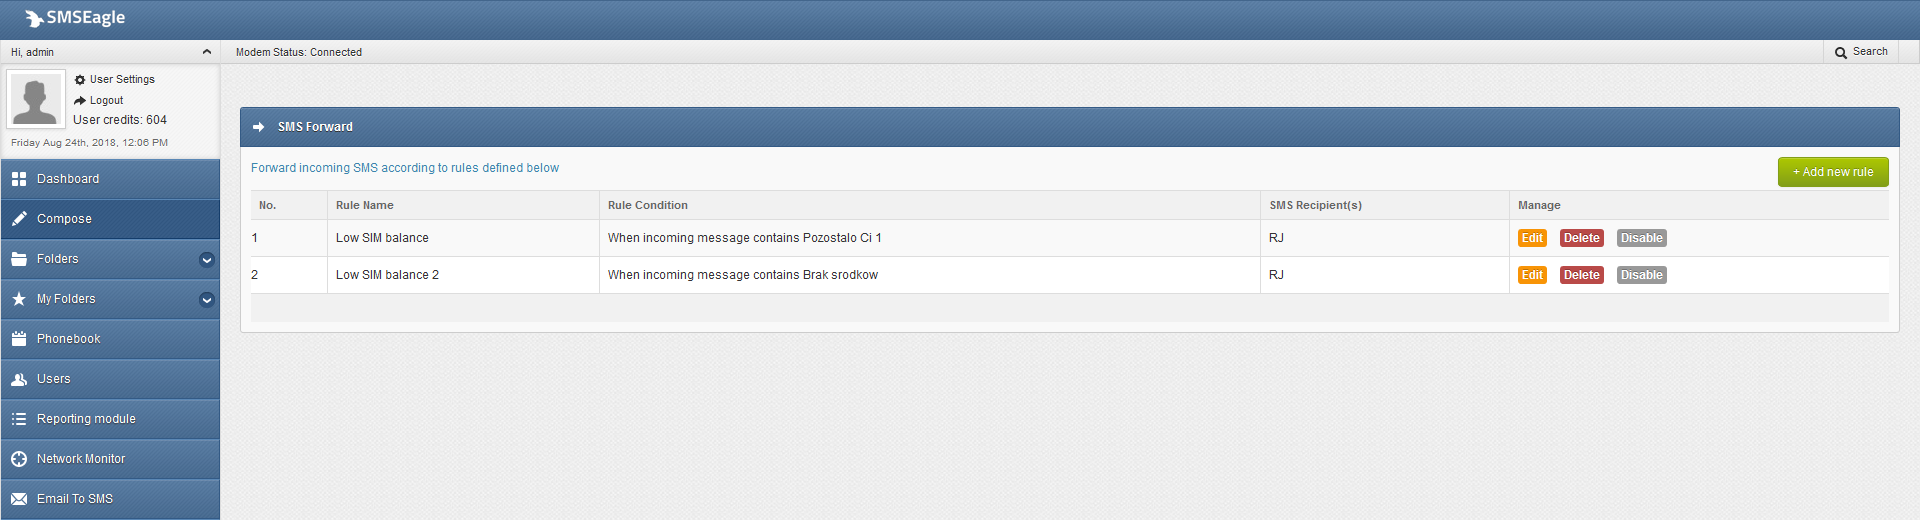
Screenshot from plugin main window
For each rule user can define:
When incoming SMS should be forwarded (Rule type) and to what number(s) the message should be forwarded (SMS Recipient).
Whether or not include in SMS a sender number from which original SMS came from.
When defining a rule user can choose SMS recipient (who gets the forwarded SMS). It can be either phone number or name of group from phonebook.
User may define many forwarding rules in the plugin.
Each rule is processed independently.
Priority can be set (0-9), message with a higher priority will be queued earlier.
User may choose to include a custom text along with placeholders:
*{SENDER} - Sender number
{MESSAGE} - Original message *
There is a possibility to enable/disable each rule.
There is a possibility to enable/disable each rule.
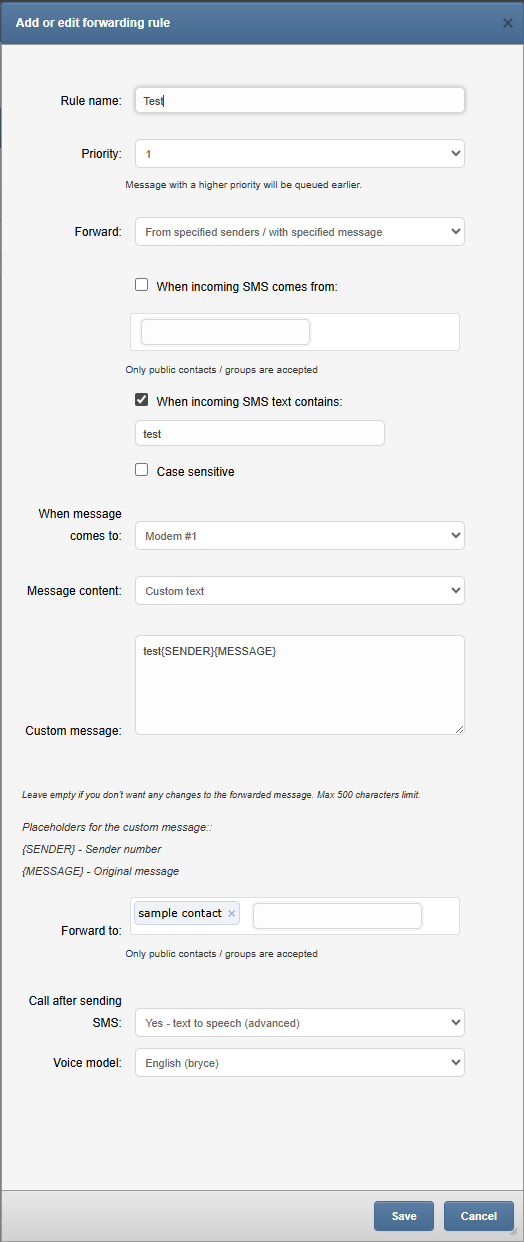
Screenshot form “Add/edit forwarding rule”
Voice Call
An SMS message can be optionally followed by a wake-up call or text-to-speech call. This can be enabled in the rule definition. The feature requires a device with an active Voice-Call add-on.
MQTT
MQTT is a messaging protocol for the Internet of Things (IoT). It is designed as an extremely lightweight publish/subscribe messaging transport that is ideal for connecting remote devices with a minimal network bandwidth. MQTT today is used in a wide variety of industries, such as automotive, manufacturing, telecommunications, oil and gas, etc.
The MQTT feature on SMSEagle lets you convert MQTT to SMS & SMS to MQTT. You can create multiple conversion rules:
when an SMS text arrives at the SMSEagle gateway with a predefined content, it is forwarded to MQTT
when a message with a defined content arrives at MQTT, the SMSEagle gateway can send it as an SMS to single or multiple recipients
Feature configuration
The “MQTT” feature allows you to define several processing rules for both Subscribe and Publish scenario.
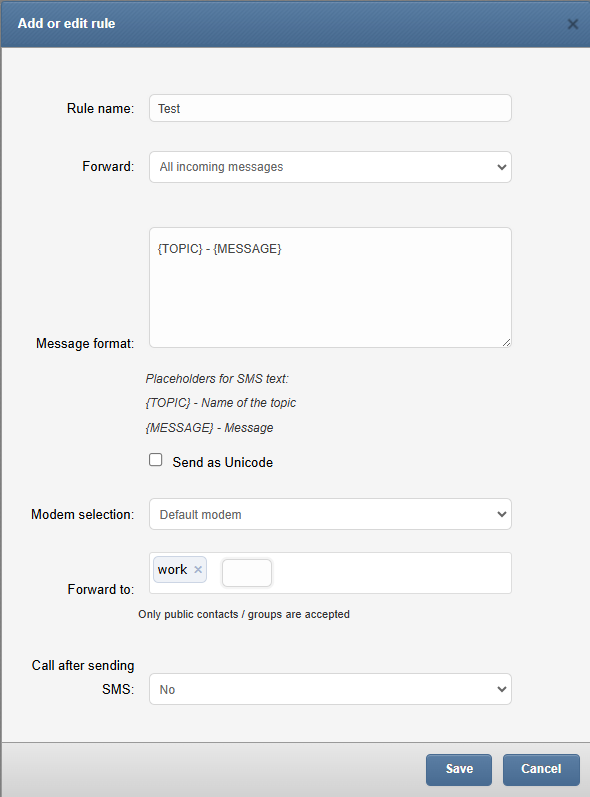
Screenshot from MQTT add rule
Subscribe rules

Screenshot from MQTT subscribe window
For each processing rule user can define:
if forwarding should always be sent or only form specified topic/when MQTT message contains
the text of the outgoing SMS message
message recipient (single or group)
for multi-modem devices users can also define from which modem the SMS is sent
Publish rules

Screenshot from MQTT publish window
For each processing rule user can define:
if forwarding SMS should always be sent or only for specified sender/message text
host, port and topic of MQTT subscriber
for multi-modem devices users can also define from which modem the SMS is received
The WhatsApp feature on the SMSEagle device enables you to send and receive WhatsApp messages via the web GUI or APIv2, or through automatic message conversion. Once you have connected a WhatsApp account in the ‘Settings’ menu, you can send WhatsApp messages via the ‘Compose’ menu. You can also configure automation workflows in combination with other sources, such as emails, SMS messages, or Signal messages. This secure, on-premises extension to your messaging stack enables real-time incident handling and customer communication via the popular WhatsApp channel. The messaging relies on data, so your device should be connected to the Internet via Ethernet or mobile data.
DISCLAIMER
This integration operates through a legitimate, user-authenticated session of WhatsApp Web. It does not use any unofficial API or reverse-engineered protocol.
WhatsApp Inc. does not officially support or endorse the use of automated systems, bots, or unofficial clients to access their platform.
Users are responsible for complying with WhatsApp’s Terms of Service, including restrictions on automation and third-party integrations.
SMSEagle provides this feature as-is, and cannot guarantee uninterrupted functionality due to potential changes in WhatsApp’s platform, policies, or technical infrastructure.
Use of this feature may be subject to limitations or account restrictions imposed by WhatsApp.
By enabling and using this feature, the user acknowledges and accepts the above conditions.
WhatsApp is a trademark of Meta Platforms, Inc. This product is not affiliated with, endorsed by, or sponsored by WhatsApp or Meta Platforms.
Setting up
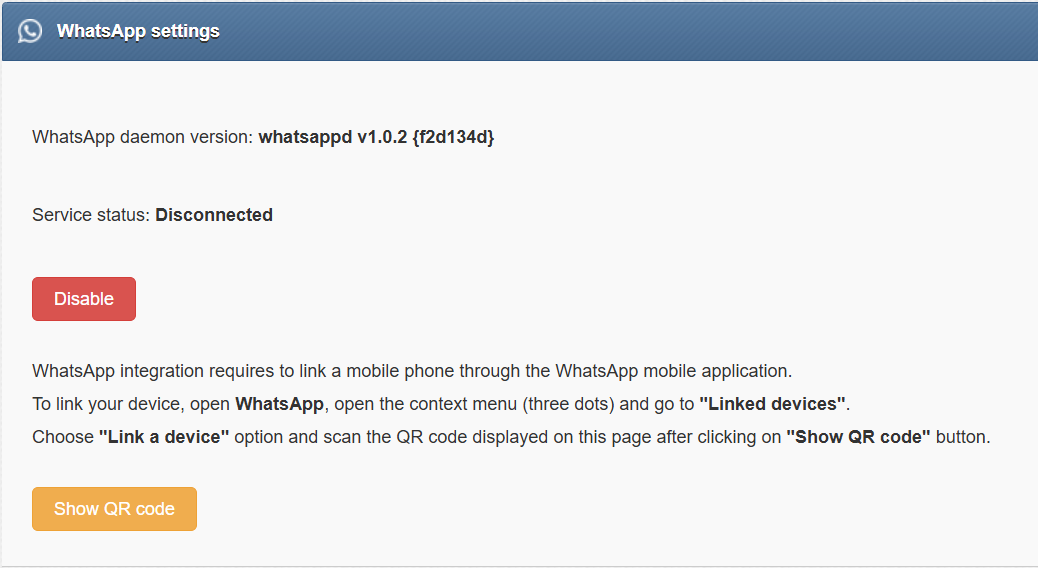
Screenshot from menu > WhatsApp settings
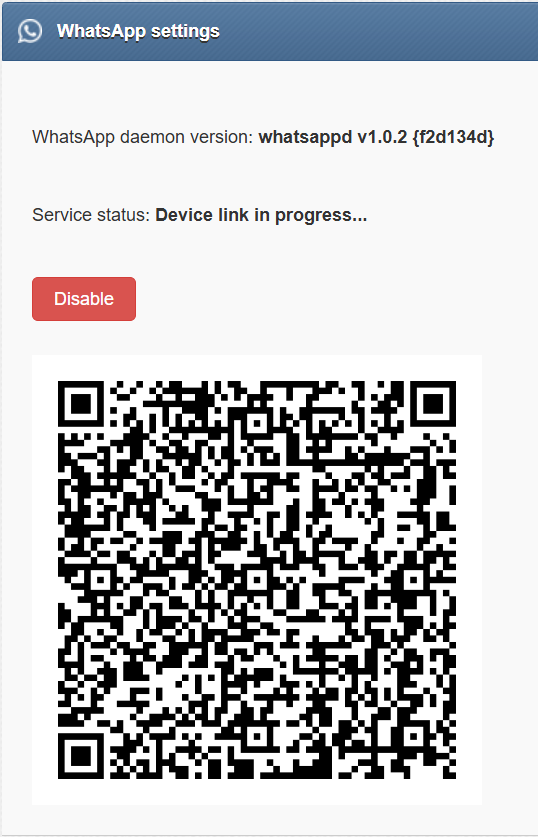
In SMSEagle web-GUI > menu WhatsApp > select the Settings tab and click Show QR code
Open the WhatsApp application on your mobile phone (it must be already registered to a WhatsApp account), open the context menu (three dots) and go to “Linked devices”.
Select Link a device and scan the QR code displayed in SMSEagle web-GUI.
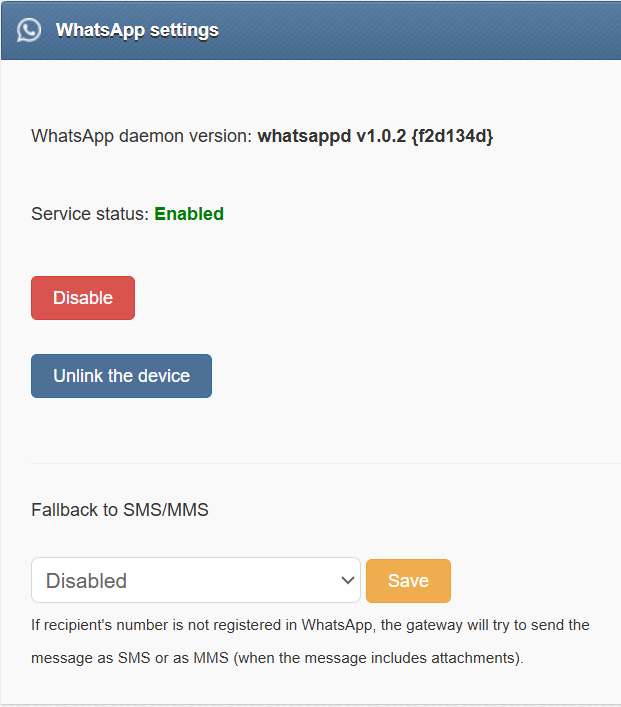
Once the app is paired you’re ready to send/receive WhatsApp messages via SMSEagle.
Screenshot from menu > WhatsApp settings
Screenshot from menu > WhatsApp settings
Send WhatsApp message with SMS/MMS fallback
In the WhatsApp Settings tab you can set a fallback to SMS/MMS. If the recipient’s number is not registered with WhatsApp, the SMSEagle will send the message as an SMS or MMS (if the message includes attachments).
Library updates
SMSEagle includes a built-in mechanism for updating the WhatsApp integration library. Since WhatsApp periodically updates its platform, keeping the library up to date ensures continued compatibility and uninterrupted operation. Available updates can be checked and applied from the WhatsApp Settings tab.
Signal (beta)
Signal is a secure messaging app. It offers encrypted messages, voice and video calls. Security experts recommend Signal because it’s end-to-end encrypted. This ensures that only your device and the recipient’s device can read the messages you send. The team behind the software operates as a nonprofit, supported by grants and donations. Signal is open source, meaning its code is publicly accessible.
SMSEagle devices support Signal messaging when sending messages from web-GUI or APIv2. You can also configure automation workflows in combination with other sources, such as emails, SMS messages, etc.
To start using Signal, go to the menu Signal > Settings and register a phone number used in your SMSEagle device as described in the knowledgebase article: How to setup Signal on SMSEagle device. The messaging relies on data, so your device should be connected to the Internet via Ethernet or mobile data.
Sent/received Signal messages can be found in menu Signal > Conversations

Screenshot from menu Signal > Conversations
Webhooks (aka. Callback URL)
Webhooks feature allows you to:
forward incoming message to a defined URL address
call defined URL address if outgoing message status has changed (message was sent/delivered or there was a sending error)
If the feature is enabled, each defined rule will trigger HTTP(S) request to a defined URL. HTTP(S) request can be of type GET or POST.
Feature configuration
The feature “Webhooks” allows to add unlimited number of rules. Each rule can be enabled or disabled by user.
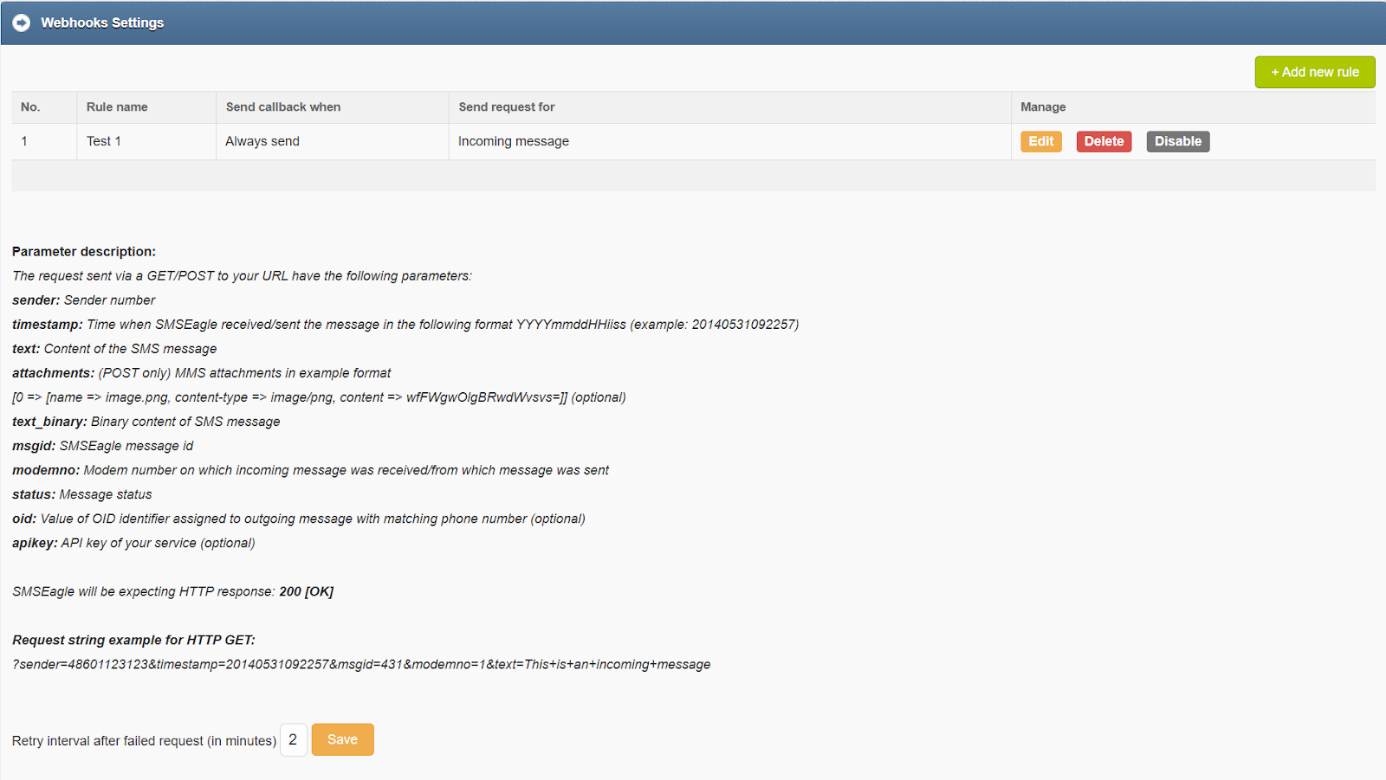
Screenshot from Webhooks settings
For each new rule user has to fill in the requested fields:
Rule name
‘URL’ field defines remote address of your callback script
‘Test URL’ button allows to test whether your Webhooks configuration is correct. SMSEagle will make a callback request with test parameters and will verify the response of remote server
‘URL method’ allows to choose whether callback to your URL is done with HTTP(S) GET or POST method
select triggers (on incoming message, on message sent, on message delivery)
select triggers (on incoming message, on message sent, on message delivery or sending error)
to change names of variables in GET/POST
choose payload format for POST (form-data or json)
“Send request when” defines if the request is always sent, sent only when SMS sender belongs to a given contact/group or only when incoming message contains a given character string
Optionally you can define “API key of your service” value. This will be passed to your callback URL in parameter ‘apikey’. If you leave the field blank, ‘apikey’ parameter will not be passed to your callback URL
Expected HTTP Status Code(s): Defines which HTTP response codes are treated as a successful webhook delivery. The webhook is considered OK only if the HTTP response status matches one of the specified codes. Multiple status codes can be provided. Default: 200
User may also choose whether to enable support of self-signed SSL certificate
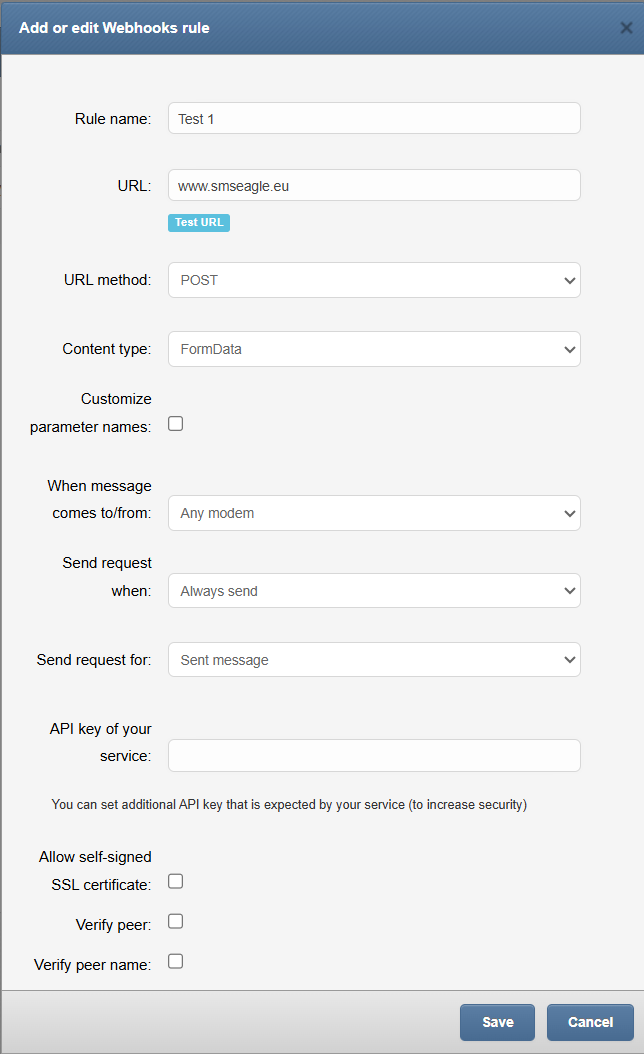
Screenshot from Webhooks add or edit rule
Request parameters
The request sent via a GET/POST to your URL have the following parameters:
sender: Sender number
timestamp: Time when SMSEagle received/sent the message in the following format YYYYmmddHHiiss (example: 20140531092257)
text: Content of the SMS message
attachments: (POST only) MMS attachments in example format
[0 => [name => image.png, content-type => image/png, content => wfFWgwOlgBRwdWvsvs=]] (optional)
text_binary: Binary content of SMS message
msgid: SMSEagle message id
modemno: Modem number on which incoming message was received/from which message was sent
status: Message status
oid: Value of OID identifier assigned to outgoing message with matching phone number (optional)
apikey: API key of your service (optional)
Expected HTTP response & retry attempts
After sending HTTP(S) GET/POST request to your callback URL, SMSEagle will be expecting HTTP response defined in parameter “Expected HTTP Status Code(s). If other or no response is received from your callback URL, SMSEagle will keep retrying every X minute for 24 hours. Retry interval can be set in main plugin Window:

Autoreply
The feature allows to automatically respond to each received message with defined text response.
Feature configuration
The feature “Autoreply” allows to add many autoreply rules. Each rule can be enabled or disabled by user.
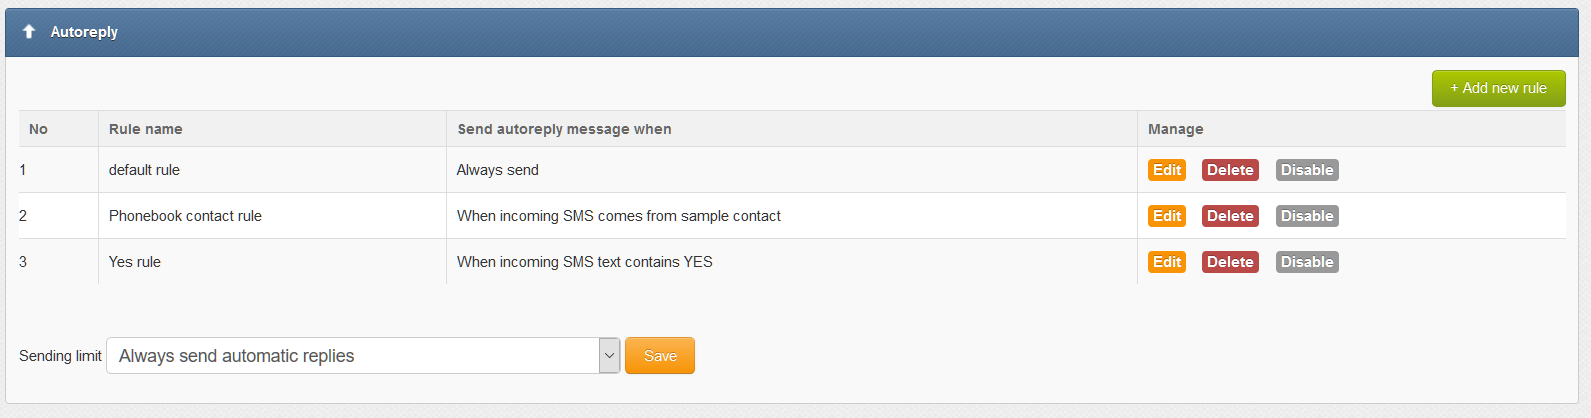
Screenshot from plugin main window
For each rule user can define:
When autoreply message should be sent:
always,
when incoming message contains defined text,
and/or when message sender belongs to Phonebook contact/group
if incoming SMS text comes to a selected modem
If autoreply message text should be sent as Unicode characters
The feature also allows to define sending limit for autoreply messages. It is possible to set limitation of max 5 messages / 10 minutes / phone number.

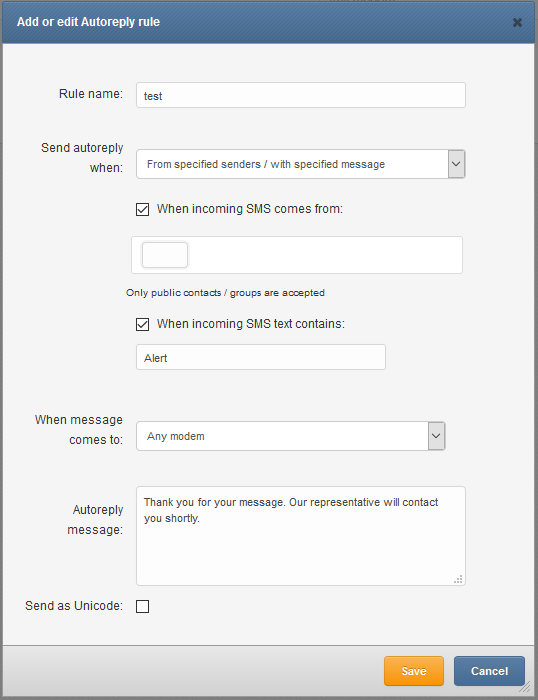
Screenshot form “Add/edit autoreply rule”
Subscriptions (newsletter)
This feature allows to enable newsletter-style subscriptions via SMS. When someone sends a message to your SMSEagle which includes a defined text, the sending number will be automatically added to a Phonebook group. This group can be later used to send messages via web-GUI/API/Email To SMS. Automatic removal from the group works the same way: when incoming SMS contains a defined text, the sending phone number will be automatically removed.

Screenshot from “Subscriptions” feature
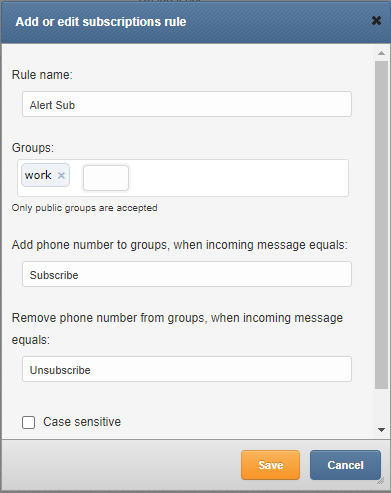
Screenshot from Subscriptions > Add or edit subscriptions rule
In the Add or edit subscriptions rule window:
You can add rule name
Select group from Phonebook
Define phrase which adds the phone number from incoming SMS to the group
Define phrase which removes the number from the group
Select if the phrase should be case sensitive
When a phone number is added to SMSEagle Phonebook via this feature, first a phonebook contact is created with a name: [RULE NAME] [PHONE NUMBER]. For example: “Alert Sub +48123456789“. Then the contact is added to a defined Phonebook group.
Periodic SMS
The feature “Periodic SMS” allows to send SMS messages or USSD codes at a desired time interval. User may define many sending rules, and each rule will be processed independently.
Feature configuration
The feature “Periodic SMS” allows to add many sending rules. Each rule can be enabled or disabled by user.
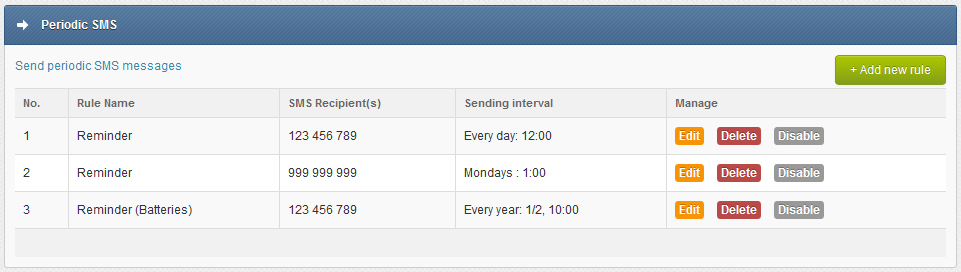
Screenshot from main plugin window
For each rule the user can define:
The rule name
Sending interval (Hourly, Daily, Weekly, Monthly or Annually)
Message type (SMS, USSD Code)
The content of the SMS text
The recipients (phone number(s) separated with comma or group(s) from phonebook)
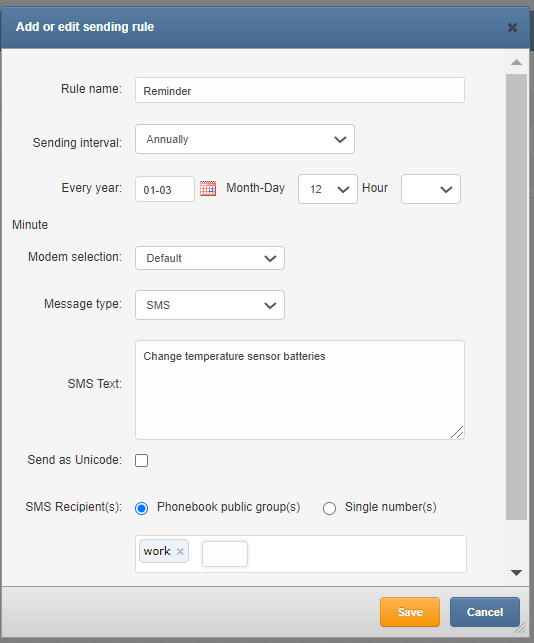
Screenshot from “Add new rule” window
Voice Call
A SMS message can be optionally followed by a wake-up call or text-to-speech call. This can be enabled in the rule definition. The feature requires a device with an active Voice-Call add-on.
LDAP
The LDAP feature allows to access directory services: Active Directory (hereinafter referred to as “AD”) and OpenLDAP. The feature allows reading directory contacts and groups in SMSEagle web-GUI. Optionally, it allows to authenticate to SMSEagle device using directory services.
Feature configuration
Choose “LDAP” from left side menu in SMSEagle web-GUI to access feature configuration. After enabling the feature, user needs to fill in all requested fields according to AD settings.
In the “AD phone attribute” field user needs to choose which phone attribute from AD will be shown in SMSEagle web-GUI.
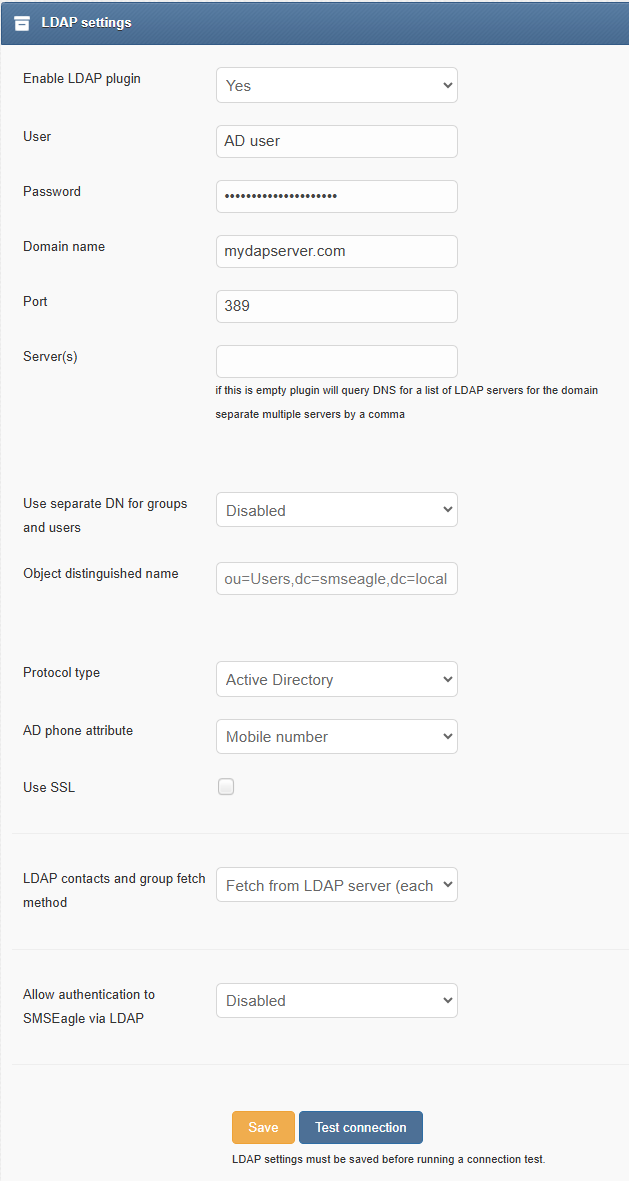
Screenshot from “LDAP settings” window
Click “Save” and “Test connection” to make sure that SMSEagle is connected with AD server.
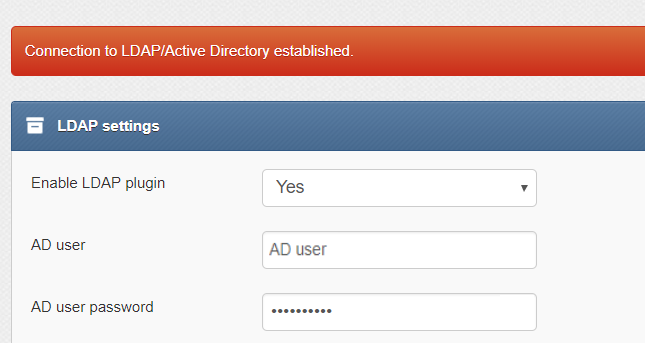
Screenshot showing successful connection to AD server.
With connection established, AD contacts/groups suggestions are shown in selected modules of Web-GUI. Start typing any part of contact/group name or number to show AD contact suggestions.
Type “LDAP” to check all contacts listed in AD directory.
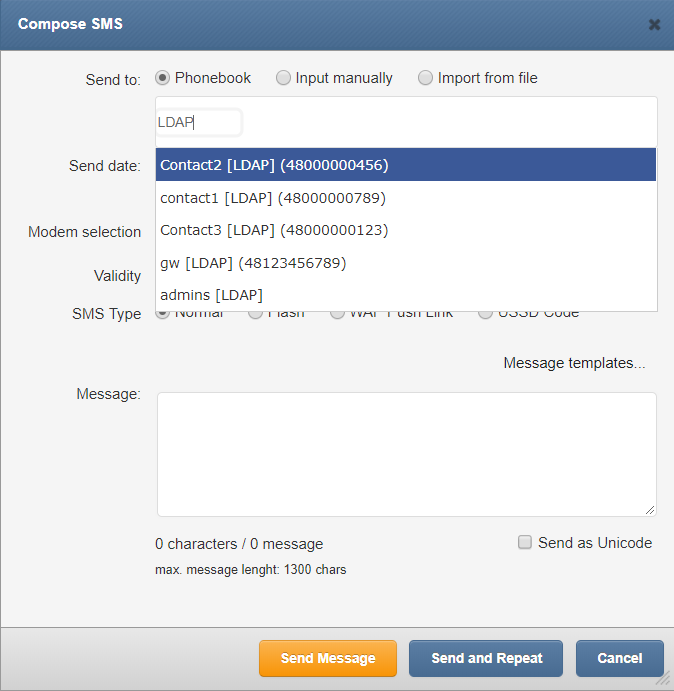
Screenshot from “Compose” module with LDAP connection enabled
LDAP directory suggestions can be used in “Compose”, “Autoreply”, “Digital input/output”, “Email To SMS” and “Email To SMS Poller” modules.
Authentication to SMSEagle via LDAP (optional)
This feature allows authentication to your SMSEagle device using LDAP. To start using it:
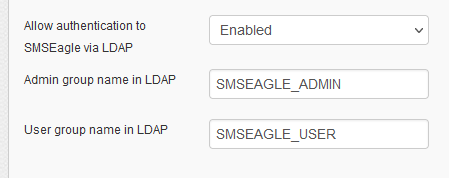
create in your directory services a new group for SMSEagle admin role. Enter the created group name in SMSEagle web-GUI > LDAP > “Admin group name in LDAP”
create in your directory services a new group for SMSEagle user role. Enter the created group name in SMSEagle web-GUI > LDAP > “User group name in LDAP”
Set parameter “Allow authentication to SMSEagle via LDAP” to “Enable”
press “Save” button”
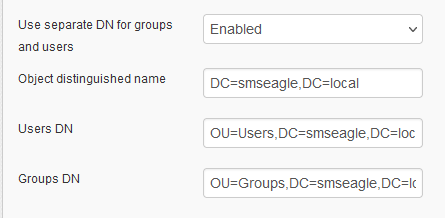
Depending on the directory structure of your LDAP server, for OpenLDAP you may also need to specify separate Distinguished Names for Users and Groups (if both are located under different paths)
On the login screen user will be able to choose between “Local” or “LDAP” authentication.
Use one of these parameters as your user in SMSEagle login form:
Common Name
givenName
sAMAccountName
displayName
userPrincipalName
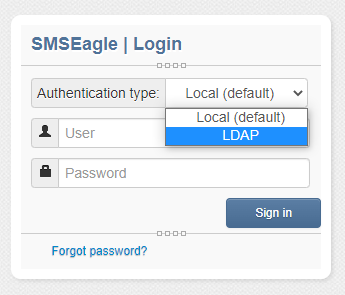
During first login using LDAP authentication type, the system will create a new user on SMSEagle device, linked to the LDAP account. This account settings will be synchronized with LDAP during every login.
Allow/Deny List
The Allow/Deny List feature lets you control both incoming and outgoing SMS traffic on your SMSEagle device. By specifying which phone numbers or number ranges are allowed or blocked, you can ensure that only approved sources can send messages to the device or that outgoing messages are sent only to approved recipients.
The Allow/Deny List operates in one of two mutually exclusive modes:
Allow selected
Deny selected
Only one mode can be active at a time.
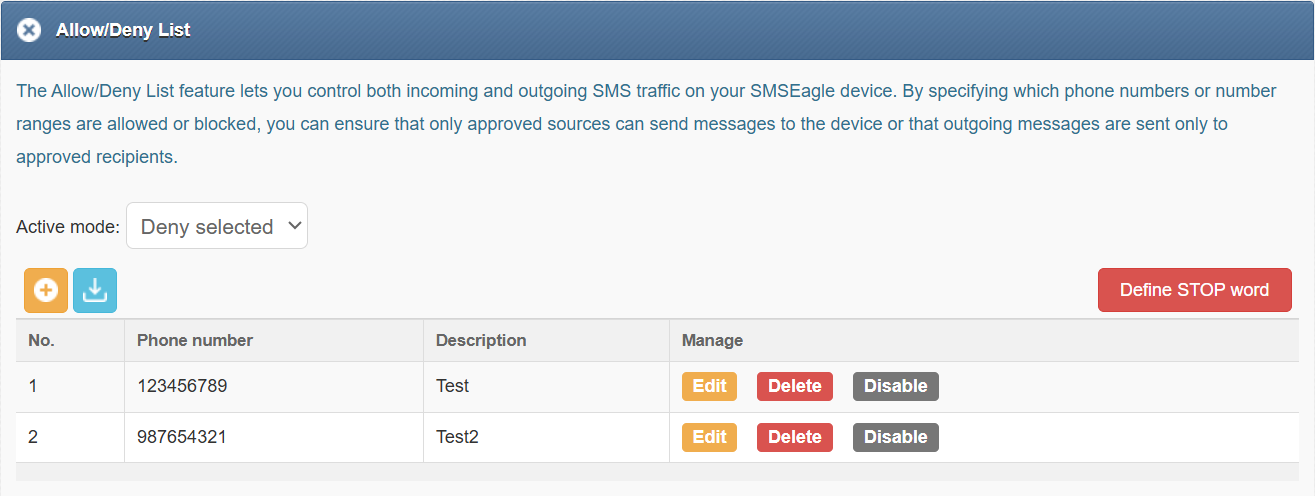
Screenshot from “Allow/Deny List” feature
Mode: Allow selected
In Allow selected mode, only phone numbers or number ranges explicitly defined on the list are permitted. All other numbers are automatically blocked.
Behavior:
Incoming SMS
Only messages sent from numbers listed in the Allow List are accepted. Messages from all other numbers are rejected.
Outgoing SMS
The device can send messages only to numbers listed in the Allow List. Attempts to send messages to other numbers are blocked.
Typical use cases
Restricting communication to a known set of trusted numbers
Limiting outbound traffic to approved recipients only
Creating a closed SMS environment for integrations, automation, or testing
Example
If the list contains:
+48123456789
+4420*
Then:
SMS traffic is allowed only to and from that specific number +48123456789 and all UK numbers starting with +4420
Any SMS involving other numbers is blocked
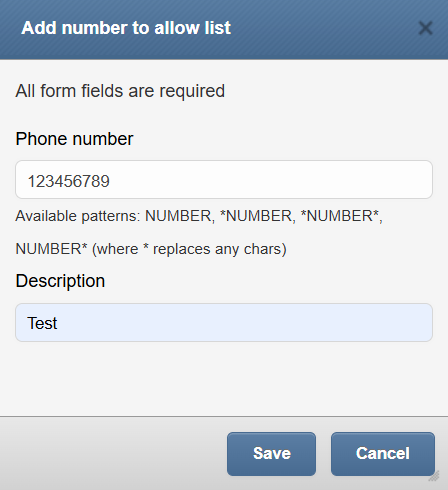
Screenshot from “Add number to allow list” window
Mode: Deny selected
In Deny selected mode, all phone numbers are permitted by default, except those explicitly defined on the list.
Behavior:
Incoming SMS
Messages from numbers listed in the Deny List are blocked. Messages from all other numbers are accepted.Outgoing SMS
The device cannot send messages to numbers listed in the Deny List, but can send messages to all other numbers.
Typical use cases:
Blocking unwanted or abusive senders
Preventing SMS delivery to specific destinations or number ranges
Replacing traditional blacklist‑style filtering with unified inbound and outbound control
Example
If the list contains:
+1555000000
+31*
Then:
Messages to or from those numbers are blocked
All other SMS traffic is allowed
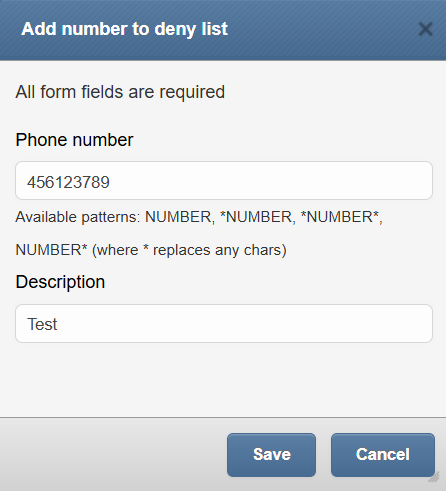
Screenshot from “Add number to deny list” window
Stop word
The STOP Word feature provides an automated way to block unwanted SMS senders based on message content. When a STOP word is defined, the SMSEagle device monitors incoming SMS messages for this keyword. If an incoming message contains the defined STOP word, the sender’s phone number is automatically added to the Deny list. As a result, any further incoming or outgoing SMS communication with that number is blocked according to the Deny selected mode rules.
This feature is especially useful for:
Automatically handling opt‑out or unsubscribe requests
Blocking senders who respond with predefined keywords (e.g. STOP, UNSUBSCRIBE)
Reducing manual administration of blocked numbers
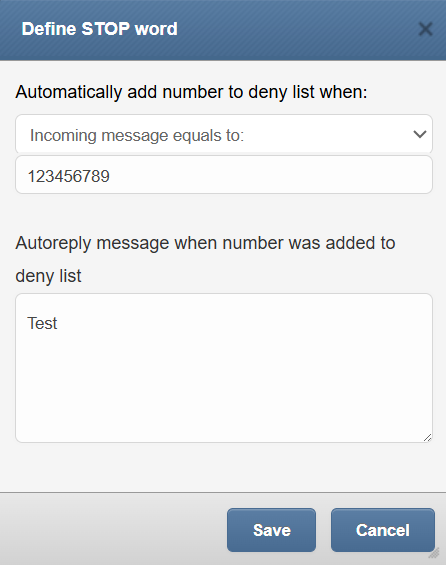
Screenshot from “Define STOP Word” window
Notes:
The Allow/Deny List applies globally to SMS traffic on the device.
Phone numbers can be defined as single numbers or number ranges using wildcards. The following wildcards may be used for multiple numbers: *NUMBER, *NUMBER*, NUMBER* (where * replaces any chars)
SMPP
Short Message Peer-to-Peer (SMPP) is a protocol used in the telecommunications industry. It is an open, industry standard protocol designed to provide a data communication interface for the transfer of short message data between External Short Messaging Entities (ESMEs) and SMSCs.
The SMPP protocol is often used to allow third parties to send messages to SMS gateways for further processing.
The SMSEagle device is equipped with an embedded SMPP server. It supports SMPP in the following scenarios:
Receive SMS requests via SMPP and send messages to the carrier via SIM and radio module
Receive incoming SMS from cellular carrier via radio-module with SIM and forward SMS to SMPP client
Within the SMPP feature it is possible to:
sending SMS text messages (max. 1300 characters)
receiving delivery reports
specifying the encoding of the message (7bit ASCII or UTF-8 is supported)
receiving incoming messages and forwarding them to the SMPP client
select modems that are used for sending/receiving SMS (only for multimodem devices)
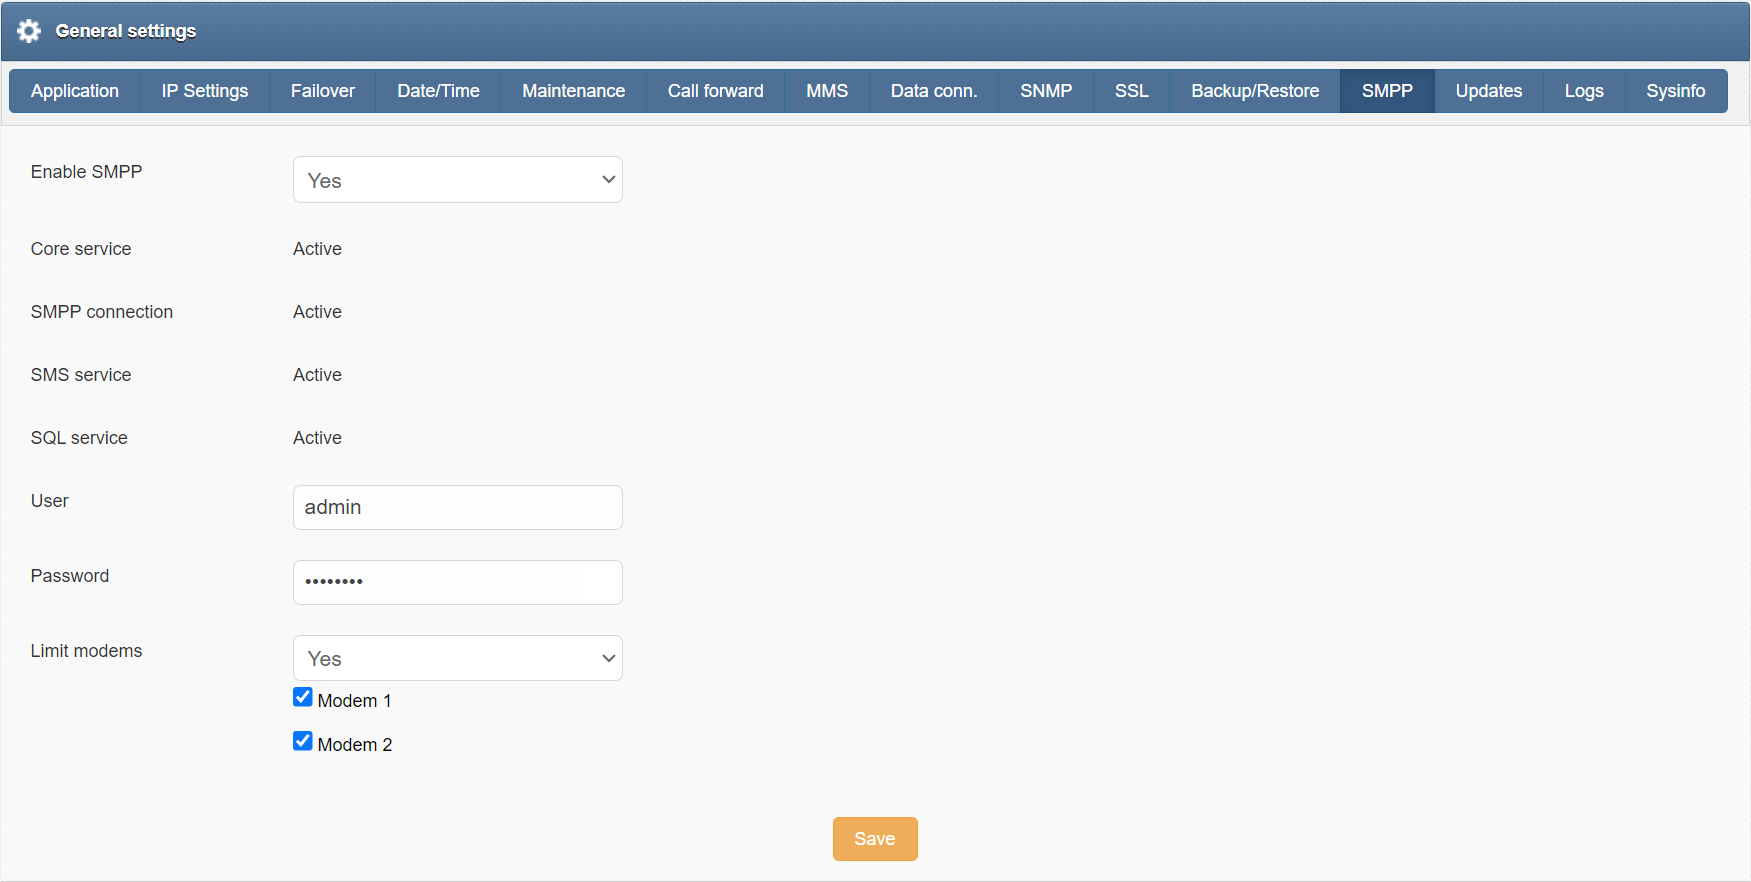
screenshot from menu Settings > SMPP
The SMPP server supports SMPP version 3.4.
Settings
Settings menu is divided into several tabs for easier maintenance.
Application Settings
Application settings can be changed under the Settings Tab > Application.
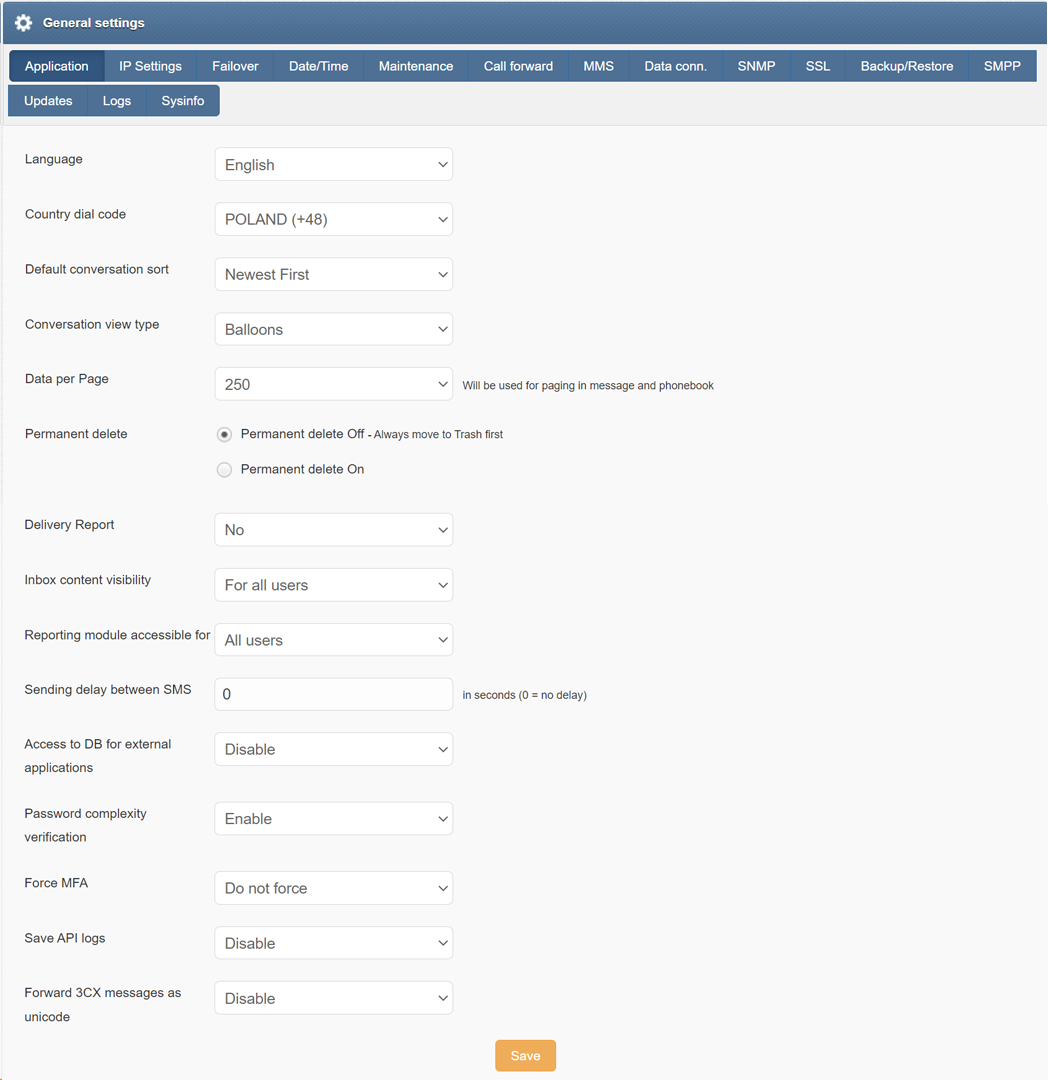
You can change the language of the application to English, French, German, Polish and Spanish
You can change the country dial code to your country (this setting affects only correct assignment of phone numbers to phonebook entries)
You can sort the conversation to show messages either “Newest First” or “Oldest First”
You can change the conversation view to either “Table” (tabular view) or “Balloons” (smartphone-like view), as shown in Folders chapter
You can adjust the amount of data displayed on one page to 10, 15, 20, 25, 50, 100, 250 or Show all
You can set for the messages to be permanently deleted or be moved to Trash first
You can set the receiving of delivery reports to Yes, No or Default (network carrier setting)
You can set the visibility of the Inbox content to All users, Only admins or Only from assigned modems
You can set access of the reporting module to All users or Only admins
You can set a delay between SMS sending in seconds (this setting may be useful for cases where cellular operator blocks a number due to intensive traffic. Note: setting delay between SMS sending also introduces a delay time between receiving SMS)
You can enable or disable access to database for external applications
You can enable/disable Password complexity verification. When enabled user password must be at least 8 characters long and include at least one lowercase letter, uppercase letter, number and special character
You can enable to force MFA (Multifactor Authentication) for user role: for all users, only new users, or leave users to choose their MFA settings (disable force)
IP Settings
IP settings can be changed under the Settings tab > IP Settings.
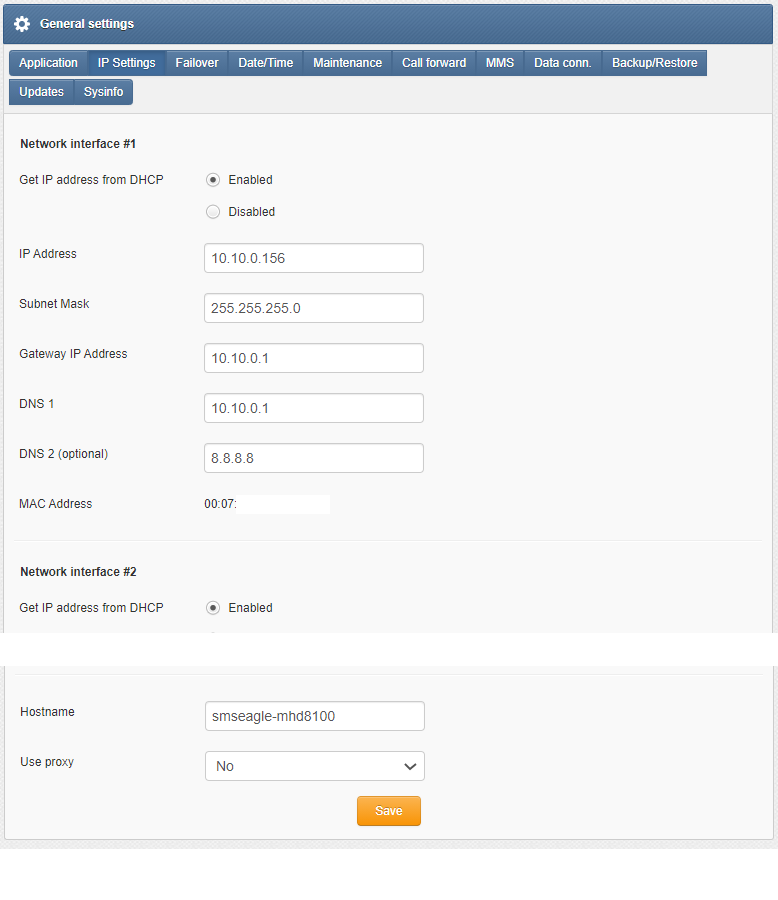
You can enable or disable Get IP address from DHCP
You can input the IP address
You can input the Subnet Mast
You can set the Gateway IP Address
You can set DNS 1
You can optionally set DNS 2
You can view the MAC address of your device
You can input Hostname
You can choose to Use proxy
Allow/Deny Rules For Ip Addresses
The IP Settings tab includes an option to define access control rules based on IP addresses. Administrators can create an allow list (whitelist) or deny list (blacklist) of IP addresses or ranges that are permitted or blocked from accessing the SMSEagle web GUI and API. This feature helps to restrict device access to trusted network segments only. Separate multiple addresses with a comma.
Notice: With the settings all ports are blocked except 22.
Failover
Failover configuration has been described in chapter “Failover (HA-cluster) feature”
Date/Time
Date/Time settings can be changed under the Settings Tab > Date/Time
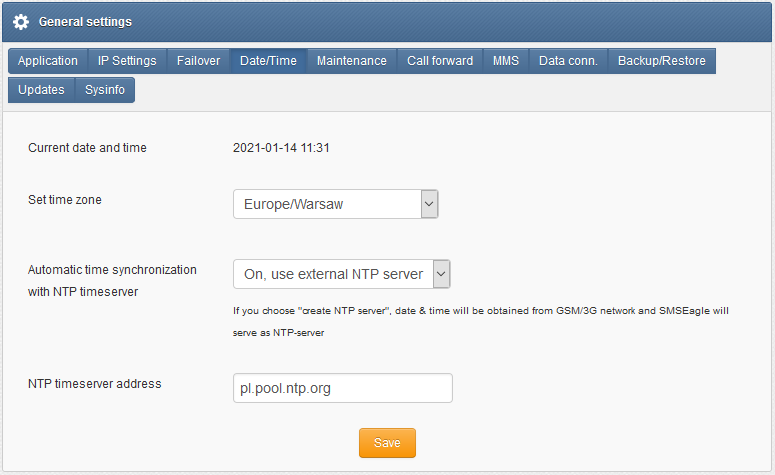
You can check current device date and time
You can set your time zone
You can set automatic time synchronization with NTP timeserver, disable automatic time synchronization or create NTP server on SMSEagle device (date & time will be obtained from 3G/4G network)
You can set NTP timeserver address (or several addresses separated with comma)
Maintenance
Maintenance settings can be accessed under the Settings tab > Maintenance
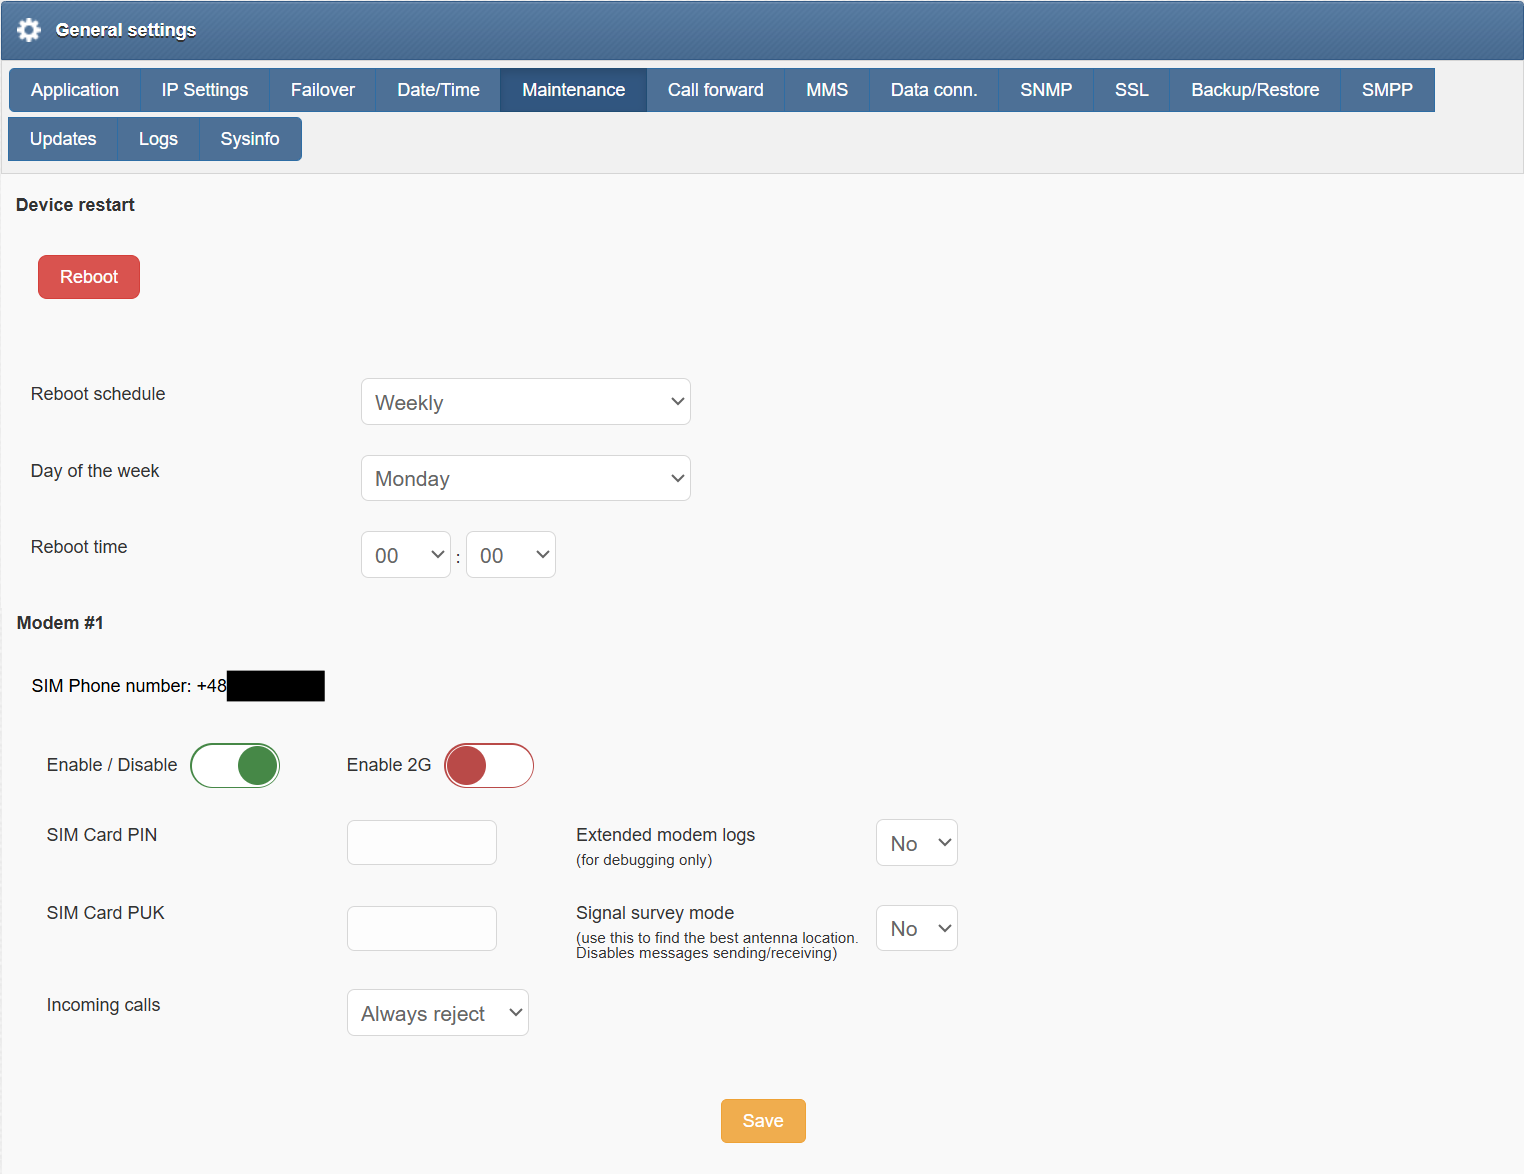
You can reboot your device
You can enable or disable the device modem
You can input your SIM card PIN
You can input your SIM card PUK
You can enable extended modem logs for modem software (debug mode)
You can enable signal survey mode (for finding the best antenna location)
You can set incoming call to always reject, accept or ignore
Multi-modem settings are described in chapter Multi-modem features.
Signal survey mode
This feature allows you to find the best location of antenna for environments with poor cellular signal strength. When enabled, signal strength value on SMSEagle dashboard will refresh every 3s. This allows you to try different location of antenna and find a spot with the best signal.
WARNING: when Signal survey mode is enabled you cannot send/receive messages on the device.
Call Forward
Call forward settings can be accessed under the Settings tab > Call forward.
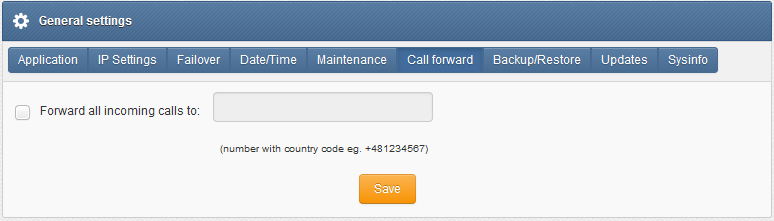
You can choose to forward all incoming calls to a chosen number
MMS
MMS Settings can be accessed under the Settings tab > MMS.
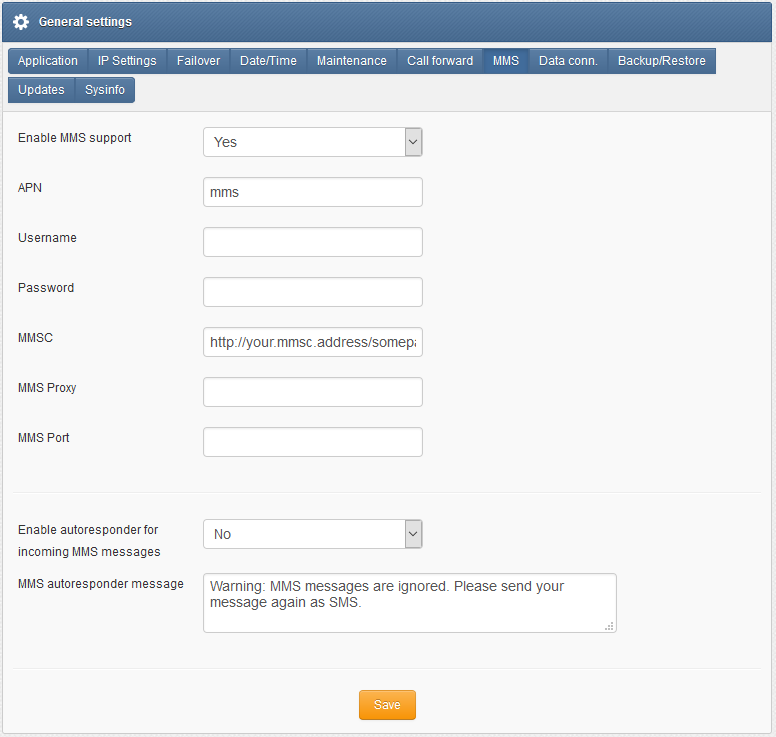
You can enable MMS support
You can set APN value
You can input APN username
You can input APN password
You can set MMSC
You can set MMS Proxy
You can set MMS Port
You can set autoresponder for incoming MMS messages
You can input MMS autoresponder message
You can load the default values for your SIM carrier using “Read APN Settings” button or enter values found on the website of your SIM operator.
Data Connection
Data connection settings can be accessed under the Settings tab > Data conn.
Here you can control a mobile data connection on your device. It can be used, for example, to utilize SMSEagle as a backup Internet source. Data connection is NOT REQUIRED for normal operation of SMSEagle device. Leave it disabled (OFF) if you don’t want to use it.
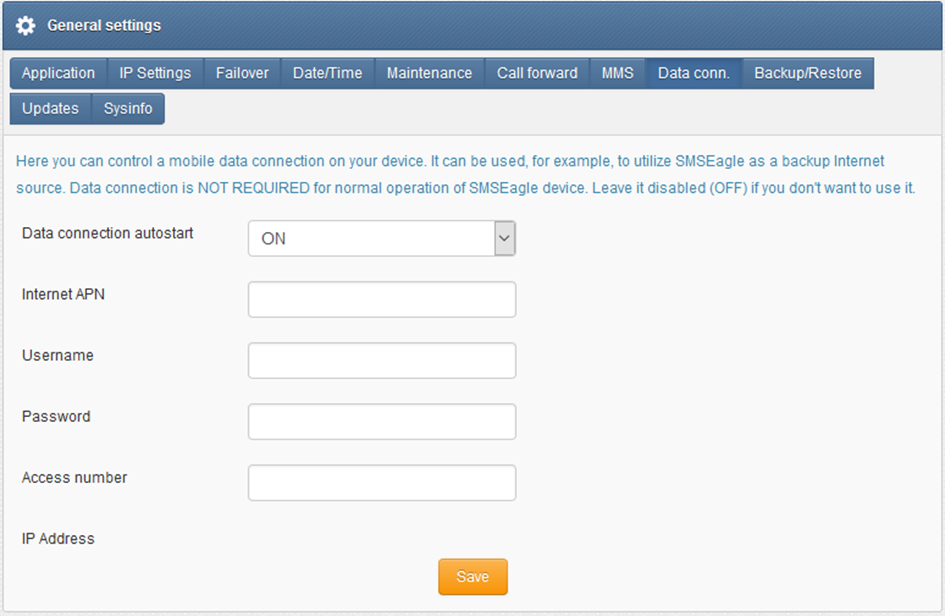
You can choose to autorestart data connection
You can input Internet APN
You can input APN username
You can input APN password
You can input access number
You can view the IP address of your device
You can load the default values for your SIM carrier using “Read APN Settings” button or enter values found on the website of your SIM operator.
SNMP
SNMP Settings can be accessed under the Settings tab > SNMP
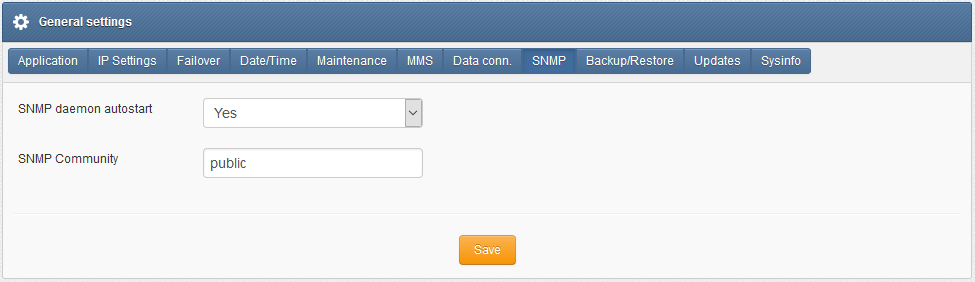
You can enable/disable SNMP daemon
You can set your SNMP community name (custom value)
SNMP deamon is required only when you want to monitor your device from external monitoring solutions like Network Monitoring Systems, etc. You can read more about custom SNMP metrics available on SMSEagle device in SNMP agent chapter.
SSL Certificate and HTTPS Redirection
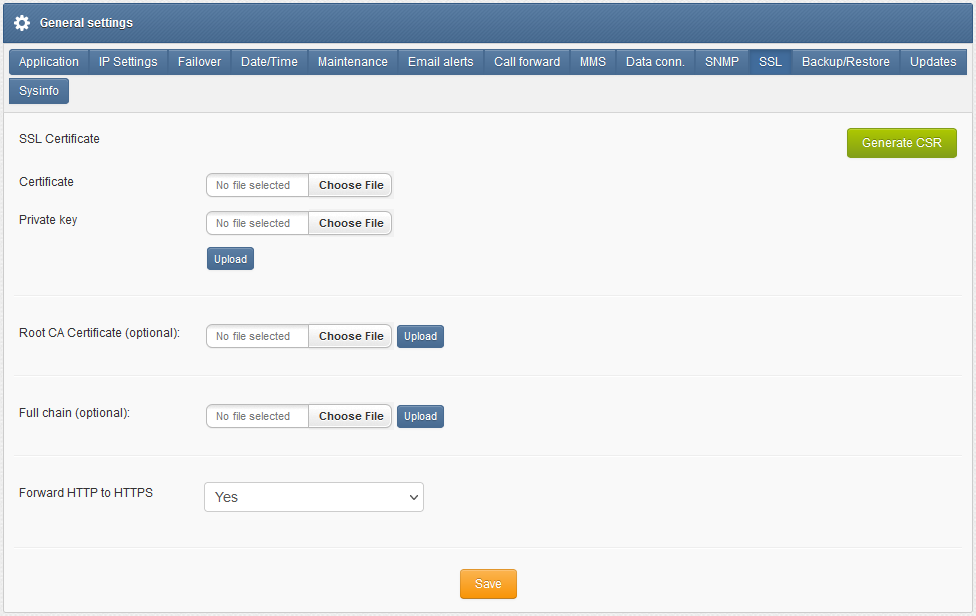
SSL settings can be accessed under the Settings tab > SSL. The settings allows you to upload an SSL certificate to your device and forward HTTP to HTTPS traffic.
**
SSL Certificate**
BY default, SMSEagle device is equipped with a self-signed SSL certificate. If you want to install your own certificate on the device, please obtain a valid certificate file issued by a Certificate Authority. To upload the certificate, please provide the certificate file and private key in PEM format. The certificate cannot be password protected.
Notice: If you want to use Let’s encrypt certificate, please follow this guide in our knowledgebase.
Root CA & Full chain (optional)
If you need to add root CA or full chain certificate, you may upload them using “Root CA Certificate” and “Full chain” controls.
Forward HTTP to HTTPS
For optimal security, we recommend using HTTPS-only connections with your SMSEagle. You may easily forward HTTP to HTTPS traffic by setting “Forward HTTP to HTTPS” to “Yes”.
Generate CSR
This feature simplifies a process of obtaining SSL certificate. It creates two files:
CSR file (Certificate Signing Request). It is needed in a SSL certification procedure. It is a file containing an encrypted text generated by the server on which the certificate is to run. It contains information that will be used in the certificate, such as: name of the organization, domain name, city, country. It also contains public key that is used to encrypt transmitted information.
Private key. CSR file private key (decryption key) must be kept for exclusive information of the certificate owner. This file should be uploaded together with SSL certificate.
Backup/Restore
Backup and restore settings can be accessed under the Settings tab > Backup/Restore
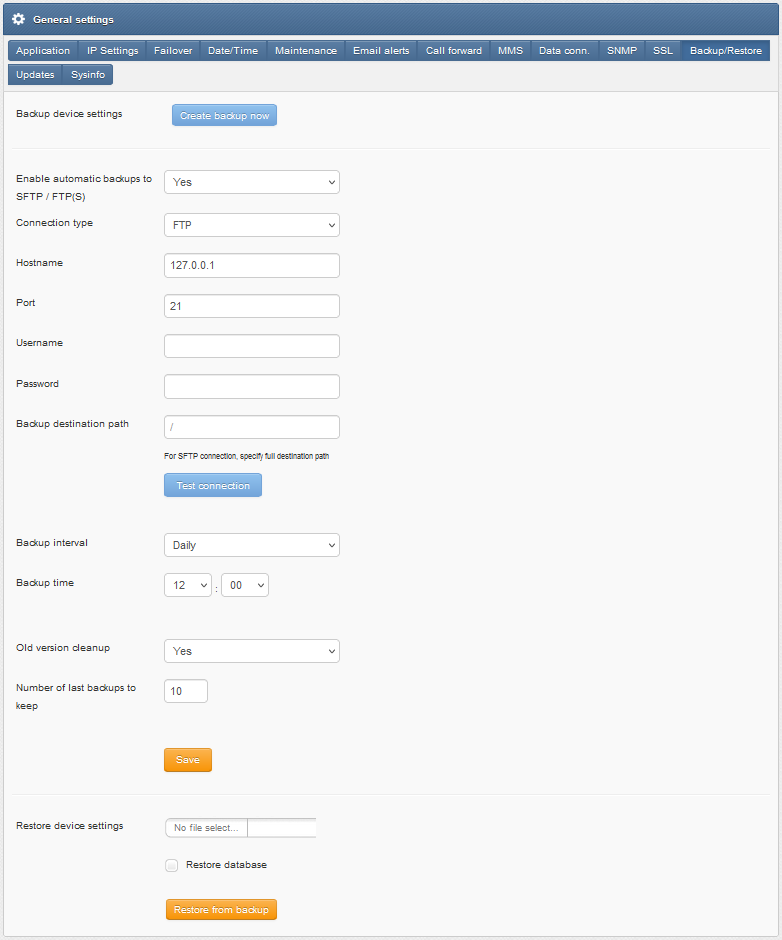
You can create a backup of your device settings
You can enable automatic backup to SFTP/FTP(S)
You can set automatic backup interval (daily/weekly/monthly) and time
You can select how many backups to keep (delete backups)
You can restore device settings form a previously saved file
You can choose to additionally restore the database
*WARNING* Restore backup settings only works with the same version of device and software.
Updates
Update settings can be accessed under the menu Settings > Updates tab.
SMSEagle software is under process of continual improvement. We listen to our customers, and new releases are based on our customer’s inputs/requests. Software updates are released frequently, and offer access to new features and fixes to reported issues. Web-GUI offers you a possibility to automatically check for new software updates. This can be done in two ways:
Manual check
In order to manually check for available software updates, go to menu Settings > tab Updates. Click on the button “Check for software update now”. At the top pops up a balloon in red with information if it is up-to-date.
Automatic check
In order to start automatic checks for software updates go to menu Settings > tab Updates, and check the option “Automatically check for software updates”. This will enable periodic checks (once a month) for available software updates. If a new update is available, a message “Update Available” will appear in menu Settings> Sysinfo – next to the current software version number.
If you select “Notify Admin about new software version by SMS”, the device will additionally send SMS to the default admin account (if the phone number is entered in the account) with a notification about new software update.
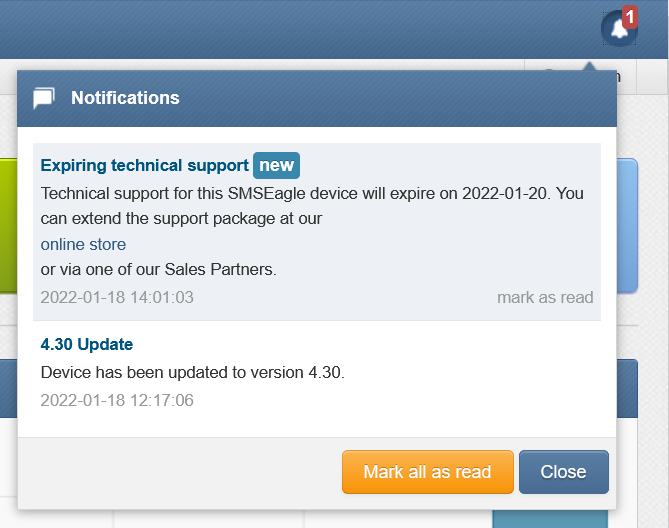
Expiring Technical support Notification
Similar to automatic software update checks, mechanism for technical support validity provides information about the technical support expiry date. A month before expiration of a support package your device will notify you about the upcoming expiration date and conveniently provide a link to our online store and sales partners where you can renew your package.
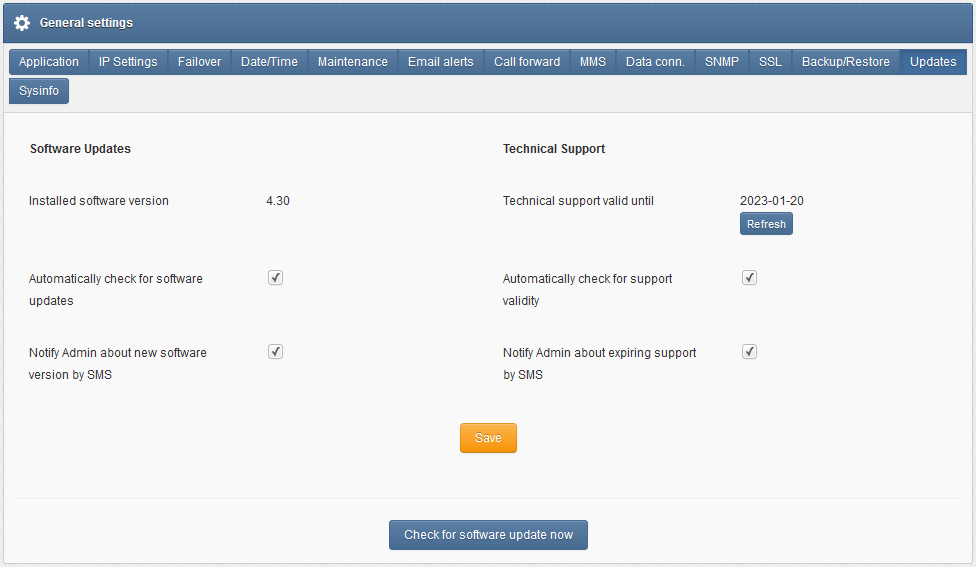
Screenshot from “General Settings-Updates”
Notice: Your SMSEagle device must have a HTTPS connectivity with the server updates.smseagle.eu for this feature to work.
Logs
Available in menu Settings > Logs section presents a visual representation of most important device logs.
The following device logs are available via web-GUI:
Modem log
Database log
System log
Application log
You may also download full device log package for troubleshooting and support. This can be done using a button “Download device logs”

You can choose to download device logs from last 14 days, 30 days or all.
Sysinfo
General device and system information can be accessed under the menu Settings > Sysinfo.
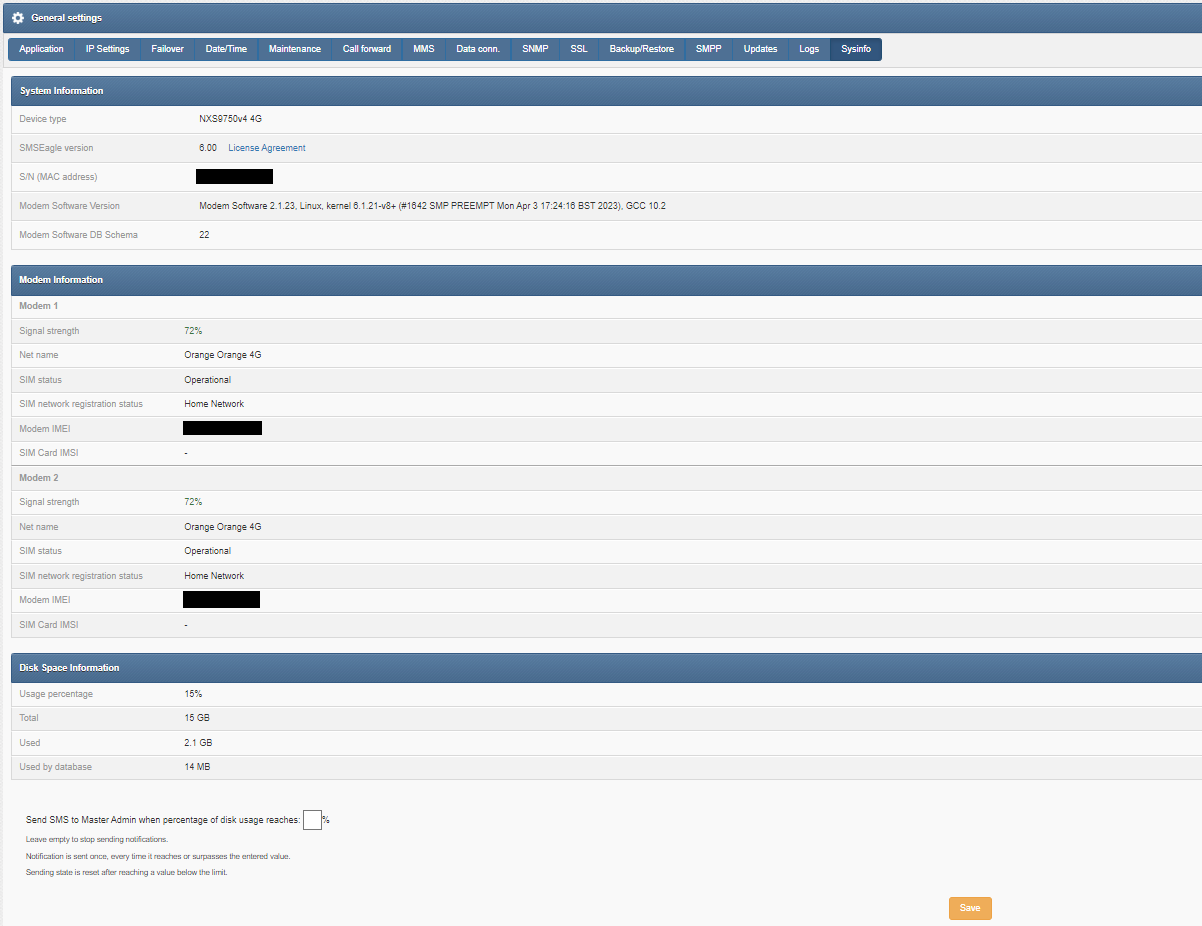
The system information contains:
device model and serial number (MAC)
software version
modem information: SIM status, signal strength, network registration status, modem IMEI
disk space availability
You can configure SMS notifications to be sent when disk usage reaches a specific value. The SMS alert will be sent to the phone number assigned to the user with the role of Master Admin (id=1).
Failover (HA-cluster) feature
“High-availability clusters (also known as HA clusters or fail over clusters) are groups of computers (…) that can be reliably utilized with a minimum of down-time. They operate by using high availability software to harness redundant computers in groups or clusters that provide continued service when system components fail. Without clustering, if a server running a particular application crashes, the application will be unavailable until the crashed server is fixed. HA clustering remedies this situation by detecting hardware/software faults, and immediately restarting the application on another system or whole node without requiring administrative intervention, a process known as failover.” (source: Wikipedia)
SMSEagle devices have their own failover mechanism based on HA-cluster. This feature allows you to assure high availability of SMSEagle devices in critical environments. To enable failover (HA-cluster) you need 2 devices (‘aka’ nodes). The failover feature monitors devices working in the cluster, and detects faults with the following services:
Apache2 WWW server
PostgreSQL database
SNMP agent
Modem software (Gammu-SMSD daemon)
Accessibility (response to ping) of whole node.
Every node in a cluster can have one of three states:
Master: main healthy node in a cluster, by default accessible through Virtual IP
Backup: second healthy node in a cluster, ready and waiting for replacing Master when needed
Fault: node with detected service fault
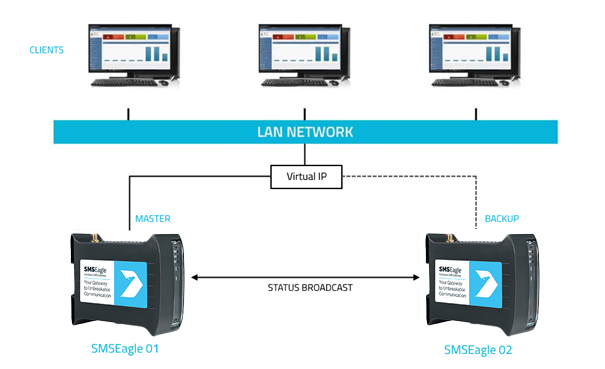
In the cluster you have one MASTER device and one BACKUP device. HA-cluster is accessed via Virtual IP address. When the daemon running at MASTER device detects failure of at least one described feature it immediately automatically switches cluster’s IP assignment to the BACKUP device (node) providing continuous usage of the SMSEagle HA-cluster for the user.
Devices (nodes) should see each other on the network. By default, HA-nodes use 224.0.0.18 multicast IP address for VRRP (Virtual Router Redundancy Protocol) for communication between two nodes. If nodes are on the same network (same subnet & IP range) there is no need for any network configuration. If two nodes are behind firewalls, make sure firewall is configured to accept multicast and VRRP protocol (IP Protocol #112).
How to configure failover (HA-cluster):
Failover cluster can be easily configured using Web-GUI. Configuration can be done in menu “Settings” > tab “Failover”. The configuration should be exactly the same on both devices in HA-cluster.
Please configure first MASTER then BACKUP device. For each device in failover cluster:
enter virtual IP address in the field “Virtual IP Address”
enter Master and Backup IP addresses (these should be physical addresses of your devices)
set “Enable Failover cluster” to “Yes”
optionally you can enable database replication between nodes
Save configuration. Reboot each device after saving.
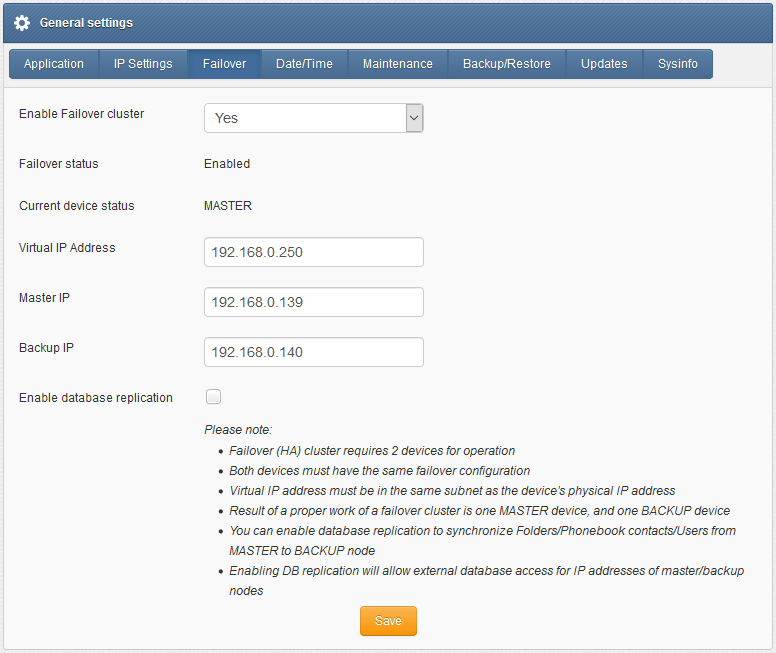
Screenshot from “General Settings-Failover”
SMS notification on state changes
The Failover feature can optionally send SMS notifications when the cluster state changes (e.g. when any node switches to MASTER state, for example: BACKUP > MASTER, or FAULT> MASTER). This allows administrators to react quickly to infrastructure failures without having to monitor the device manually. SMS notification can be enabled in the Failover configuration tab. Notifications are automatically sent to the phone number assigned to the primary Admin account (id=1).
Database replication
Database replication (optional) allows to automatically replicate database content between nodes from MASTER to BACKUP. In the current software version, the following content is replicated: Folders (with messages), Phonebook contacts, Users.
We recommend to use the same device models for seamless replication between nodes.
After correct configuration of the HA-cluster you should access the cluster via its Virtual IP address.
SNMP-monitoring of HA-cluster
Failover feature uses KEEPALIVED-MIB for SNMP monitoring.
Example of reading device cluster state value using NET-SNMP library
a) Command for reading the result value:
snmpget -v 2c -c public ip-of-smseagle .1.3.6.1.4.1.9586.100.5.2.3.1.4.1
Result:
KEEPALIVED-MIB::vrrpInstanceState.1 = INTEGER: master(2)
Comment: Current device state is master