

Troubleshooting
To make sure that the device is working properly, follow the three steps:
1. Verification of LEDs
2. Checking the device configuration (IP Settings)
3. Check the device logs (description below)
Verification of LEDs
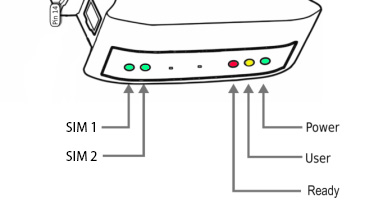
Normal operation of the device is signaled by LEDs as follows:
LED |
Correct operation |
|---|---|
Power (PWR) |
Continuously lit |
User |
Blinks during flashdisk read/write |
Ready (RDY) |
Blinking |
SIM1 (only 3G device) |
Slow flashing in stand-by mode, Quick flashing when modem 1 in use |
SIM2 (only 3G device) |
Not used |
Checking the device information
The device information (device type, software version, modem IMEI, IMSI, network signal strength, network name) can be found under menu “Settings” > “Sysinfo”.
Device logs
Under menu “Settings” > “Logs” you can find latest lines of device logs: modem log, database log and system log. In case of any problems with the device these logs are a valuable source of troubleshooting information.
Extended device logs can be downloaded via button “Download device logs” in menu “Settings” > “Logs”.
When the device is not reachable
Check if the device is correctly connected to the network. Check LED status of RJ45 socket.
In the case when the device does not respond due to a malfunction or incorrect user settings please reboot the device by disconnecting and connecting power source (or pressing Reset switch).
If you still cannot connect with the device, it is possible to restore to factory IP settings by using the SW button.
Restoring factory defaults
The Reset to Default Settings function allows you to quickly restore the device to its original factory configuration.
Warning
Restoring factory defaults permanently removes current user configuration. Ensure any necessary settings or data are backed up before proceeding.
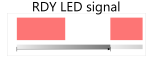
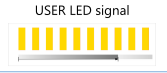
To initiate the reset, press and hold the SW button for 10 seconds. The device will enter recovery mode.
LED signaling |
USER actions |
System reaction |
|---|---|---|
|
1. When the device is ready to operate |
– |
– |
2. Press and hold SW button for 10 seconds |
Restore service is counting down. |
|
3. Release SW button after 10 seconds. User LED will begin to blink. |
System is reading factory defaults. Factory settings are being applied to the device. |
|
4. Wait until system reboots. Default settings are restored. |
System is going for a reboot. |

Hardware Rev.5 and later
The process uses a dedicated read-only recovery partition, ensuring the restore image remains intact and unaffected by normal device operation. Once recovery mode is entered, a single short beep starts a 10s countdown. A second short beep confirms the start of the restore process. The entire process typically takes a few minutes to complete.
Upon successful completion, the device signals with three short beeps, followed by a 10s countdown before automatically restarting. If the operation is cancelled during the countdown, two short beeps are emitted. In the event of a restore error, the device emits one long beep followed by two short beeps, then exits to a service shell for diagnostics.
Hardware Rev.3–Rev.4
The reset function restores only the following settings to their default values: IP settings, time zone settings, database content, and Linux OS users/passwords.
Service & Repair
Warranty
Your SMSEagle comes with a standard 2 years of technical support and hardware repair warranty coverage. The standard warranty can be extended during device purchase to 3-years coverage (check your purchase conditions). For detailed information on warranty terms and conditions check the warranty card that comes with your device or follow the link: www.smseagle.eu/downloads
Service
Before contacting with support team, be sure that you have read Troubleshooting section of this manual.
SMSEagle Support Team is available by email or telephone.
Support Portal: https://support.smseagle.eu
Email: support@smseagle.eu
Phone: + 48 61 6713 413
The support service is provided by:
Proximus Sp. z o.o.
ul. Piątkowska 163,
60-650 Poznan, Poland
When contacting support team, be prepared to provide the following information:
System Logs
Go to menu Settings > Logs > “Download device logs”. Provide log package to support team when requested.
MAC address
Each SMSEagle device has its unique MAC address. MAC address is printed on the device body or can be found in menu Settings > IP Settings