

Settings
This chapter covers the Settings section of the web interface, following the same second-level menu you see in the sidebar.
Account settings
Click your avatar (bottom-left) and choose Account settings to manage your own account, under three tabs: Personal data (name, login, phone number, interface language, compose defaults, notification sound), Password, and Security - see Web Interface Overview for the full tab layout.
How to configure Multi-Factor Authentication (MFA)
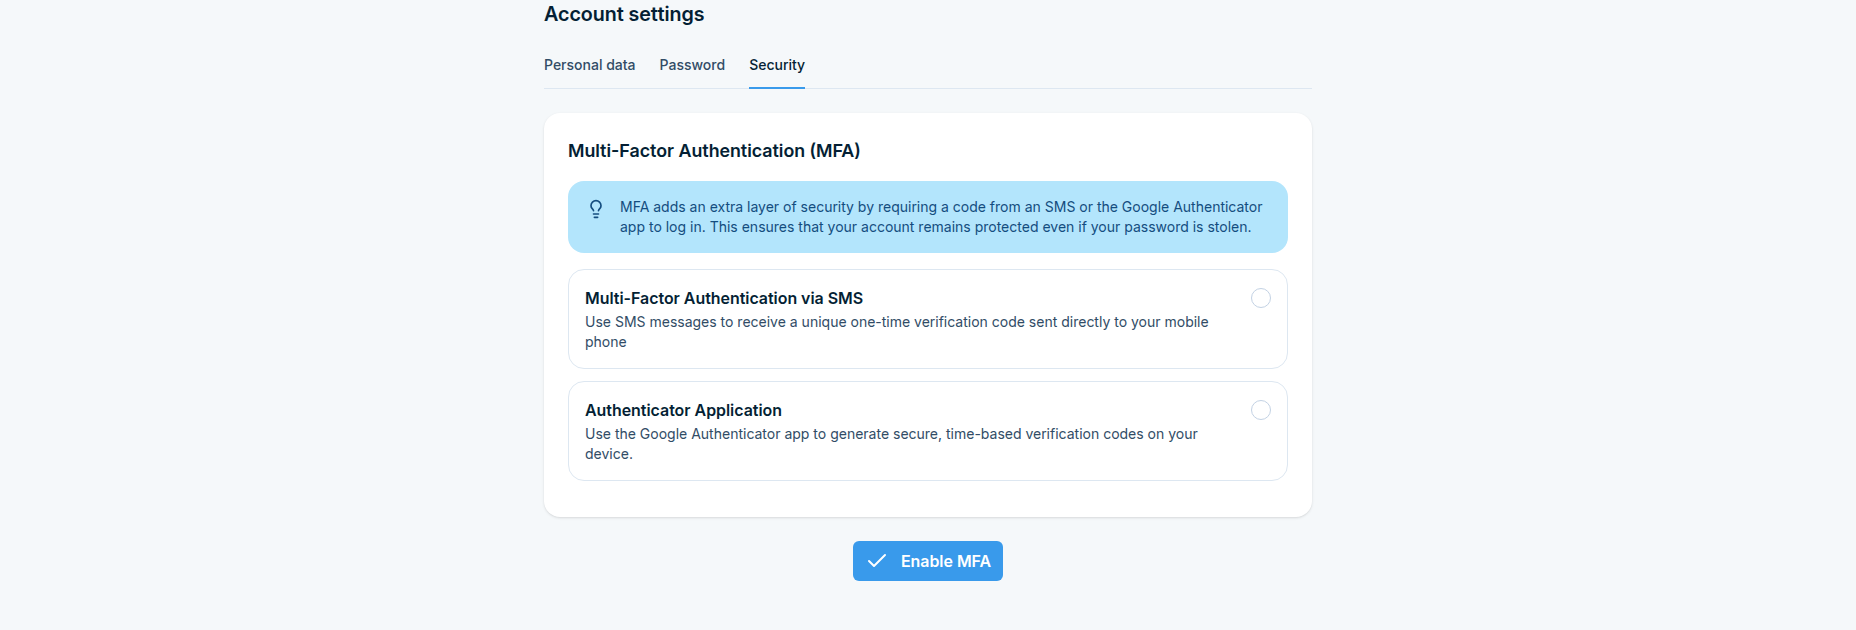
MFA adds an extra layer of security by requiring a one-time code, in addition to the password, to sign in. This keeps the account protected even if the password is stolen.
Where to find it
Per user: Account settings > Security (
/settings/account/security), for your own account.Device-wide: the Two-factor authentication option on the Administrator step of the Configuration Wizard, and when creating or editing a user under System > Users.
Step 1: Choose an MFA method
Under Account settings > Security, choose one of:
Multi-Factor Authentication via SMS - a one-time verification code is sent to your mobile phone by SMS at each sign-in.
Authenticator Application - time-based codes are generated by an app such as Google Authenticator.
Click Enable MFA and follow the on-screen steps to confirm the chosen method.
Step 2: Enforce MFA device-wide (optional)
An administrator can require MFA for every account instead of leaving it optional per user. Under Administrator in the setup wizard (or per user under System > Users), set Two-factor authentication to:
Do not enforce - each user decides individually whether to enable MFA.
Enforce for all users - every existing and new user must set up MFA.
Enforce for new users - MFA is required only for accounts created from now on.
SMS / MMS
Messages
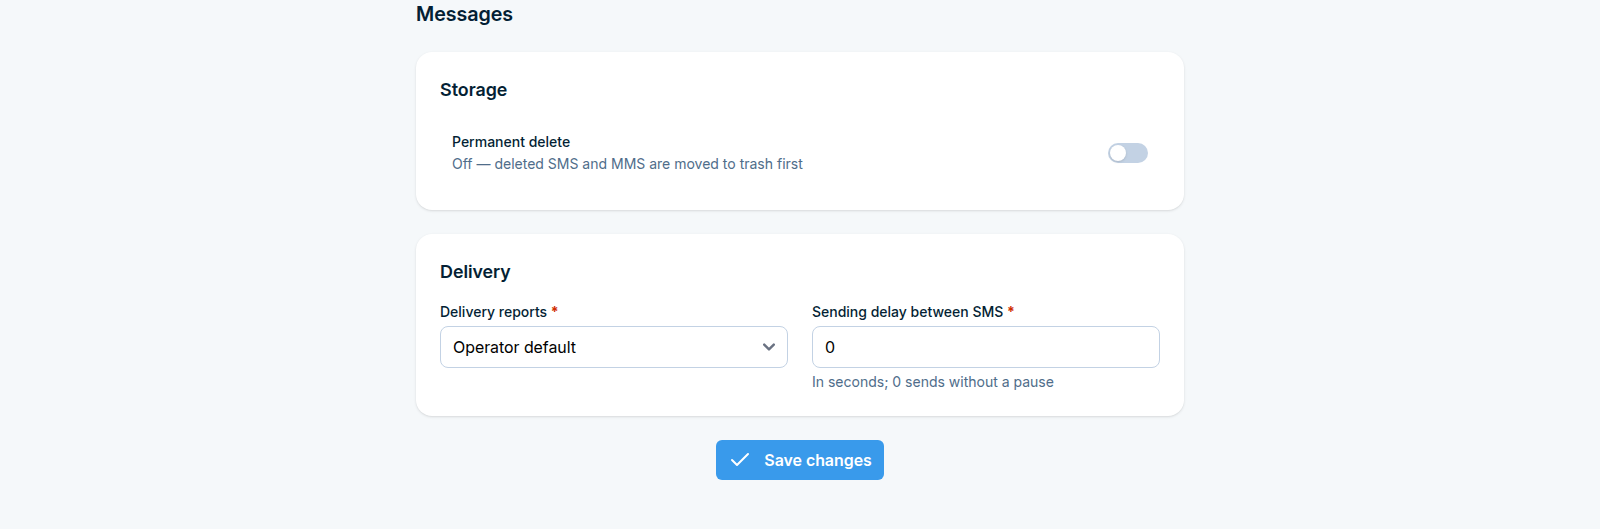
Settings > SMS / MMS > Messages (/settings/sms-mms/messages/) groups the general behavior of the SMS/MMS storage and delivery pipeline.
Storage
Permanent delete - off by default, so deleted SMS and MMS are moved to Trash first instead of being removed immediately.
Delivery
Delivery reports let you find out whether a sent SMS actually reached the recipient’s phone.
Delivery reports - Operator default (use whatever behavior your mobile operator applies by default), Always request, or Never request. Also offered during the Configuration Wizard.
Sending delay between SMS - a pause, in seconds, inserted between consecutive outgoing SMS.
0sends without a pause.
When a delivery report is requested, SMSEagle updates the message’s status in Sent Items / Outbox once the network confirms delivery (or reports a failure), and the report becomes visible in the message’s details.
Modems
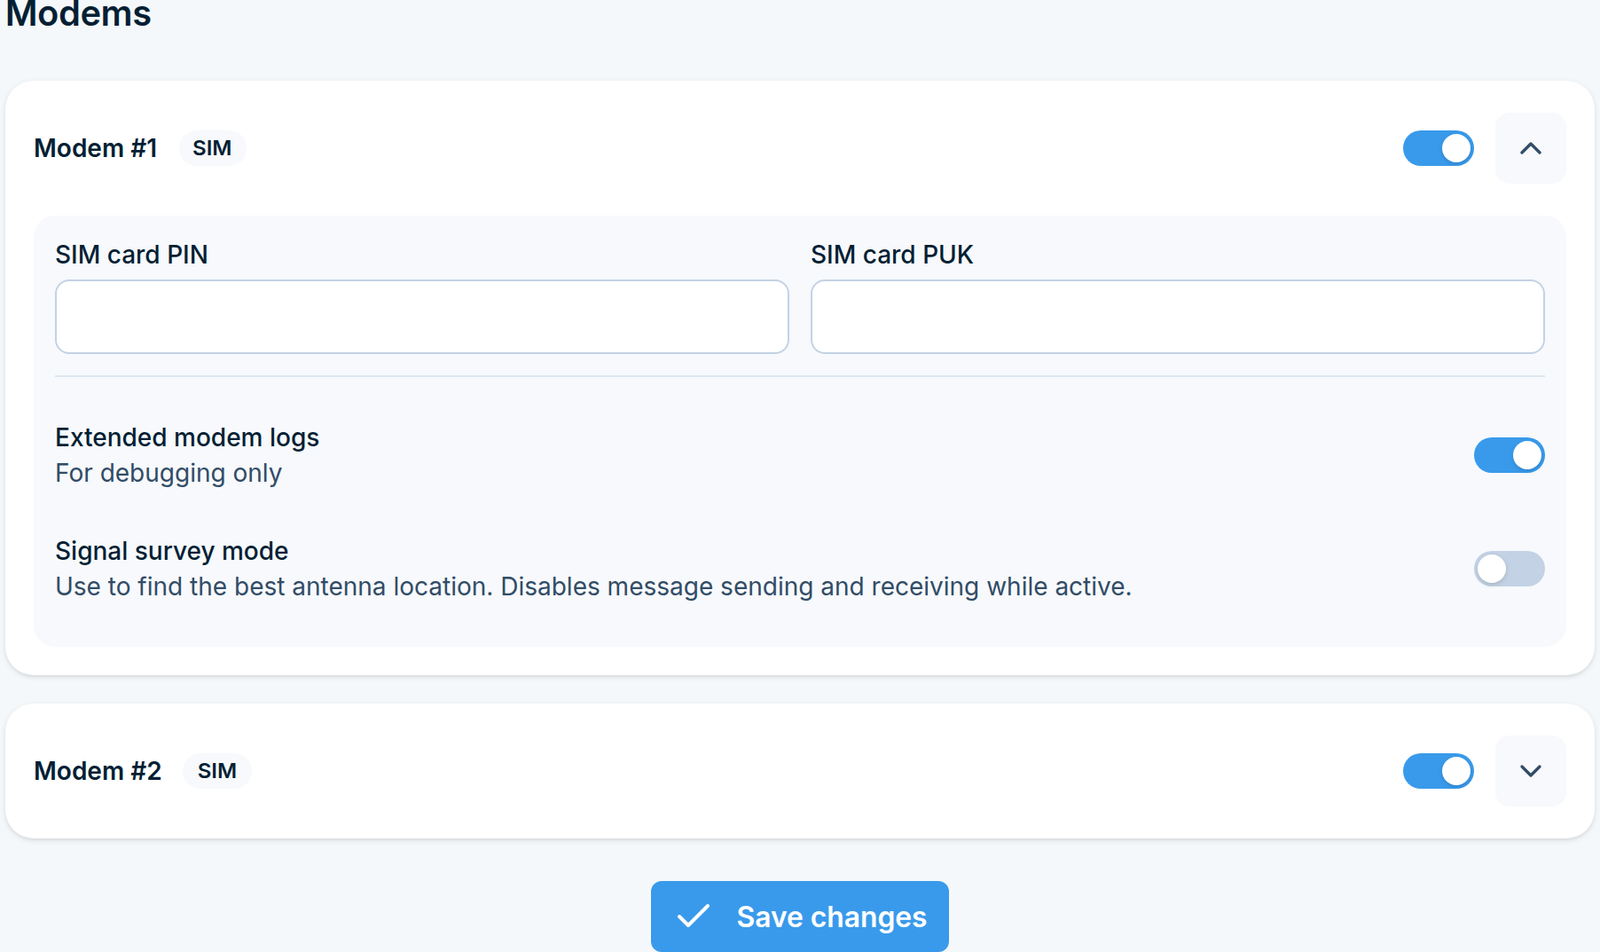
Settings > SMS / MMS > Modems (/settings/sms-mms/modems/) lists each built-in modem (Modem #1, Modem #2 on multi-modem devices) with a switch to enable its SIM. Expanding a modem’s section reveals four settings:
SIM card PIN and SIM card PUK - only needed if the card asks for them. The same two fields are offered during the Configuration Wizard.
Extended modem logs - verbose modem logging, for debugging only.
Signal survey mode - use it to find the best antenna location. It disables message sending and receiving while active, so turn it off when you are done.
Multimodem
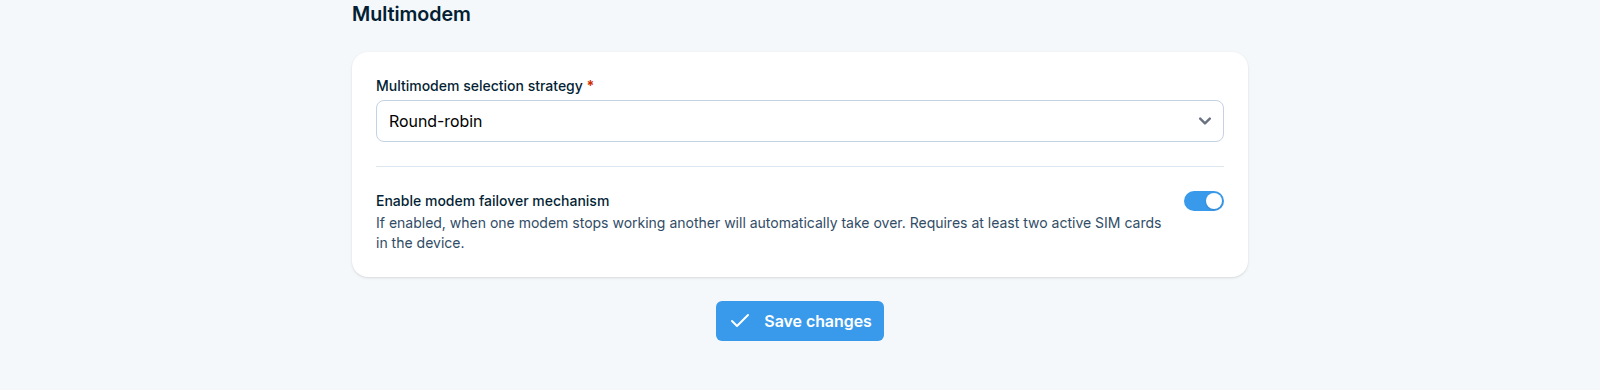
Settings > SMS / MMS > Multimodem (/settings/sms-mms/multimodem/) decides which of the device’s
two built-in modems sends each outgoing SMS, and whether another modem takes over when one stops
working. The page is available to administrators only.
How SMSEagle picks a modem
The two settings on this page are only part of the decision. For every outgoing SMS, SMSEagle checks these rules in order:
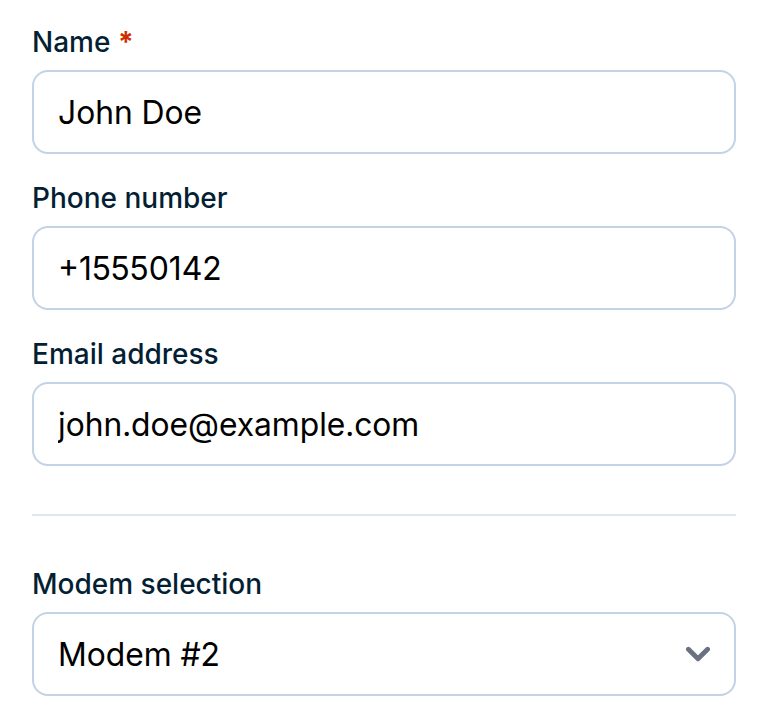
A modem chosen for the message. When the sender picks a modem, for example in Compose, with the modem parameter of an API call, or in an Automation rule limited to one modem, that modem is used and nothing below applies. The sender must be allowed to use it (see rule 3), otherwise the message is rejected.
A modem pinned to the contact. When the message goes to a Phonebook contact whose Modem selection is set, that modem is used and nothing below applies.
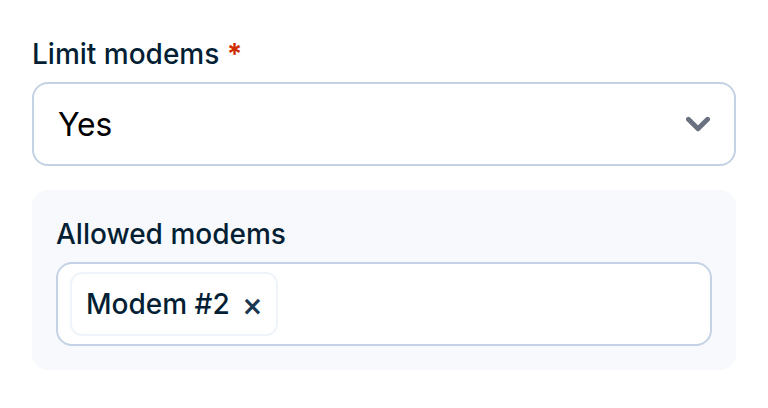
The sender’s allowed modems. Limit modems in the user’s settings under System > Users restricts the user to the Allowed modems listed there. Without a limit, the user may use every modem. Modems whose SIM is switched off under Modems are left out, unless that would leave none.
The selection strategy picks one of the allowed modems. See Multimodem selection strategy below.
Modem failover, when enabled, swaps the picked modem for the next working one if the picked modem is not working at that moment. See Modem failover below.
Multimodem selection strategy
Multimodem selection strategy offers Round-robin and one SIM N as Master modem option for each built-in modem (SIM 1 and SIM 2):
Round-robin - the sender’s allowed modems take turns: modem 1 > modem 2 > modem 1 > modem 2, and so on. Each user has a rotation of their own, so two users sending at the same time do not move each other’s turn.
SIM N as Master modem - modem N sends every message, and the other modems are used only by modem failover, when modem N is not working. A user who is not allowed to use modem N cannot send with this strategy, except for messages with a modem chosen for them (rule 1) or to a contact pinned to a modem (rule 2). Their messages are rejected with a missing modem access error.
Modem failover
Turn on Enable modem failover mechanism so that a working modem takes over from one that stops working. This requires at least two active SIM cards in the device. Failover acts at two moments:
When a message is sent. If the modem picked by the strategy is not working, SMSEagle tries the next of the sender’s allowed modems, in modem number order and starting again from the first after the last one, and uses the first working one. Messages with a modem chosen for them (rule 1) or to a pinned contact (rule 2) are not redirected at this point.
Every 2 minutes. SMSEagle checks all modems. Messages still waiting in the Outbox of a modem that is not working are moved to the next working modem that the message’s author is allowed to use. If there is no such modem, the messages stay where they are.
A modem counts as not working when any of these is true:
it has not reported to the device for more than 4 minutes,
its SIM card is not ready, for example missing or waiting for a PIN,
the device’s watchdog, which checks every modem every 2 minutes, has restarted its modem service at least 3 times in quick succession (less than 5 minutes apart), the last time within the past 5 minutes,
messages on it keep failing: at least one message in its queue has been retried 3 times, and the modem has sent nothing successfully in the last 5 minutes. When other messages in the same queue have not reached 3 retries, the problem is taken to be with the failing recipients, not with the modem.
Every redirected message is recorded in the Application log under System > Logs, as a line
starting with Modem: Modem failover triggered.
MMS
What this feature does
MMS lets the device send and receive multimedia messages: a text with images or other files attached, rather than plain SMS.
Unlike SMS, MMS does not travel over the plain GSM channel. It goes through the operator’s data network to an MMS centre, so each SIM card needs its own set of connection parameters (APN, MMSC and optionally a proxy). In SMSEagle those parameters are set per modem, under Settings > Channels > SMS / MMS > MMS.
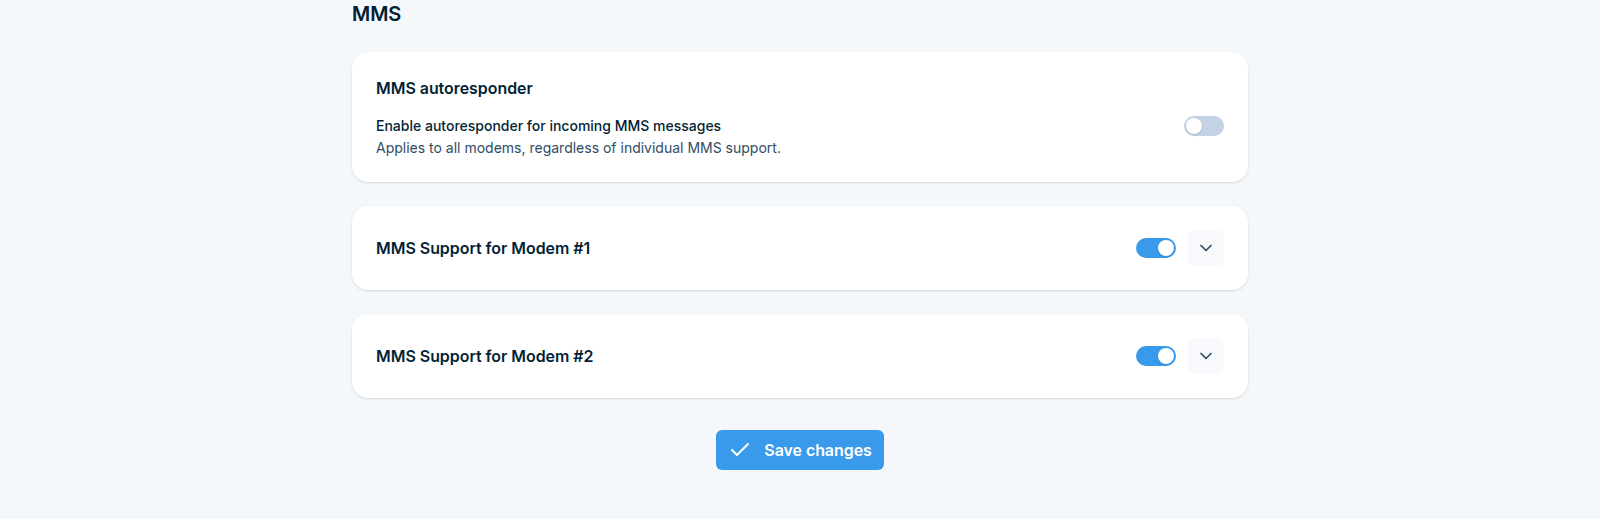
The same screen also holds the MMS autoresponder, which sends an automatic reply to every incoming MMS.
Before you start
You need the MMS settings for each SIM card from its operator: APN, MMSC address, and a proxy with port if the operator uses one. Some operators also require a username and password.
The SIM must have MMS enabled on the tariff. A SIM that can text but has no data or MMS service will fail no matter how the settings are filled in.
Many operator profiles are already known to the device, so try Read APN settings before you go looking for the values yourself.
Step 1: Open the MMS page
In the sidebar, go to Settings > Channels > SMS / MMS > MMS.
The MMS page shows the MMS autoresponder box at the top, then one collapsible section per modem, headed MMS Support for Modem #1, #2 and so on, as in the figure at the start of this section.
Step 2: Enable MMS on a modem
Each modem section has a switch next to its heading. Turn it on for every SIM that should handle MMS.
Then click the arrow on the right of the heading to expand the section and fill in the connection parameters.
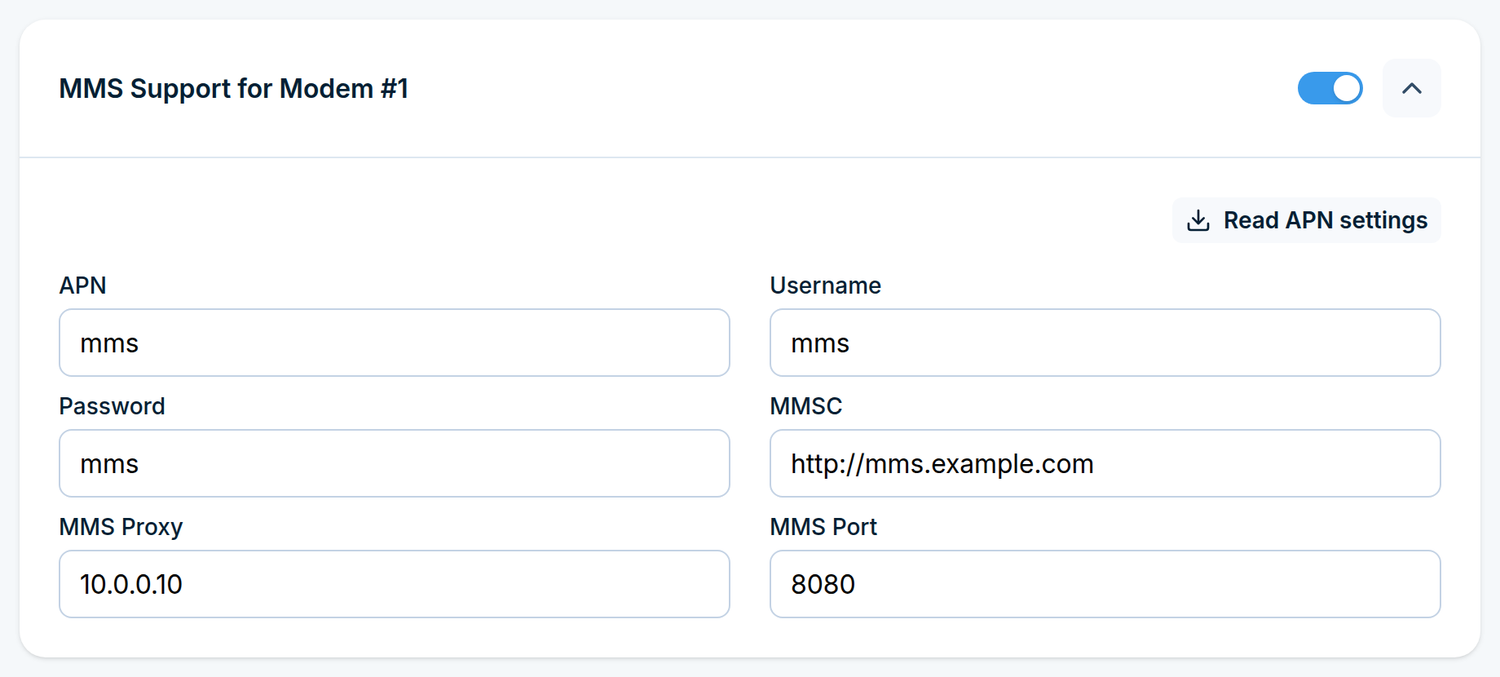
An expanded modem section, with Read APN settings above the fields
Step 3: Fill in the connection parameters
The quickest route is the Read APN settings button at the top of the expanded section. It looks up a matching configuration for the SIM currently in that modem and fills the fields in for you. If no match is found, SMSEagle reports it and you enter the values by hand.
Field |
What to enter |
|---|---|
APN |
The operator’s access point name, for example |
Username |
The APN user, if the operator requires one. Leave empty otherwise. |
Password |
The APN password, if required. |
MMSC |
The address of the operator’s MMS centre, for example |
MMS Proxy |
The proxy address, if the operator uses one. Leave empty otherwise. |
MMS Port |
The proxy port. Only needed together with a proxy. |
Every field belongs to that one modem. Two SIM cards from different operators need two different sets of values, so repeat this for each modem you enabled.
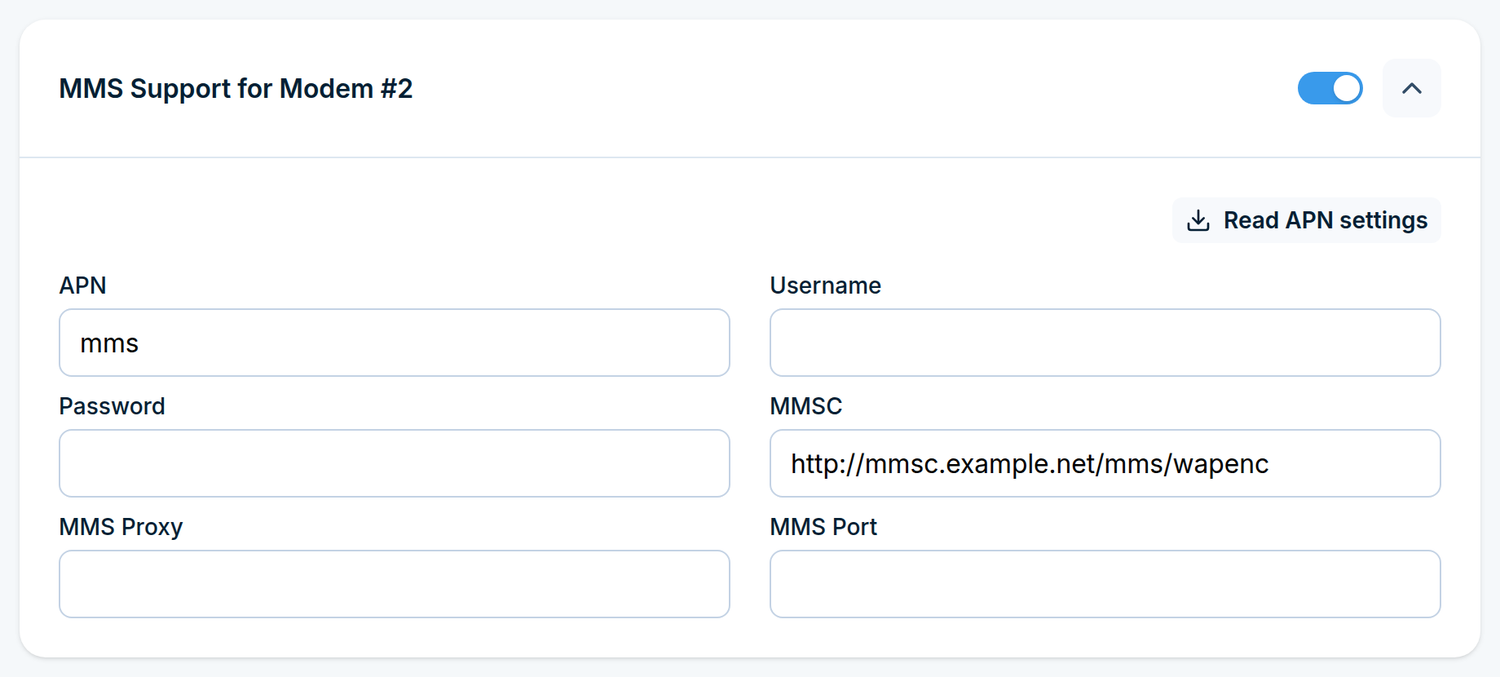
The second modem carries its own values, and needs no proxy in this example
Step 4: Set up the autoresponder (optional)
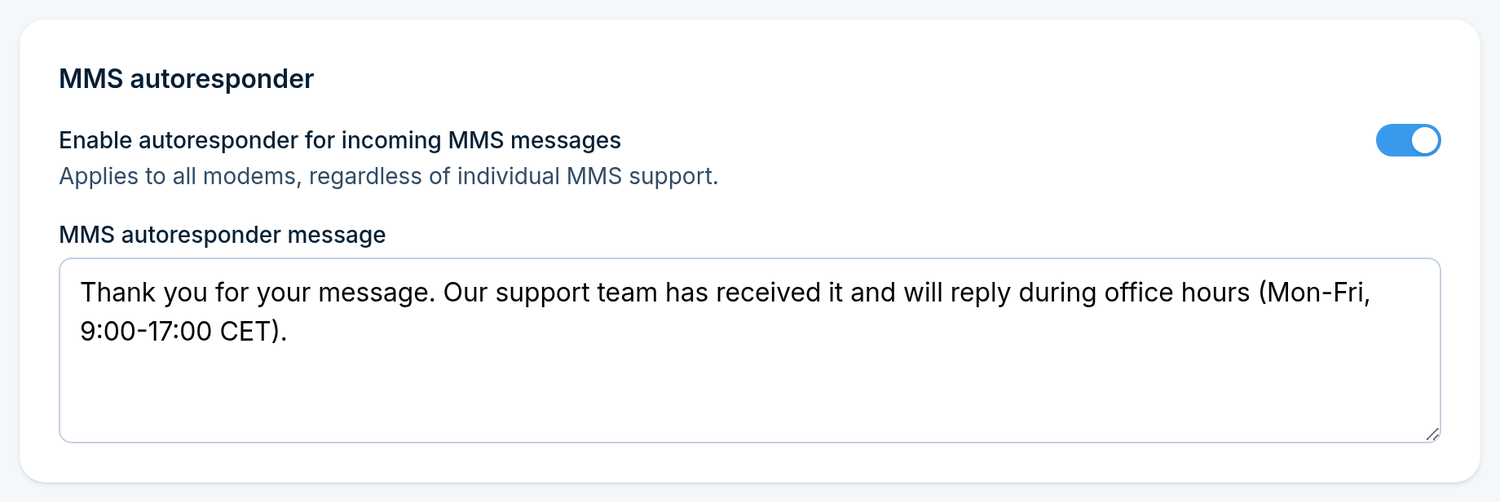
The MMS autoresponder box at the top of the MMS page sends an automatic reply whenever an MMS arrives.
Turn on Enable autoresponder for incoming MMS messages.
Type the reply in MMS autoresponder message.
The autoresponder applies to all modems, regardless of individual MMS support. It is a single global setting, not a per-modem one, and there is one reply text shared by every incoming MMS, so keep the wording general.
Step 5: Save and reboot
Click Save changes.
A reboot is needed. After saving, SMSEagle asks you to reboot the device so the MMS changes take effect. Until you do, the new parameters are stored but not yet in use.
Calls
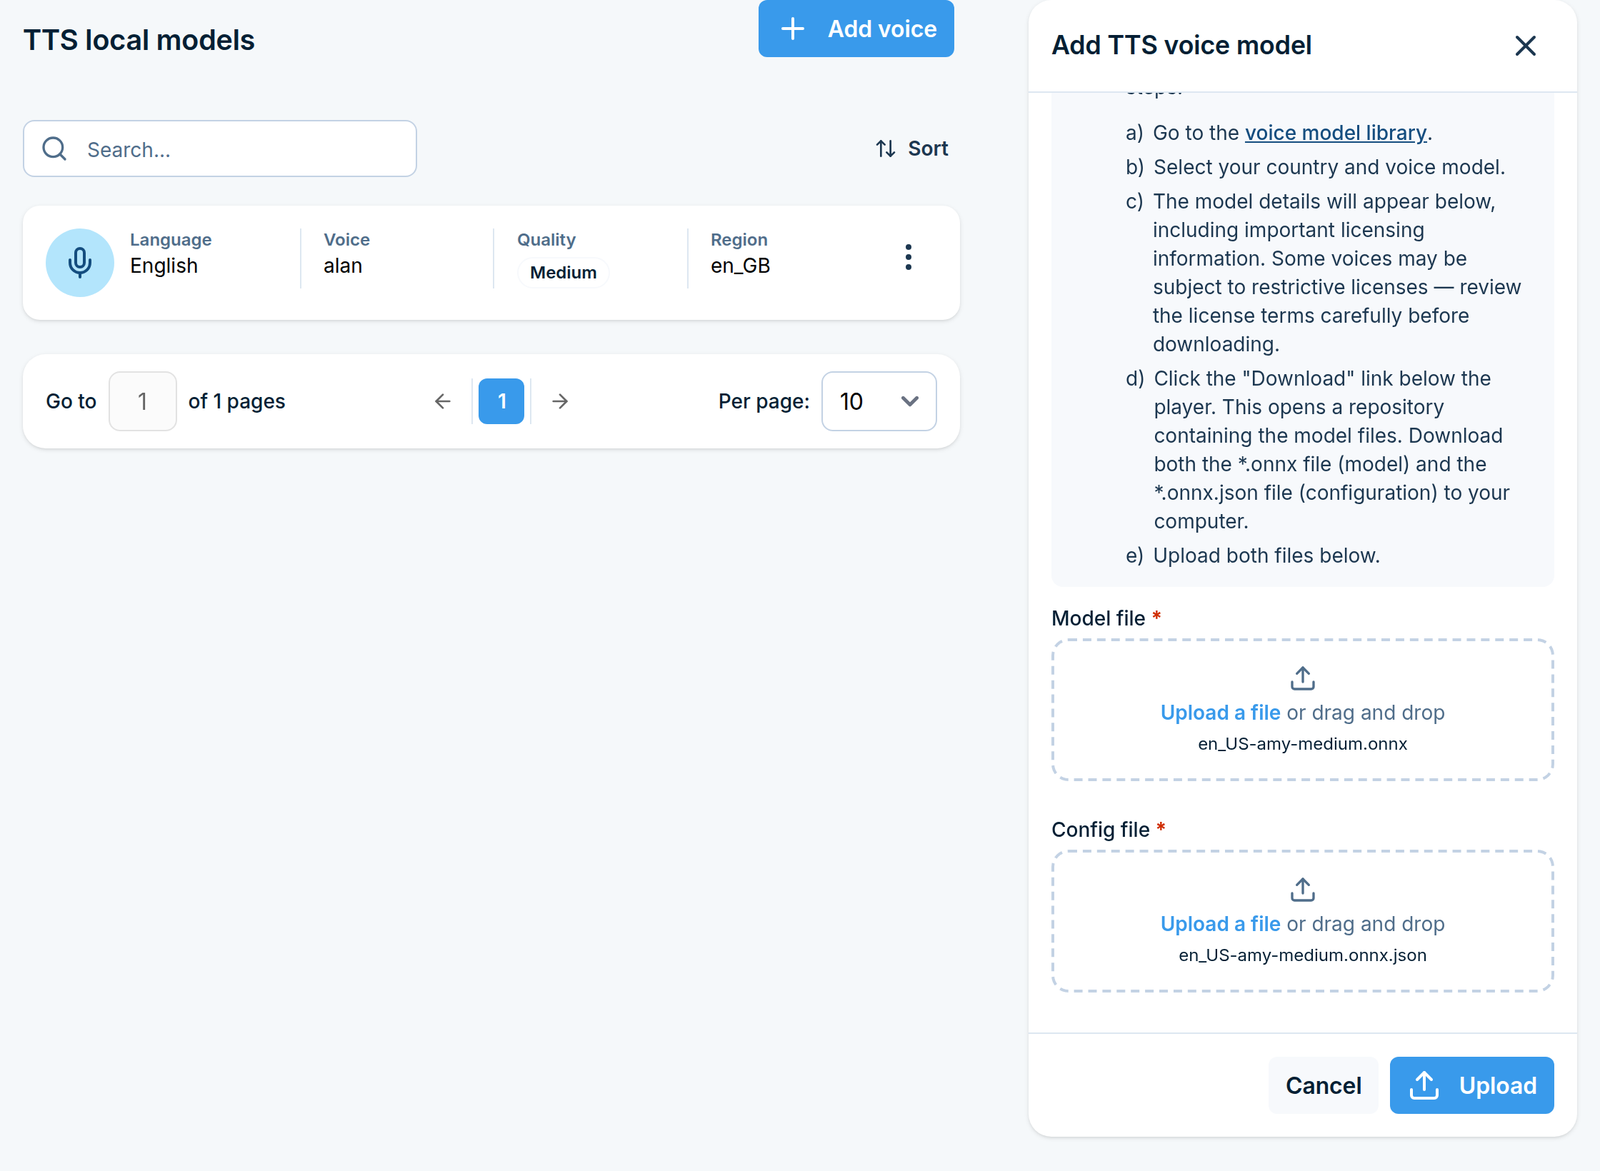
TTS local models
Local voice models power Text to speech - advanced. They run on the device, so no internet connection is needed once a model is installed.
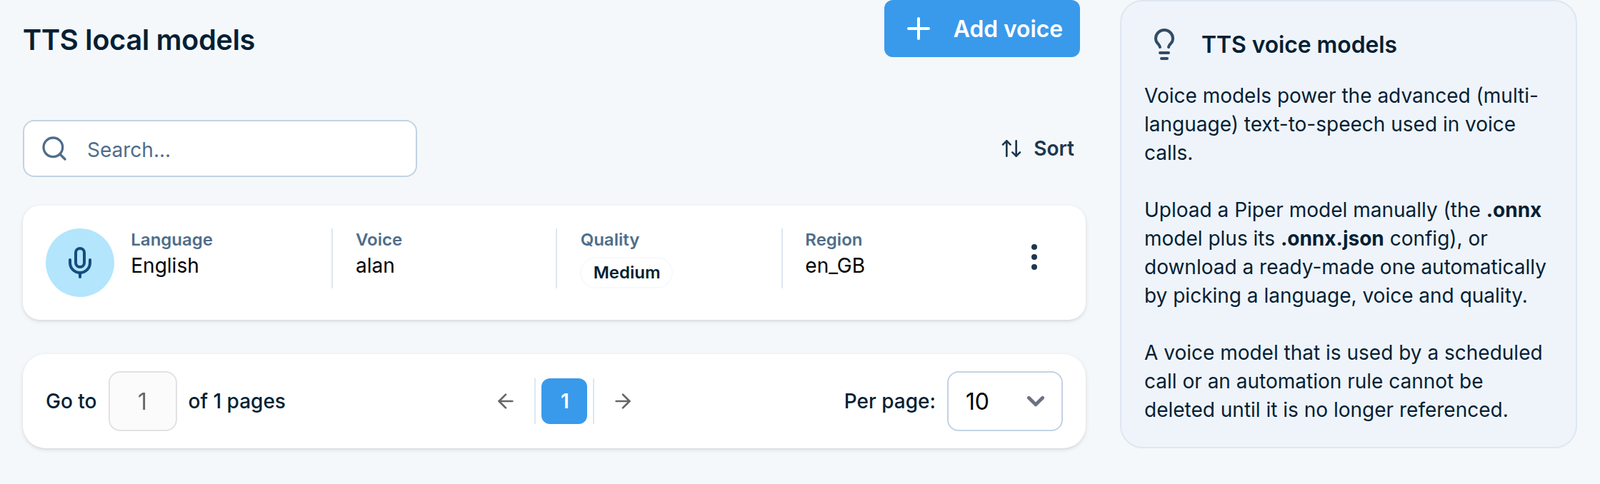
Go to Settings > Channels > Calls > TTS local models. The page lists the installed models with their language, region and quality.
Add a model
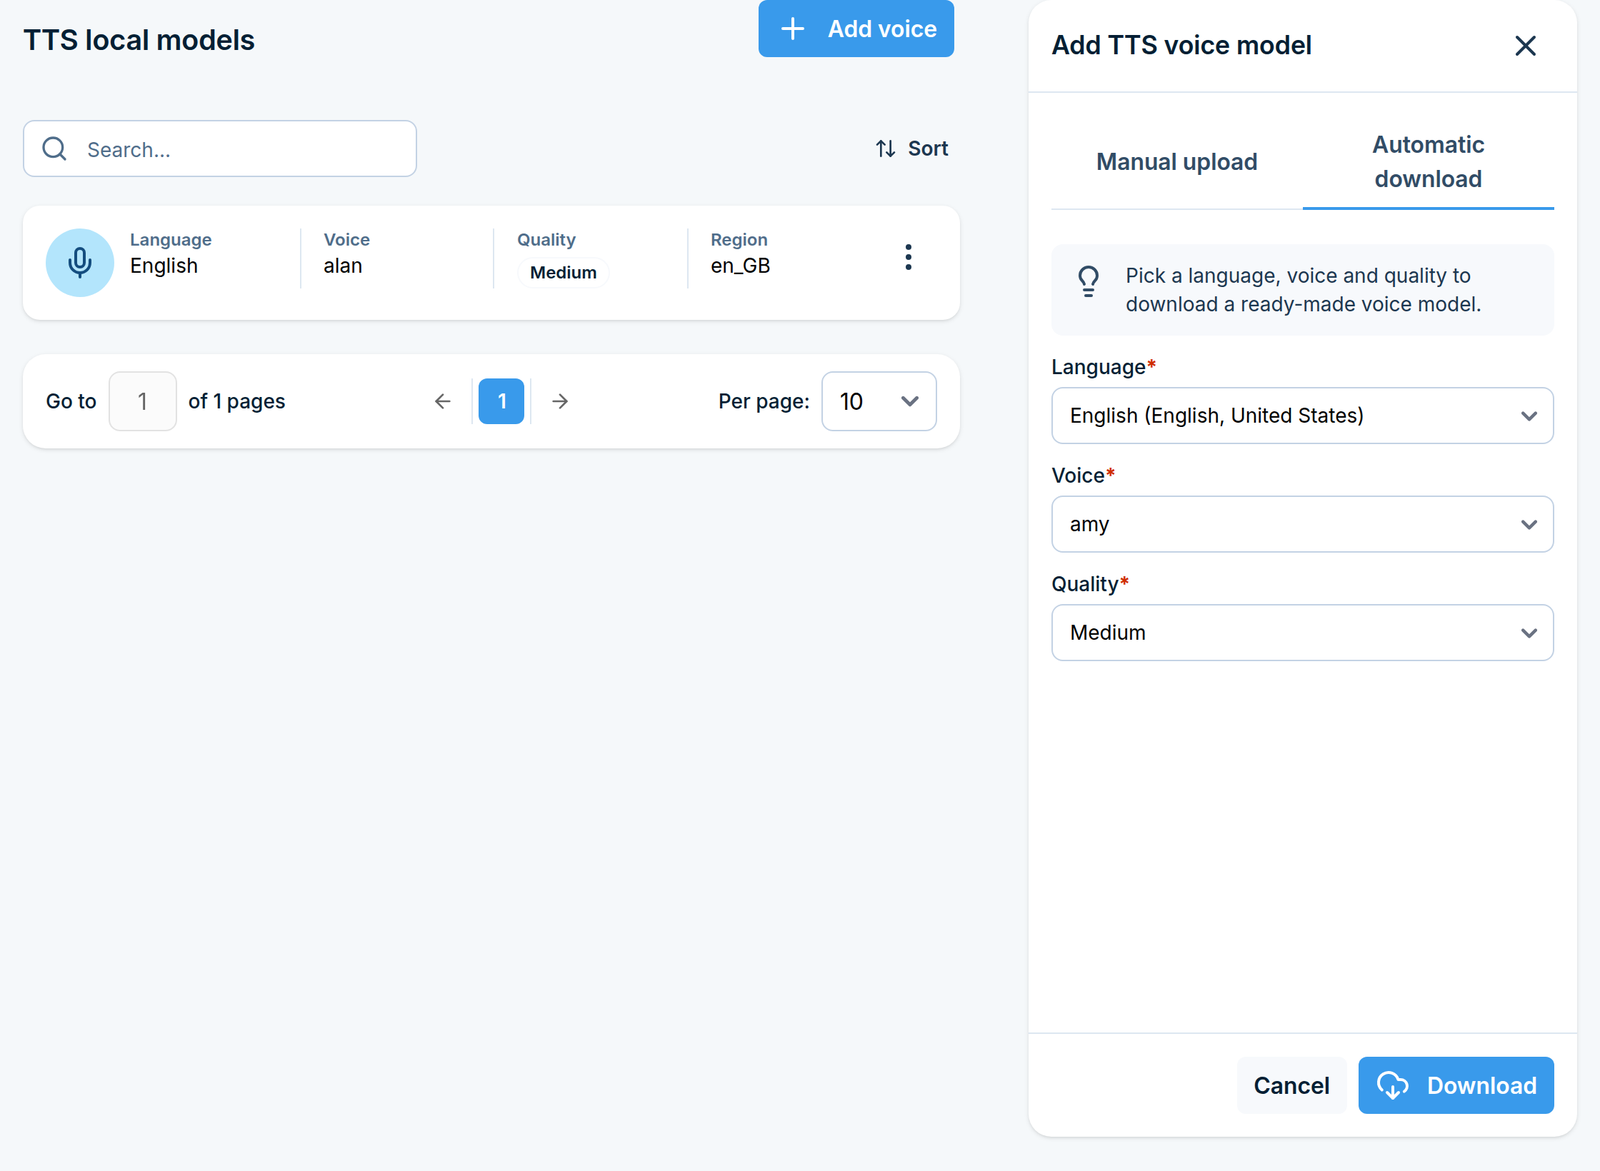
Click Add voice in the top right corner. The panel offers two ways to do it.
Automatic download (the easy way)
On the Automatic download tab, pick in order:
Language
Voice
Quality - Very low, Low, Medium or High
Click Download. A progress bar shows the download, and the model appears in the list when it finishes.
Higher quality means a more natural voice but a larger file and slightly slower synthesis. Medium is a good default.
If the panel reports “Voice list unavailable”, the device could not reach the online voice catalogue. Check the network settings and try again later, or use manual upload instead.
Manual upload
On the Manual upload tab you provide a voice model yourself:
Model file (.onnx) - the model itself.
Config file (.onnx.json) - its matching config file.
Both files are required and must belong together. Click Upload.
Delete a model
Use the Delete action next to a model, or tick several and delete them together.
A model that is still referenced somewhere cannot be deleted. The message tells you where it is used, for example in a scheduled call, an Email to SMS rule, a digital input or output action, or a Network Monitor task. Change or remove that reference first, then delete the model.
TTS online models (ElevenLabs)
Online models produce the most natural-sounding speech, but they use the ElevenLabs API, so they require an ElevenLabs account and an internet connection.
Go to Settings > Channels > Calls > TTS online models.
Step 1: Prepare the ElevenLabs account
In your ElevenLabs account:
Go to Developers > API Keys and generate an API key.
Give the key the permissions Text to Speech: Access and Voices: Read, then save.
Go to the Voices tab, choose the voice you want and add it to your account.
Open My Voices and copy the voice ID of that voice.
The page has a button that takes you straight to the ElevenLabs settings.
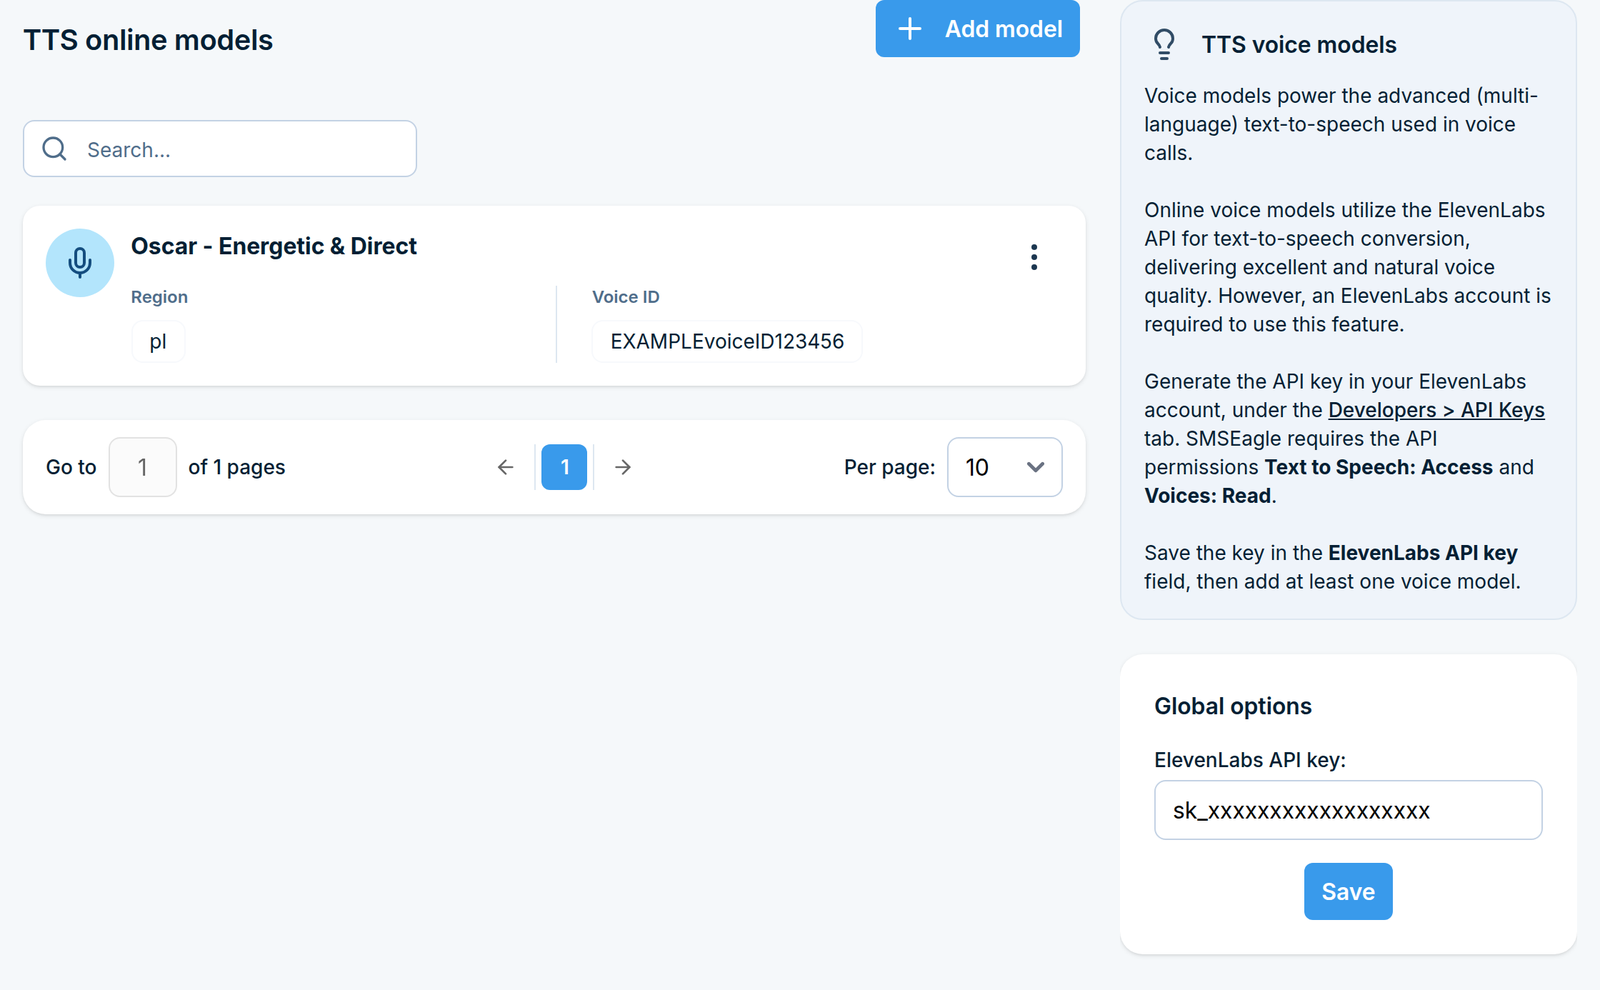
Step 2: Save the API key
In the Global options box on the right, paste the key into ElevenLabs API key and click Save.
Step 3: Add a voice model
Click Add model in the top right corner, paste the Voice ID you copied and click Save.
The rest of the model data (name, language, region) is fetched from the API automatically and shown in the list.
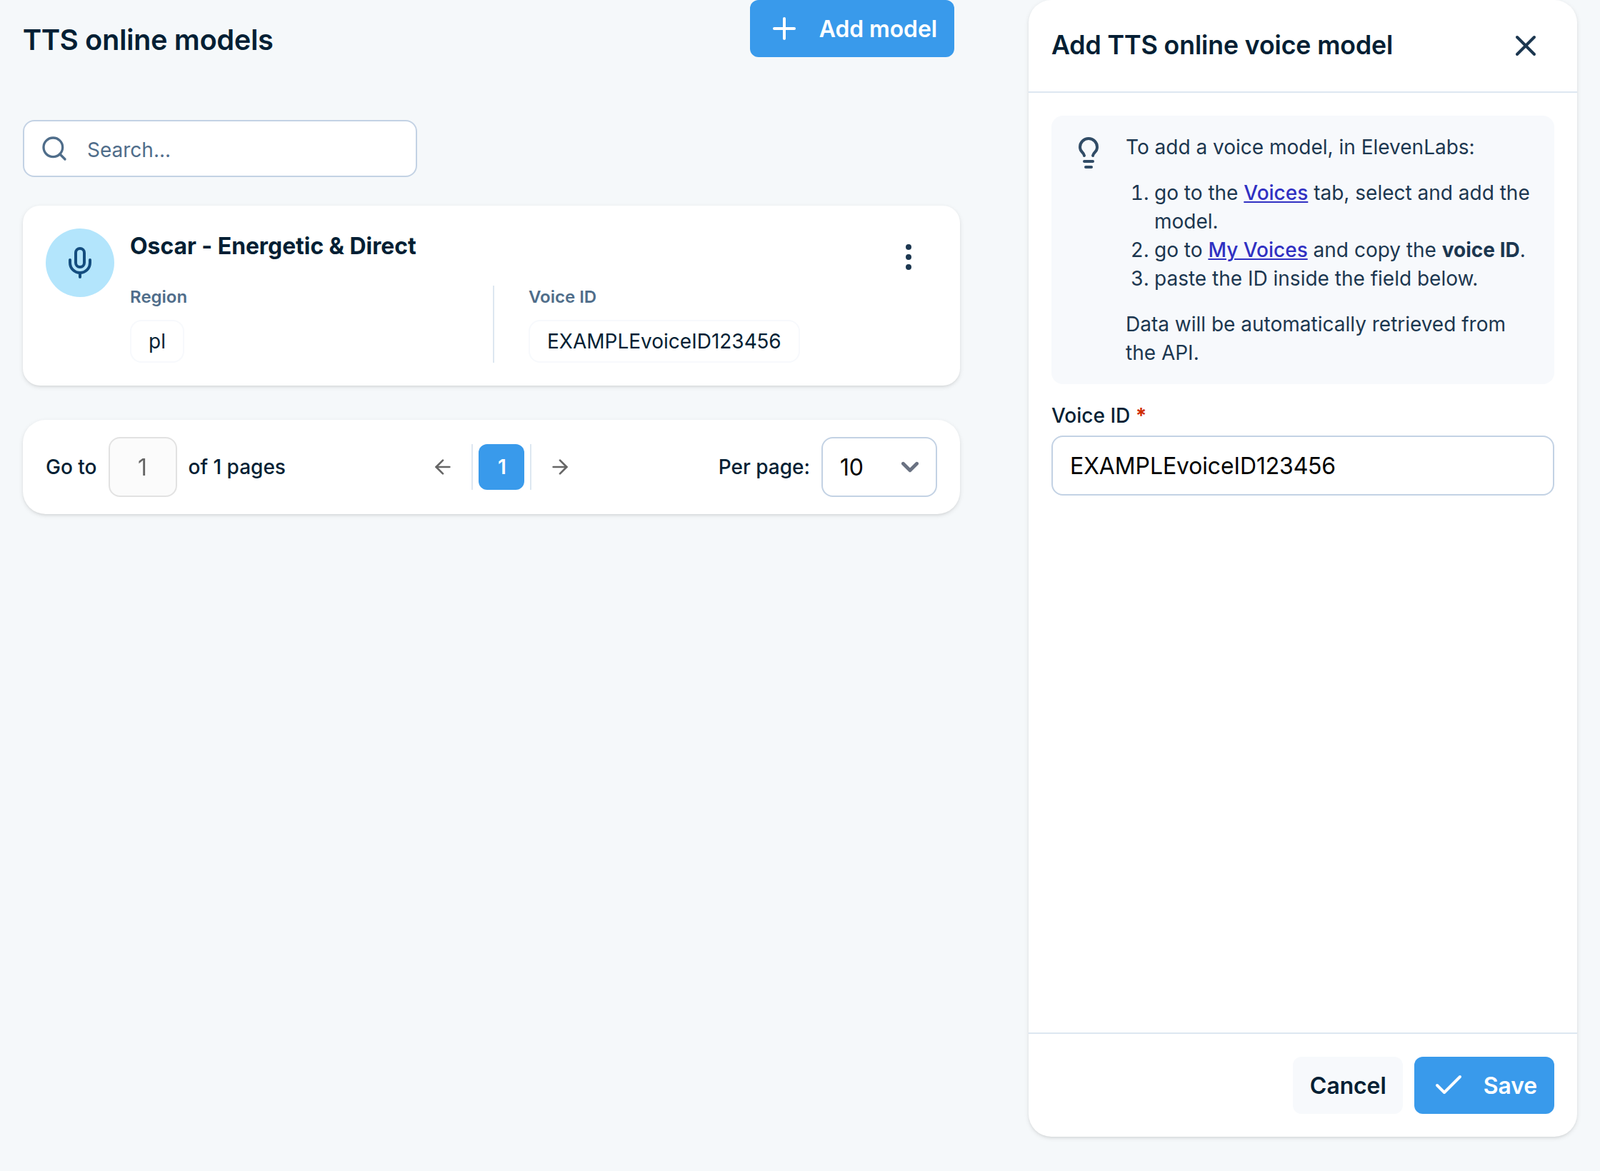
Models can be edited (to point at a different voice ID) or deleted from the list, individually or in bulk.
Incoming calls
Settings > Channels > Calls > Incoming calls (/settings/calls/incoming-calls) sets, per modem, how an inbound voice call is handled: Always accept, Always reject, or Ignore.
Call forward
Settings > Channels > Calls > Call forward (/settings/calls/call-forward) manages call-forwarding codes per modem. Not every network carrier supports forwarding codes - check with your operator before relying on this.
What this feature does
WhatsApp support lets your SMSEagle send and receive WhatsApp messages in addition to SMS. The device is linked to a WhatsApp account the same way a desktop or browser session is: you scan a QR code with the phone that owns the account.
Once linked, WhatsApp becomes another channel you can pick when composing a message, with its own conversation view. There is also a fallback option, which sends an SMS or MMS instead whenever a recipient turns out not to have WhatsApp.
Typical uses: reaching people who use WhatsApp, sending longer notifications without splitting them into several SMS parts, or cutting the cost of messages to recipients abroad.
Setting it up is a two-part job: first you enable the service and link a device (Settings > Channels > WhatsApp), then you use the channel (Messages > WhatsApp, or the Compose window).
Before you start
WhatsApp is available on selected device models only. If Settings > Channels > WhatsApp is not in your sidebar, your device does not support it.
You need a phone with an active WhatsApp account, in your hands, to scan the QR code.
The device must be able to reach the internet. WhatsApp messages travel over the network connection, not through the modem.
The linked account is a real WhatsApp account. Everything the gateway sends appears to come from that account, and messages sent to it appear in SMSEagle.
Step 1: Open the WhatsApp settings
In the sidebar, go to Settings > Channels > WhatsApp.
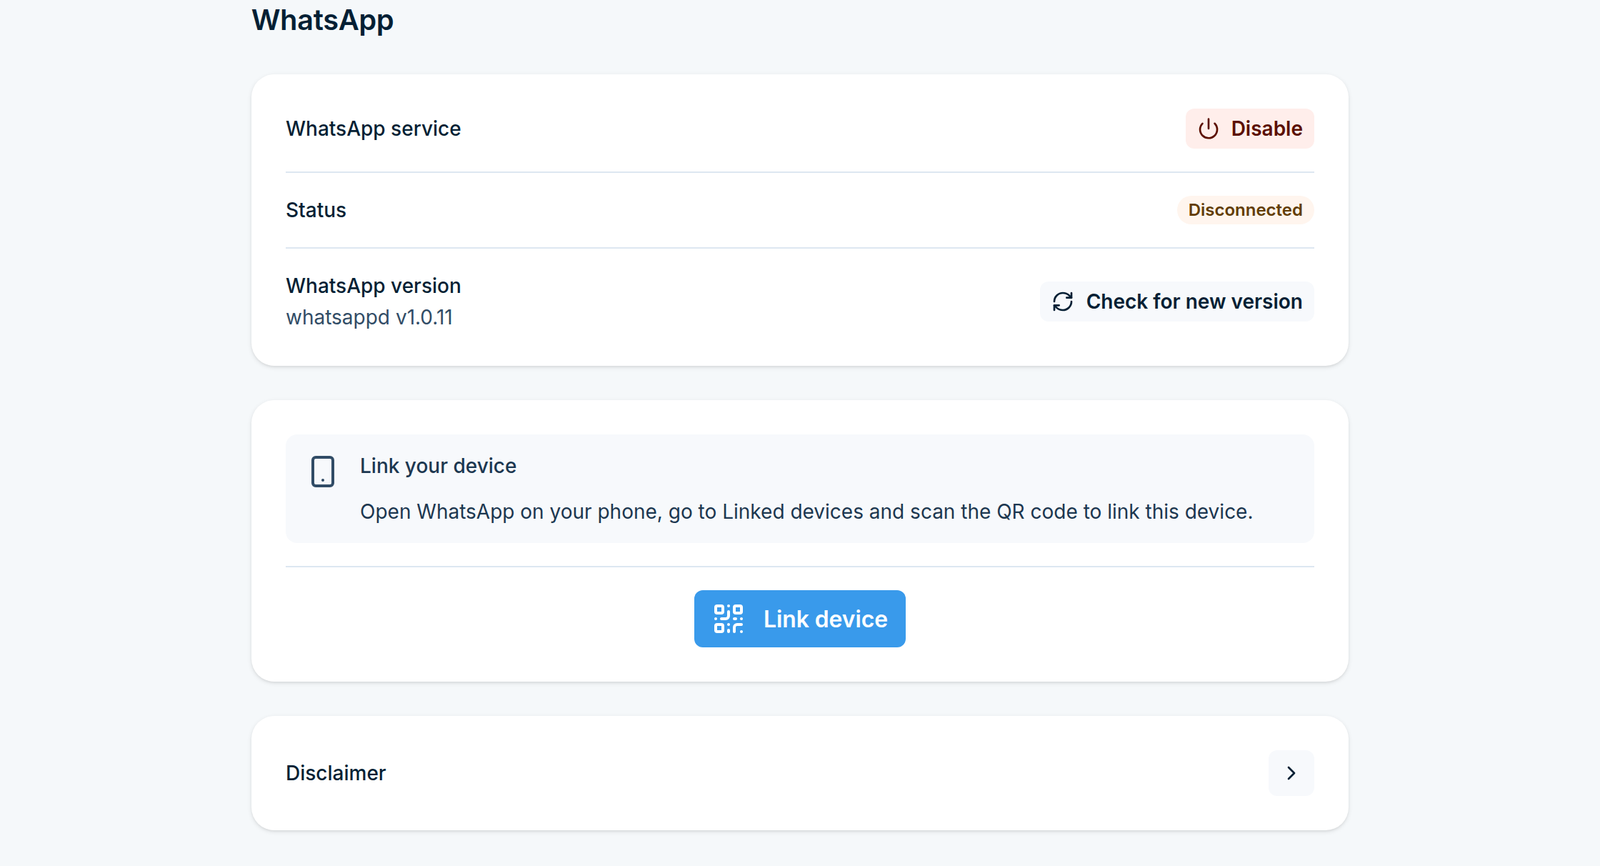
The Connection box shows the installed WhatsApp version and the current Status. On a fresh device the status is Disabled and a warning explains that the service must be enabled before a device can be linked.
Step 2: Enable the service
Click Enable at the bottom of the page. The status changes to Disconnected, which means the service is running but no account is linked yet. That is the state shown in the figure at the start of this section, with the Link device button waiting below the Connection box.
Step 3: Link your phone
Click Link device. A QR code appears on screen.
On your phone, open WhatsApp, go to Linked devices and choose to link a new device.
Point the phone at the QR code on screen.
While the code is displayed, the page keeps checking whether it has been scanned and refreshes the code by itself. When the phone confirms, the status changes to Connected.
The QR code does not wait forever. If nothing scans it within a short time, linking is cancelled and the page returns to Disconnected. Have the phone open on the Linked devices screen before you click Link device, and simply click it again if the code expires.
You can also stop the process yourself with Cancel linking.
Step 4: Decide what happens to non-WhatsApp recipients
Once the status is Connected, a Fallback box appears with one switch:
Fall back to SMS/MMS When it is on, a message addressed to a number that is not registered on WhatsApp is sent as an SMS or MMS instead of failing. When it is off, such a message is simply not delivered.
The switch is saved as soon as you flip it, there is no separate save button.
Step 5: Keep the service up to date
The Connection box has a Check for new version button. Click it to ask whether a newer WhatsApp version is available:
Result |
What to do |
|---|---|
No new version found |
Nothing. You are current. |
A new version is available |
The button turns into Update now, which takes you to the patch page where the update can be installed. |
Could not fetch the newest version |
The device could not reach the update server. Check the network settings and try again later. |
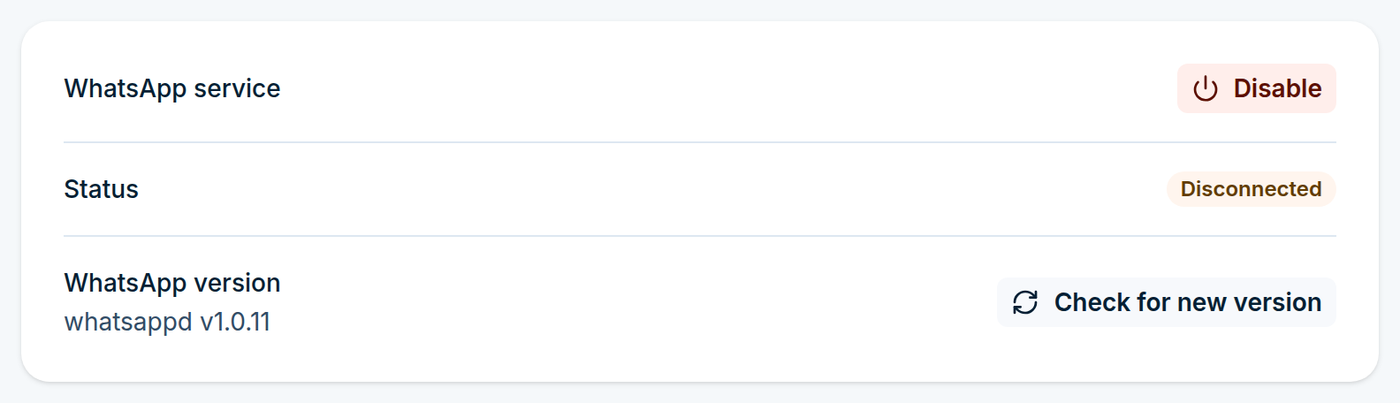
The Connection box, with Check for new version beside the installed version
Unlinking and switching off
Two buttons at the bottom of the settings page do different things:
Button |
What it does |
|---|---|
Unlink device |
Logs the account out. The service keeps running, the page returns to Disconnected and you can link another account. Fall back to SMS/MMS is turned off at the same time. |
Disable |
Stops the WhatsApp service altogether. The channel disappears from the Compose window. |
You can also unlink from the phone side, in WhatsApp > Linked devices. The page then shows Disconnected at its next refresh.
Good to know
WhatsApp messages use the network connection, so they do not consume SIM credit and do not depend on GSM coverage. The Fall back to SMS/MMS option is the exception: those fallback messages do go through the modem.
The link lives on the device. Restoring a backup onto different hardware, or unlinking from the phone, requires scanning a new QR code.
Only messages received after the device was linked appear in the conversation list.
Signal
What this feature does
Signal support lets your SMSEagle send and receive Signal messages in addition to SMS. The device registers itself with the Signal network using a phone number, and from then on Signal becomes another channel you can pick when composing a message, with its own conversation view.
Typical uses: reaching people who prefer Signal over SMS, or sending alerts to recipients who are abroad and would otherwise cost roaming charges.
Setting it up is a two-part job: first you enable the service and register a number (Settings > Channels > Signal), then you use the channel (Messages > Signal, or the Compose window).
Before you start
Signal is available on selected device models only. If Settings > Channels > Signal is not in your sidebar, your device does not support it.
You need a phone number that can receive a verification code, and it must not already be registered with Signal on another device.
Registration requires a captcha link, which you generate in a browser. Keep the link handy before you start; it expires quickly.
Step 1: Open the Signal settings
In the sidebar, go to Settings > Channels > Signal.
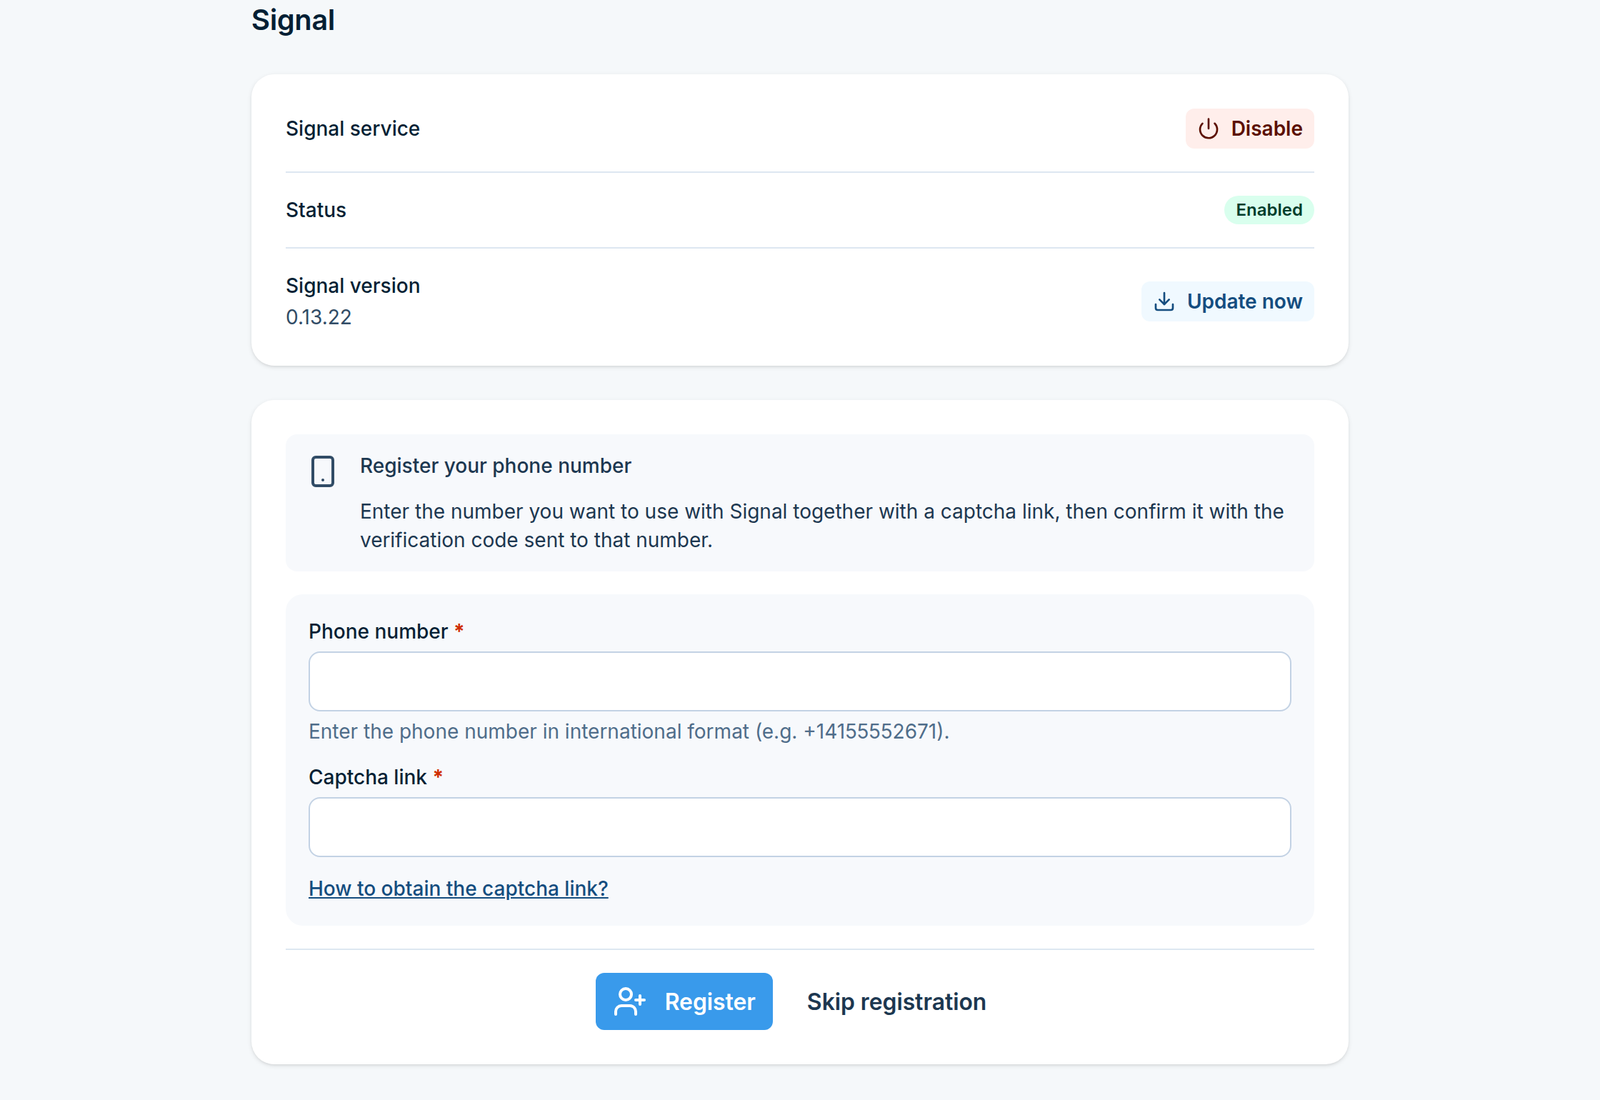
The Service box at the top shows the installed Signal version and the current Status. On a fresh device the status is Disabled and a warning explains that the service must be enabled before a number can be registered.
Step 2: Enable the service
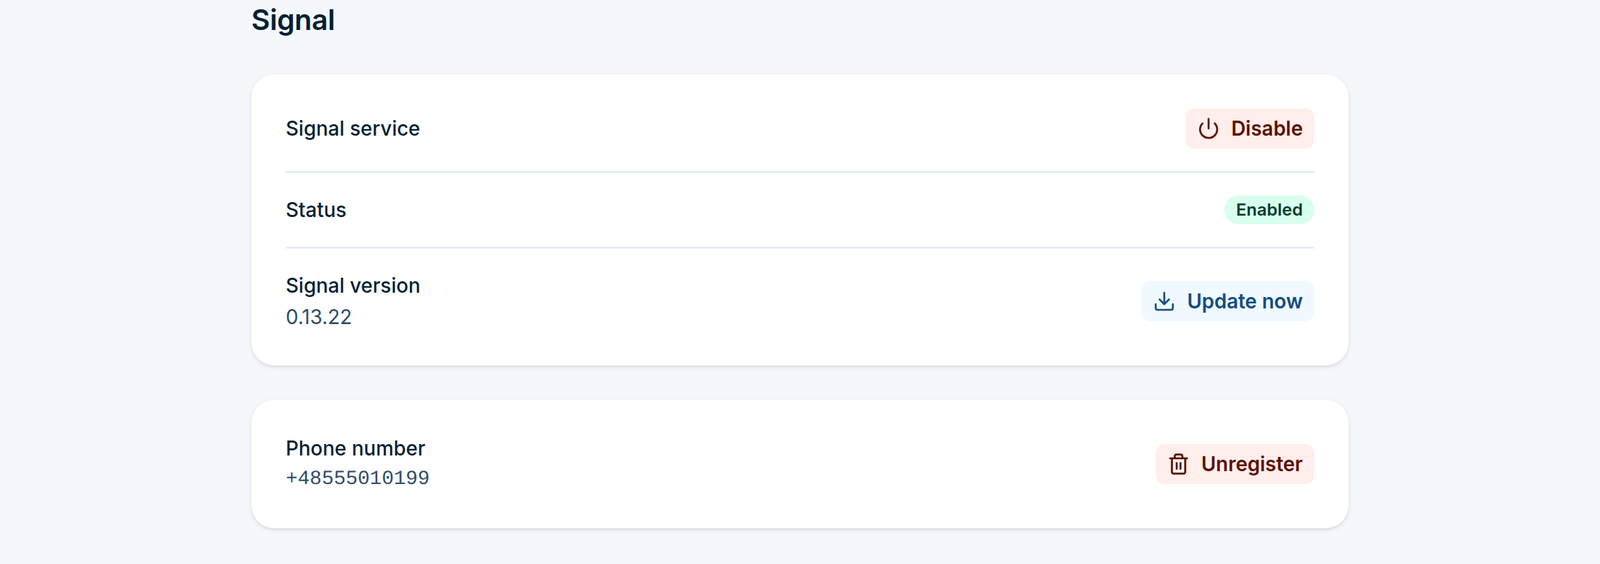
Click Enable at the bottom of the page. The status changes to Enabled and the registration form appears, as in the figure at the start of this section.
Step 3: Register a phone number
In the Register a phone number box:
In Phone number, type the number in international format, for example
+14155552671.In Captcha link, paste the captcha link. The link How to obtain the captcha link? below the field opens step-by-step instructions in a new tab.
Click Register.
Signal then sends a verification code to the number.
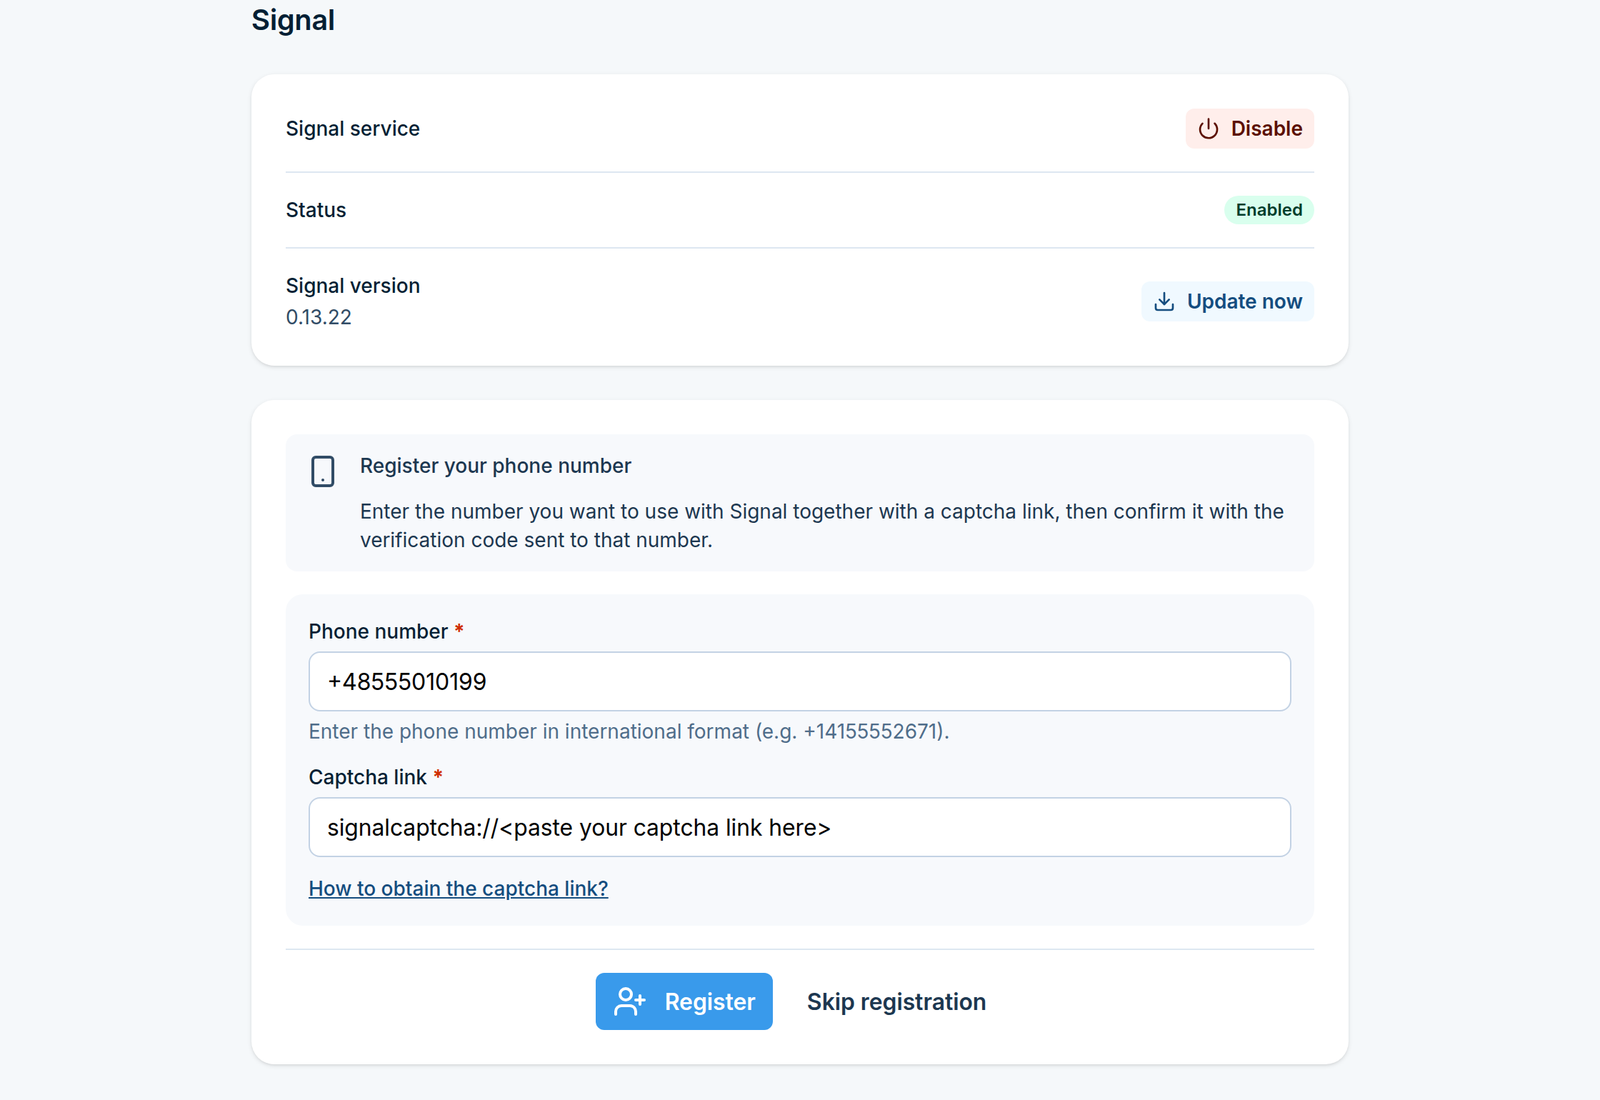
Already registered this number recently? Click Skip registration instead. The form jumps straight to the verification step, where you can enter a code you already received.
Step 4: Verify the number
The form now asks for the Verification code. Type the code you received and click Verify.
On success the page reports that Signal is connected and shows the Registered number box.
Step 5: Keep the service up to date
The Service box has a Check for new version button. Click it to ask whether a newer Signal version is available:
Result |
What to do |
|---|---|
No new version found |
Nothing. You are current. |
A new version is available |
The button turns into Update now, which takes you to the patch page where the update can be installed. |
Could not fetch the newest version |
The device could not reach the update server. Check the network settings and try again later. |
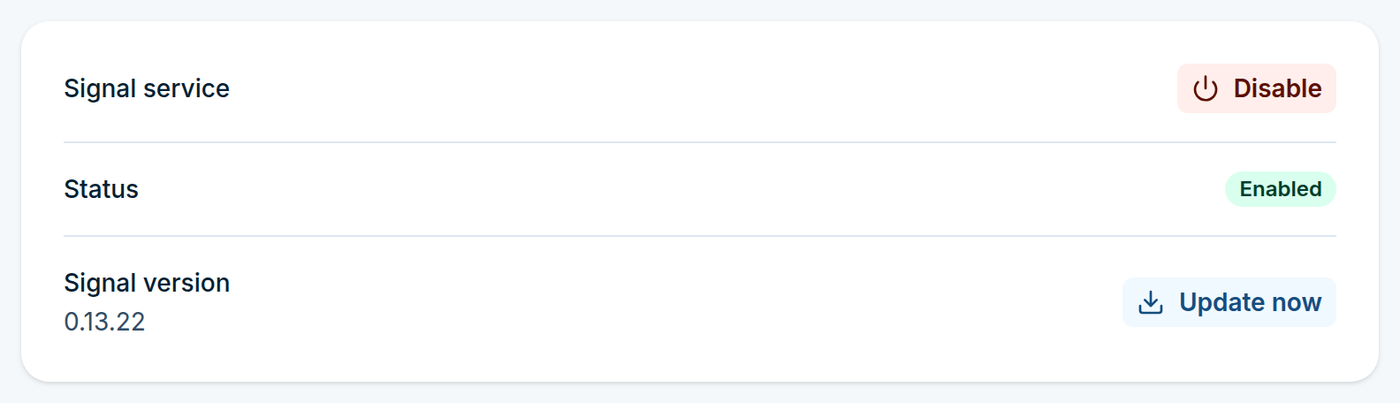
The Service box. Here a check has already found a newer version, so the button reads Update now
Removing the number
To unregister the device from Signal, go back to Settings > Channels > Signal and click Unregister in the Registered number box. The number is released and the page returns to the registration form.
To turn the channel off without unregistering, click Disable at the bottom of the page. The service stops and Signal disappears from the Compose window, but the registration is kept, so enabling it again does not require a new verification.
Good to know
Signal messages are sent over the network connection, not through the modem, so they do not use SIM credit and do not depend on GSM coverage.
The registration lives on the device. Restoring a backup onto different hardware, or removing the number, requires registering again.
Only messages received after the service was enabled appear in the conversation list.
Email to SMS
Settings > Channels > Email > Email to SMS (/settings/email/email-to-sms) starts a built-in mail
server on the device and converts incoming emails into SMS, according to the rules you define under
Email to SMS in Automation.
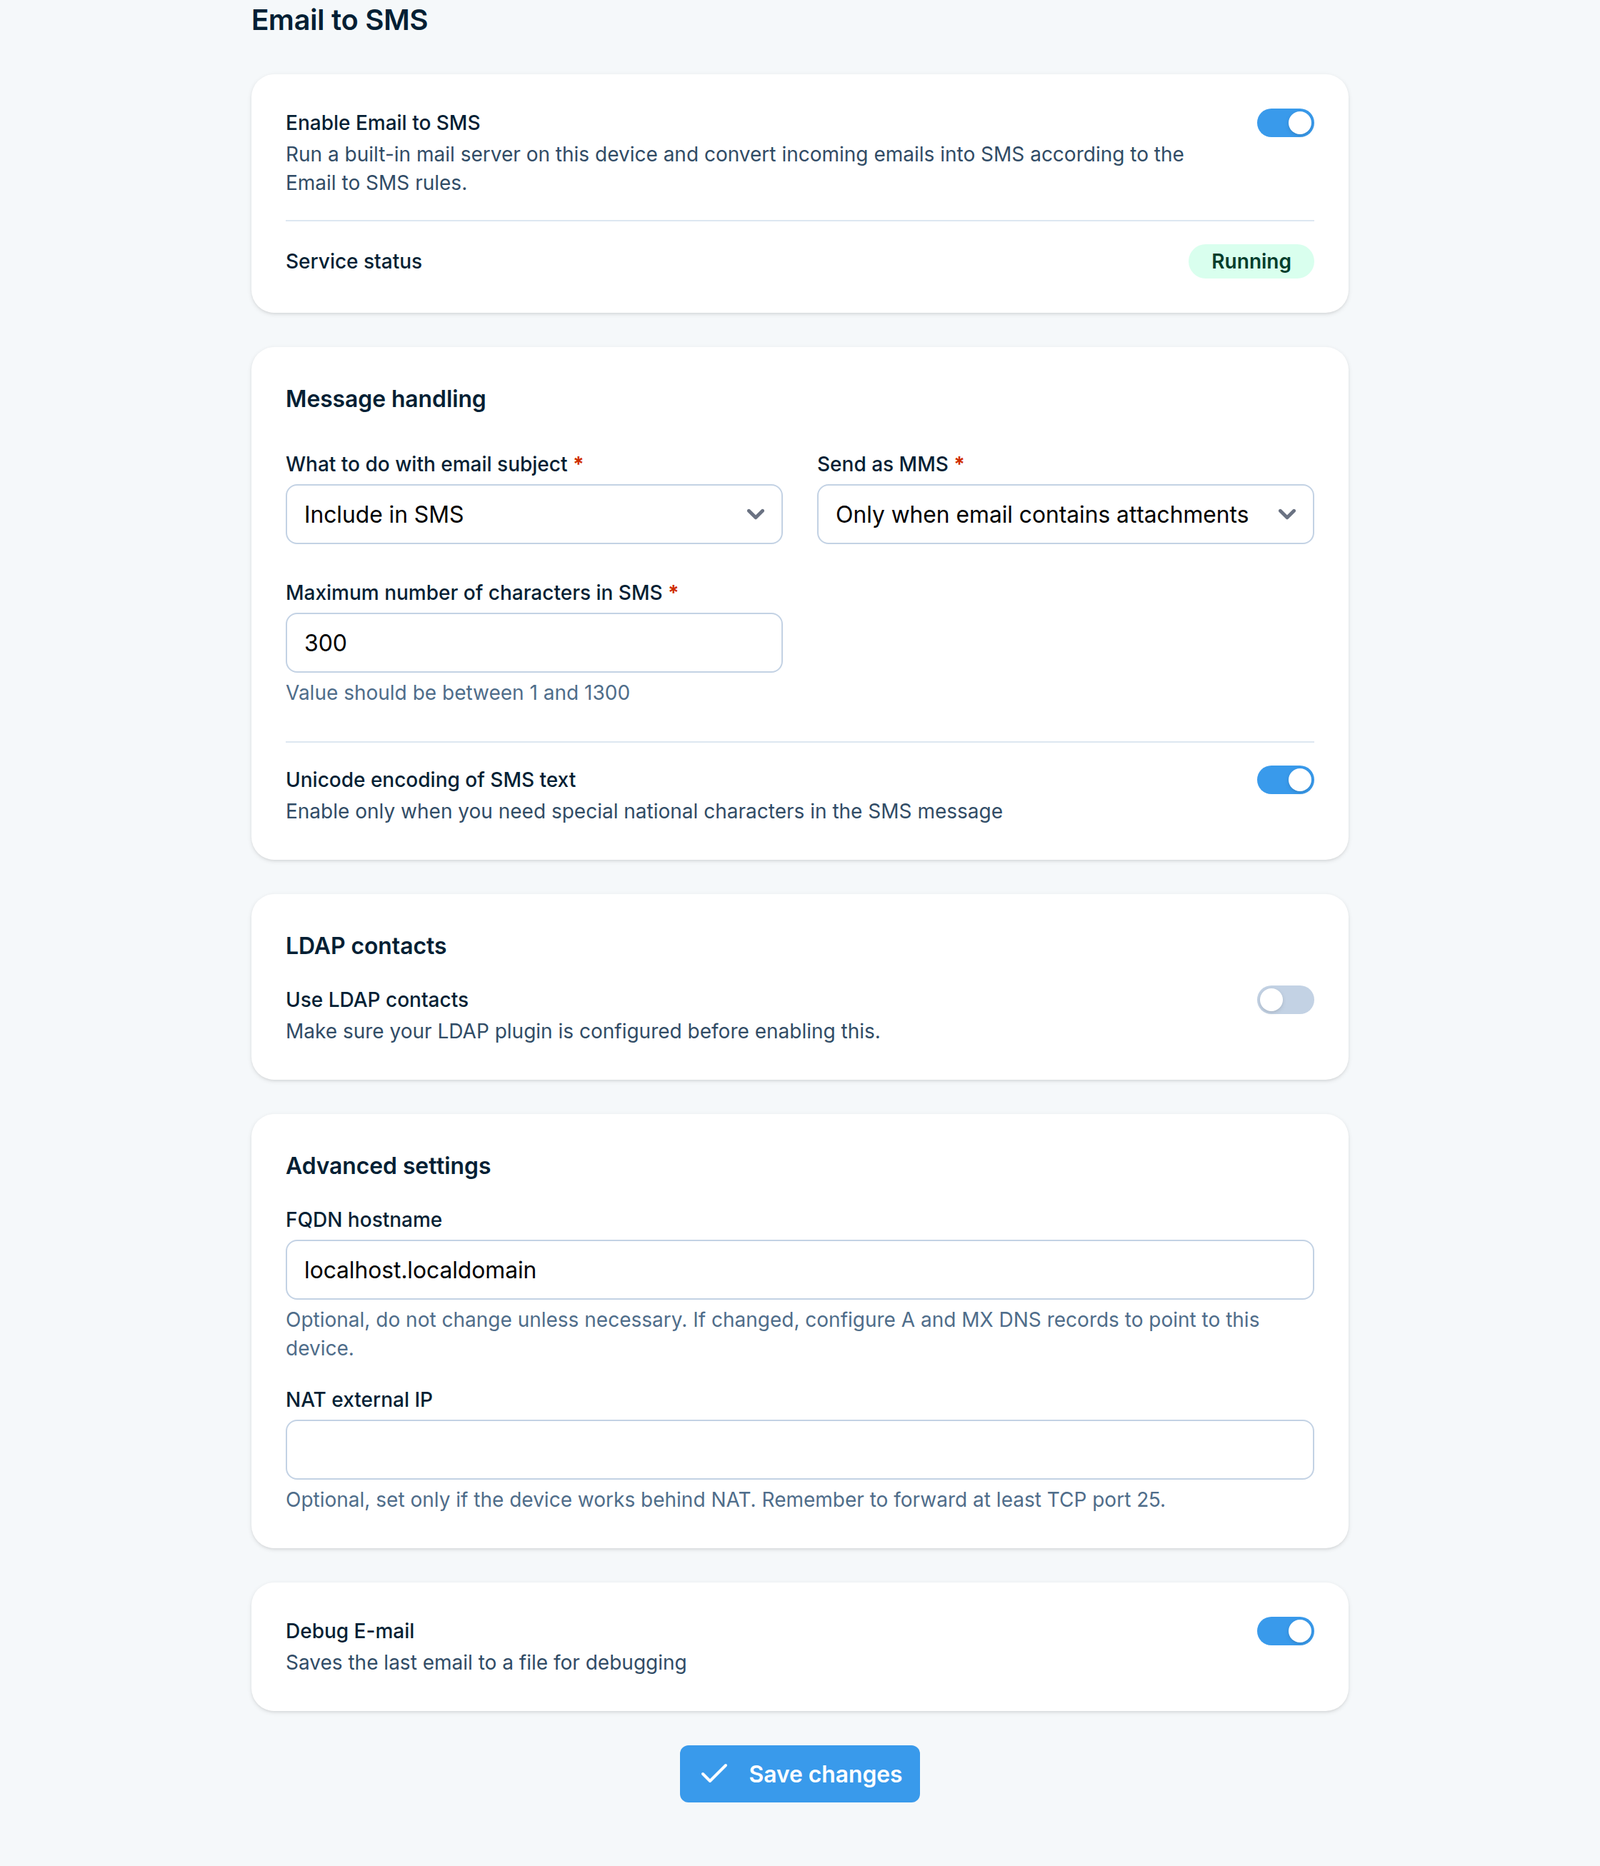
Turn on Enable Email to SMS to start the mail server. Service status shows whether it is Running or Stopped. The rest of the page decides how an email becomes an SMS:
What to do with email subject - Ignore it, Include in SMS, Use for authentication, or Send only subject without email body.
Send as MMS - Never, Always, or Only when email contains attachments.
Maximum number of characters in SMS - from 1 to 1300.
Unicode encoding of SMS text - turn it on only when messages need national characters that the standard SMS alphabet does not have.
Use LDAP contacts - lets the recipient part of the address name a directory contact or group. Configure LDAP first.
FQDN hostname (under Advanced settings) - optional domain name to use in recipient addresses instead of the device’s IP address. If you change it, point the A and MX DNS records for that name at the device.
NAT external IP - set it only when the device sits behind NAT, and forward at least TCP port 25 to the device.
Debug E-mail - saves the last received email to a file for troubleshooting.
Email to SMS Poller
Settings > Channels > Email > Email to SMS Poller (/settings/email/email-to-sms-poller) connects
the device to an existing mailbox, checks it at a fixed interval, and converts the emails it finds into
SMS according to the rules under Email to SMS Poller in
Automation. Unlike Email to SMS, no mail has to be delivered to the device itself.
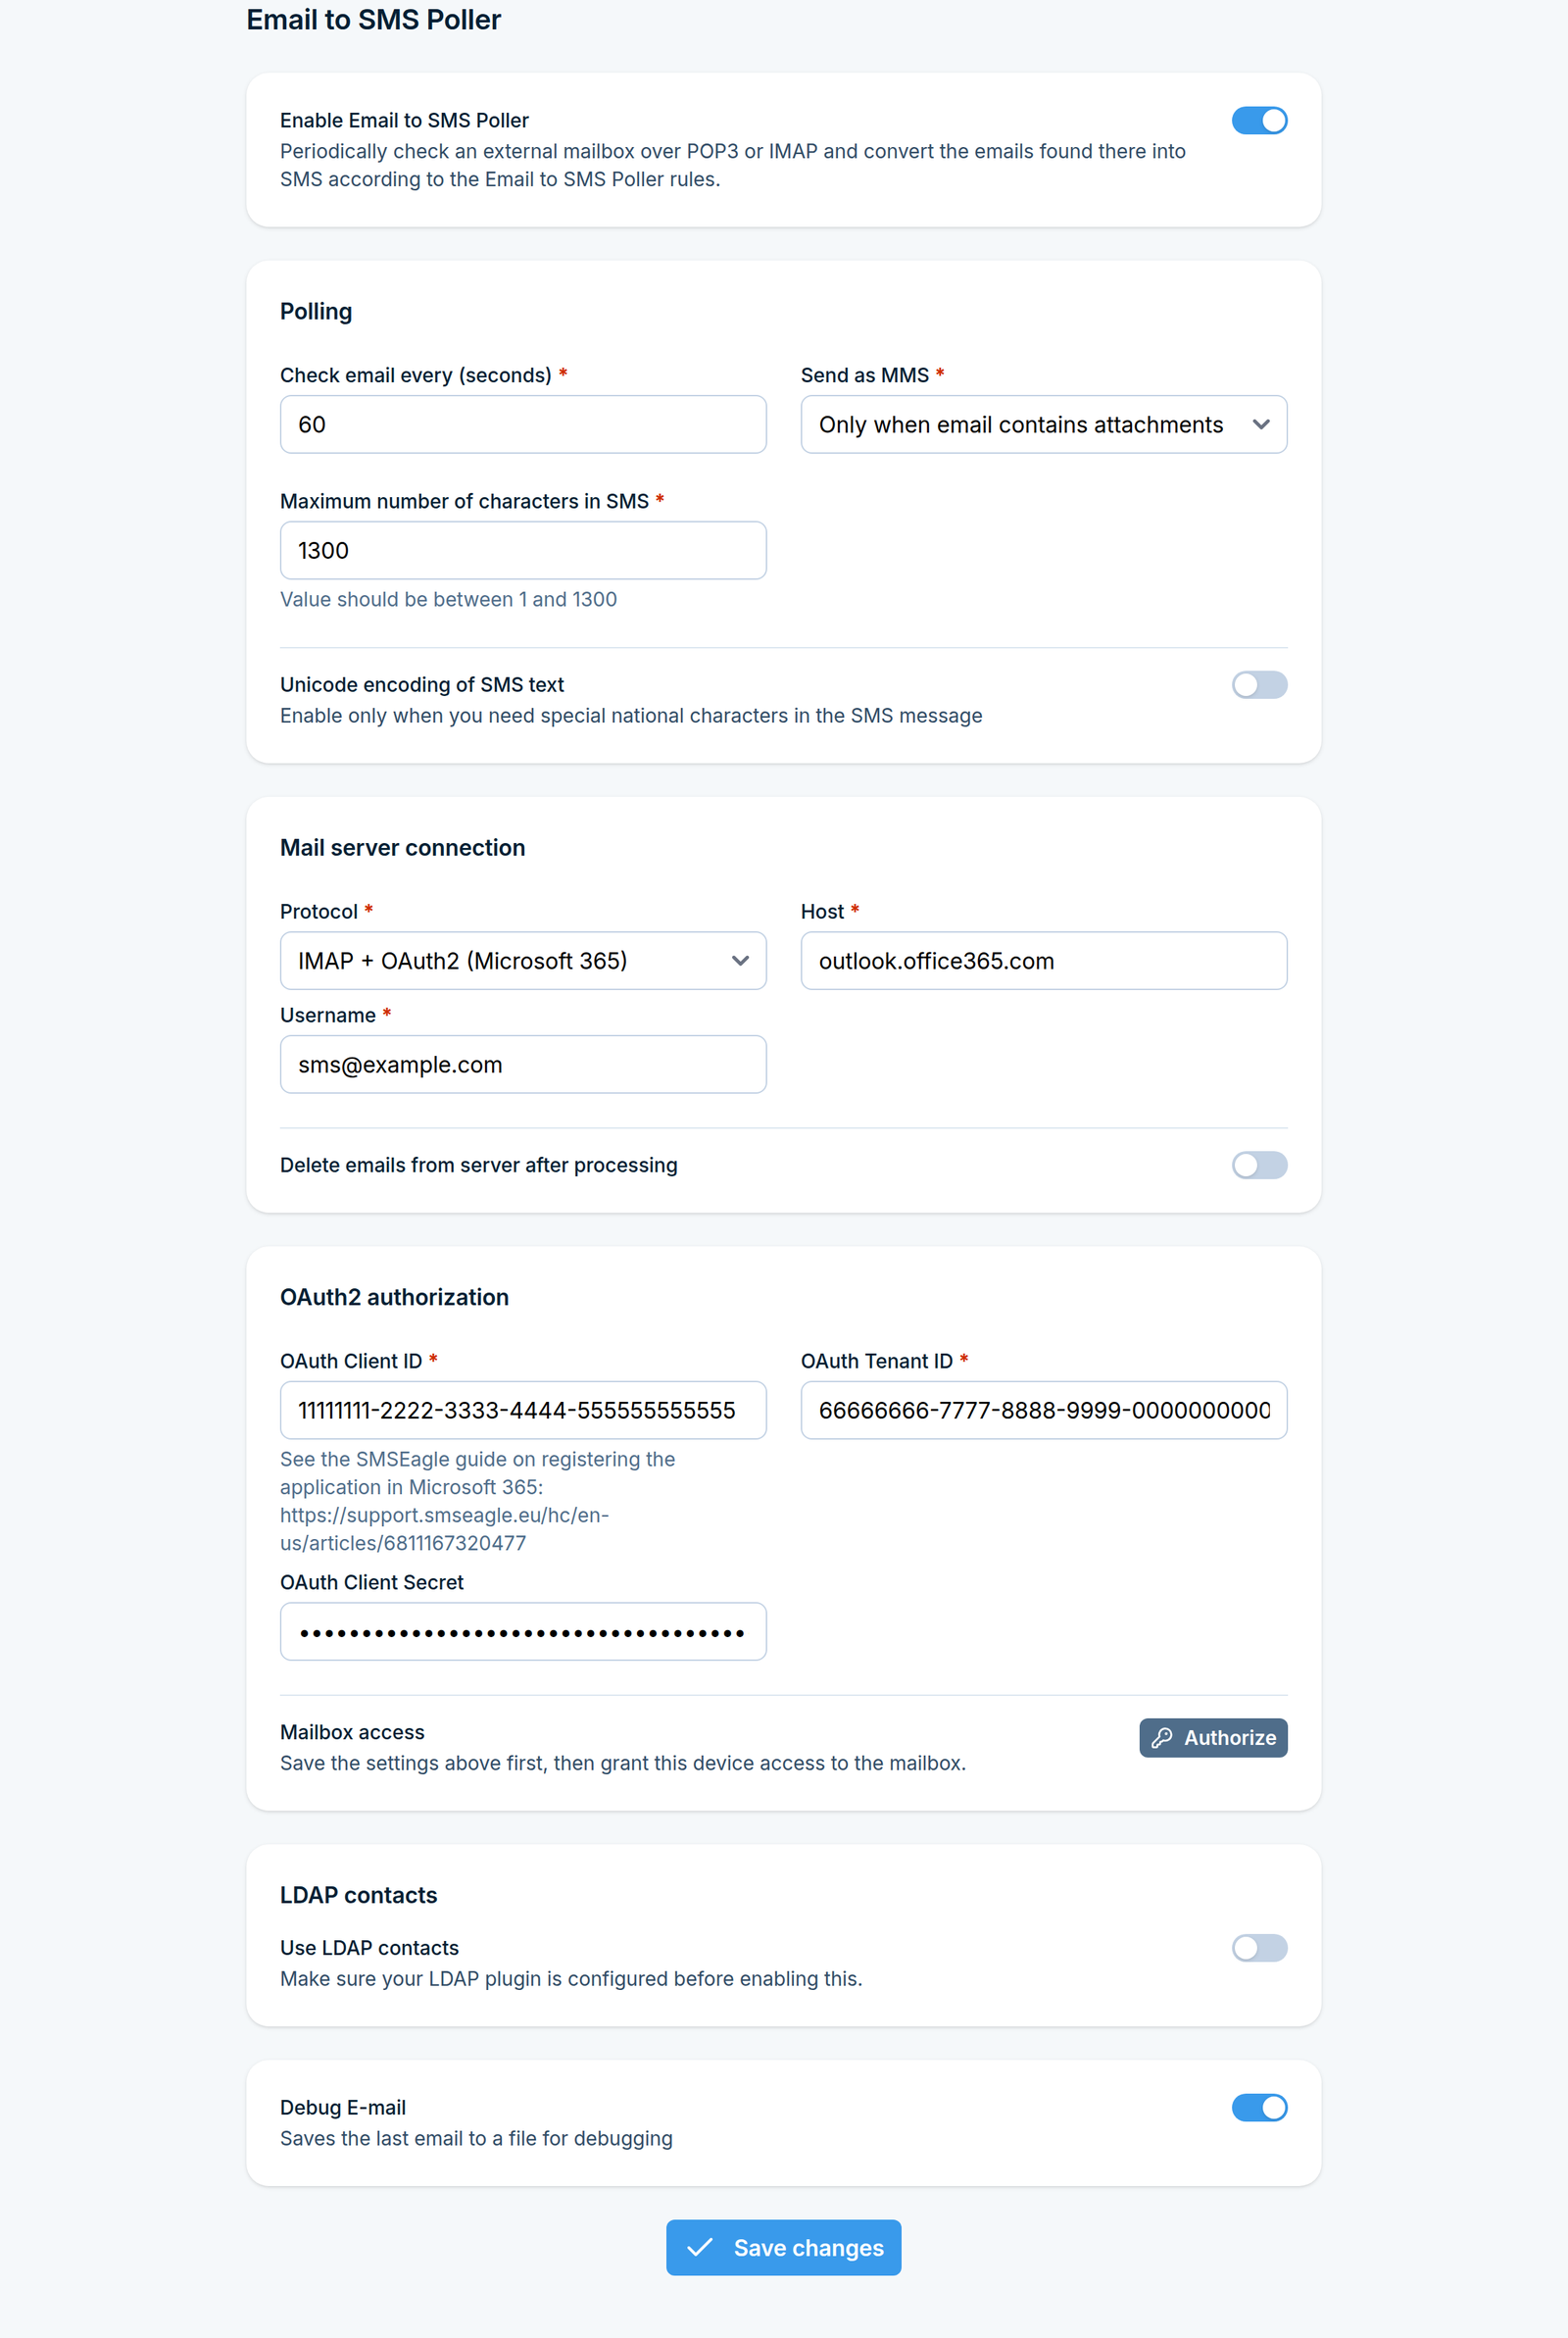
Email to SMS Poller settings, connected to a Microsoft 365 mailbox
Turn on Enable Email to SMS Poller. The form below it has these parts:
Polling
Check email every (seconds) - how often the mailbox is checked.
Send as MMS, Maximum number of characters in SMS and Unicode encoding of SMS text - same meaning as for Email to SMS.
Mail server connection
Protocol - POP3, IMAP, or IMAP + OAuth2 (Microsoft 365).
Host and Username of the mailbox.
With POP3 and IMAP only: Port, Password and Use TLS/SSL encryption. The page lists the standard ports: POP3 110, POP3 with TLS/SSL 995, IMAP 143, IMAP with TLS/SSL 993.
Delete emails from server after processing - removes each email from the mailbox once it has been handled. Leave it off to keep the mailbox untouched.
OAuth2 authorization (only with IMAP + OAuth2 (Microsoft 365))
OAuth Client ID, OAuth Tenant ID and OAuth Client Secret of the application registered in Microsoft 365. See the SMSEagle guide on registering the application in Microsoft 365.
Save the settings first, then click Authorize under Mailbox access and grant the device access to the mailbox.
Use LDAP contacts and Debug E-mail work as for Email to SMS.
For POP3 and IMAP the page also has a Test connection button. Save the settings before you use it. Some mail providers block IMAP test connections under their default security settings, so a failed test does not always mean the settings are wrong.
SMTP Configuration
Settings > Channels > Email > SMTP Configuration (/settings/email/smtp) manages a list of reusable SMTP server presets, and assigns one to each feature that sends outgoing email:
Compose menu, APIv2, SMS to Email, Alerts, Reporting module, Workflows
Each of these can be set to None or to one of your saved presets. Unassigning a preset from a feature disables that feature’s existing email setup.
Click Create new under Configuration presets to add an SMTP server (host, port, encryption, sender address, credentials); presets can then be picked from the dropdown for any of the features above.
Email alerts
Settings > Channels > Email > Email alerts (/settings/email/alerts) emails an alert when
outgoing messages keep failing to send. It needs an SMTP preset assigned to Alerts under
SMTP Configuration.
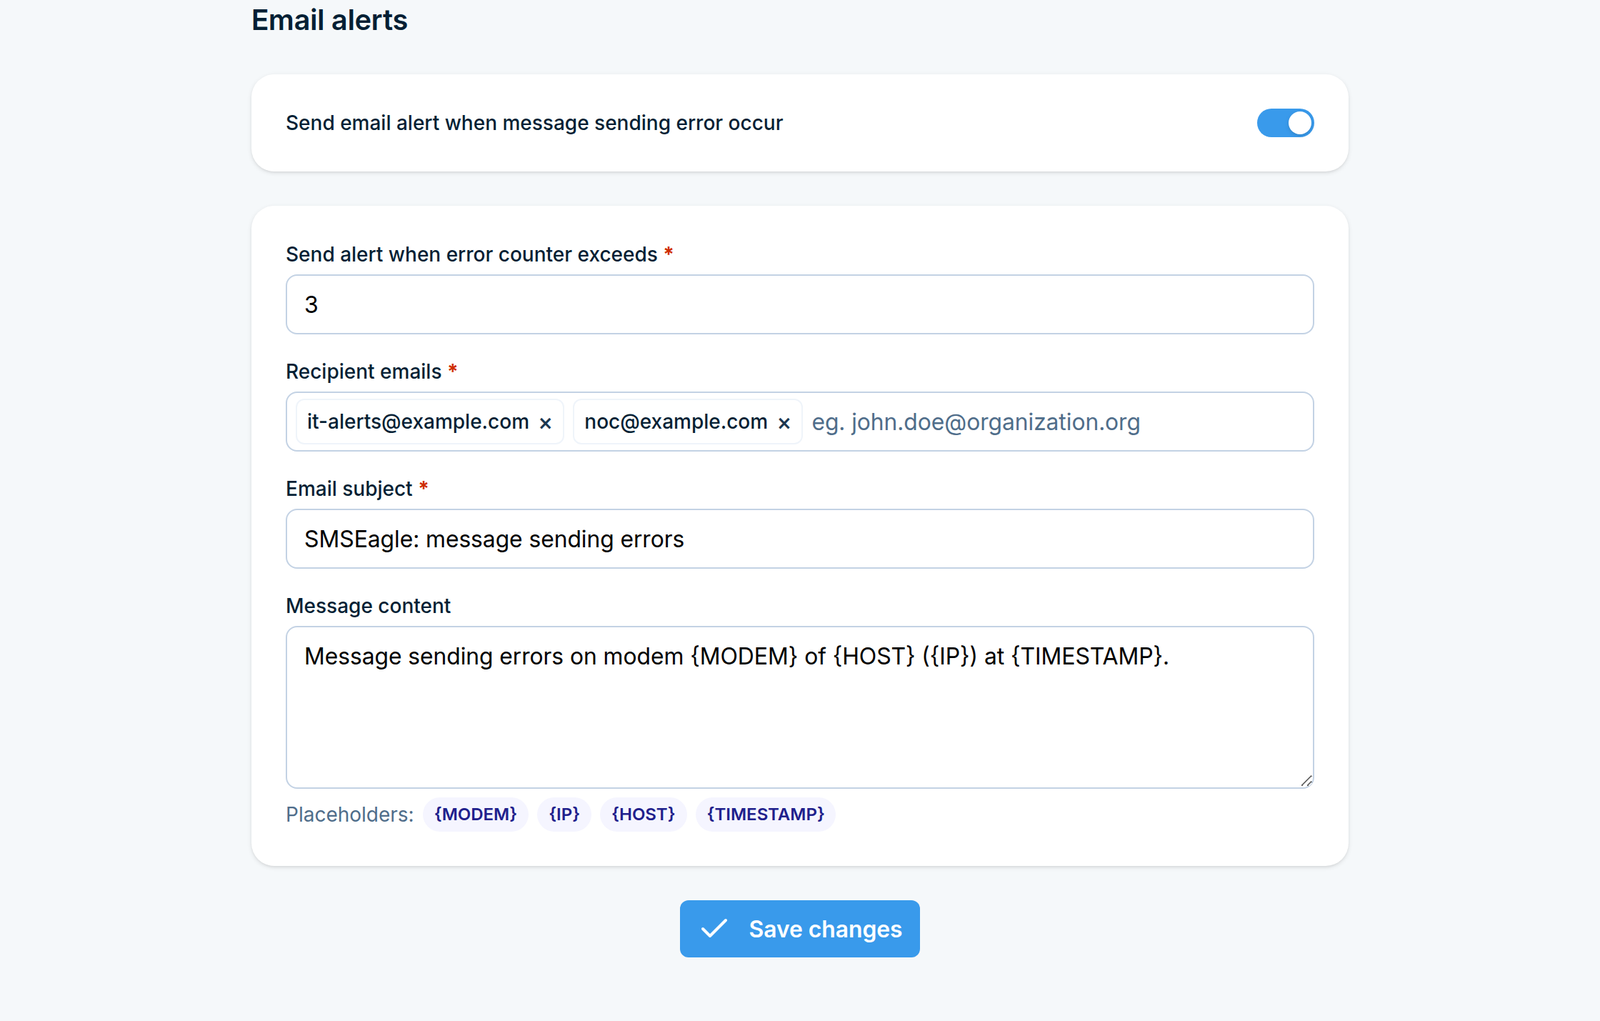
Turn on Send email alert when message sending error occur, then set:
Send alert when error counter exceeds - how many sending errors are counted before the alert goes out. A value above 2 avoids alerts caused by a single temporary failure.
Recipient emails - one or more addresses.
Email subject and Message content - the text of the alert. The placeholders {MODEM} (the modem that raised the alert), {IP} (the device’s IP address), {HOST} (its host name) and {TIMESTAMP} (when the error was detected) are replaced with real values. Click a placeholder under the message field to insert it.
SMPP
Settings > Channels > SMPP (/settings/smpp/) turns on the device’s built-in SMPP server. An
external application acting as an SMPP client can then submit SMS through the device’s modems, and
receives incoming SMS and delivery reports back over the same connection.
Connection details
Parameter |
Value |
|---|---|
Protocol |
SMPP 3.4 |
Port |
TCP 2770 |
Client to SMSEagle |
SMS to be sent through the device’s modems |
SMSEagle to client |
Incoming SMS and delivery reports |
The SMPP client binds with the User and Password set on this page, as its system_id and
password.
Incoming SMS and delivery reports are queued on the device while no SMPP client is connected. As
soon as a client binds, SMSEagle delivers everything in that queue, so the client must be ready to
receive and acknowledge deliver_sm messages from the moment it binds.
Turning SMPP on
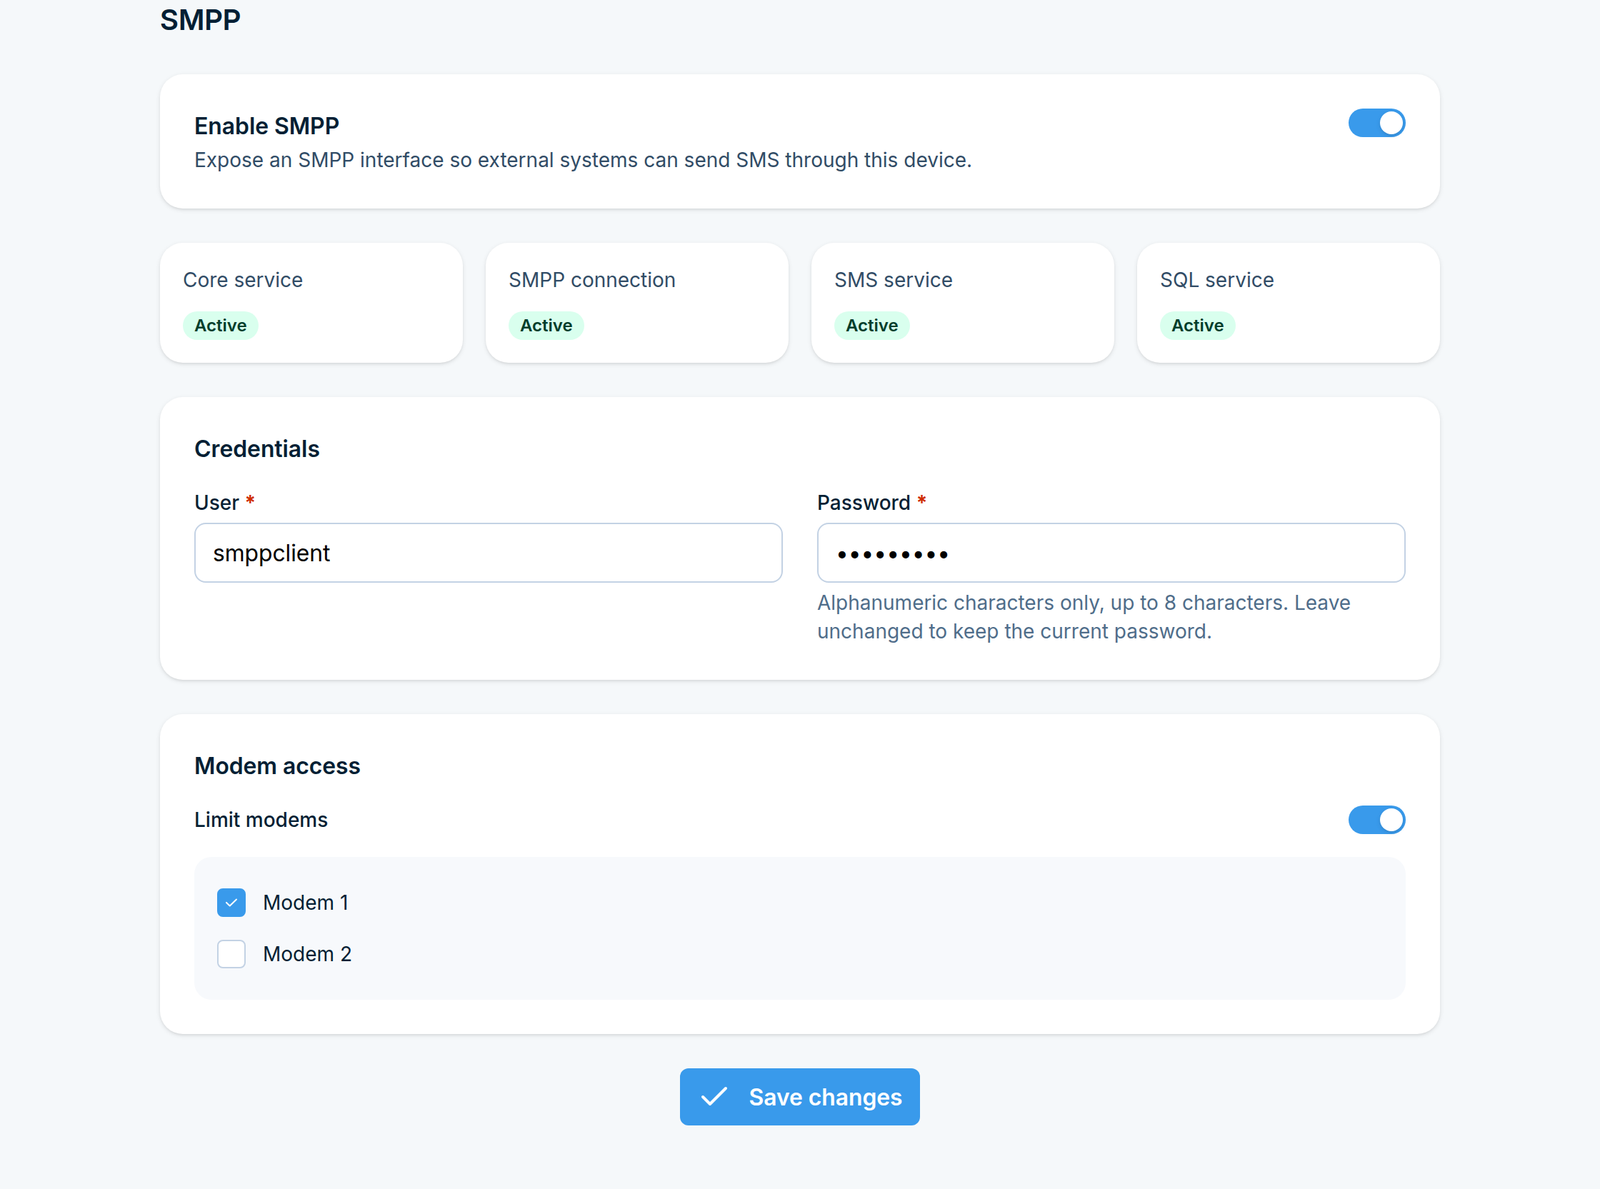
Turn on Enable SMPP. The service status cards, Credentials and Modem access appear.
Under Credentials, set the User and Password the SMPP client will bind with. The password can contain letters and digits only, up to 8 characters. When a password is already stored, leave the field as it is to keep it.
Under Modem access, turn on Limit modems to let SMPP traffic use only the modems you tick. Leave it off to allow all modems.
Click Save changes.
A reboot is needed. After saving, SMSEagle asks you to reboot the device so the SMPP changes take effect. Until you do, the new settings are stored but not yet in use. Use System > Restart when you are ready.
After the reboot, the four status cards (Core service, SMPP connection, SMS service, SQL service) show whether each part of the SMPP server is running. All four must read Active for SMPP clients to connect and exchange messages.
The first time you enable SMPP, SMSEagle also creates an internal user for SMPP traffic, with its own API key listed under Settings > API v2 keys, and the internal rules that pass incoming SMS and delivery reports to the SMPP client. Do not revoke or edit them. Turning SMPP off removes the user and the rules again.
MQTT
Settings > Channels > MQTT (/settings/mqtt/) connects the device to the MQTT broker it listens
to. The Subscribe rules under MQTT in Automation, which turn MQTT messages
into SMS, use this connection. Publish rules do not: each of them names its own broker.
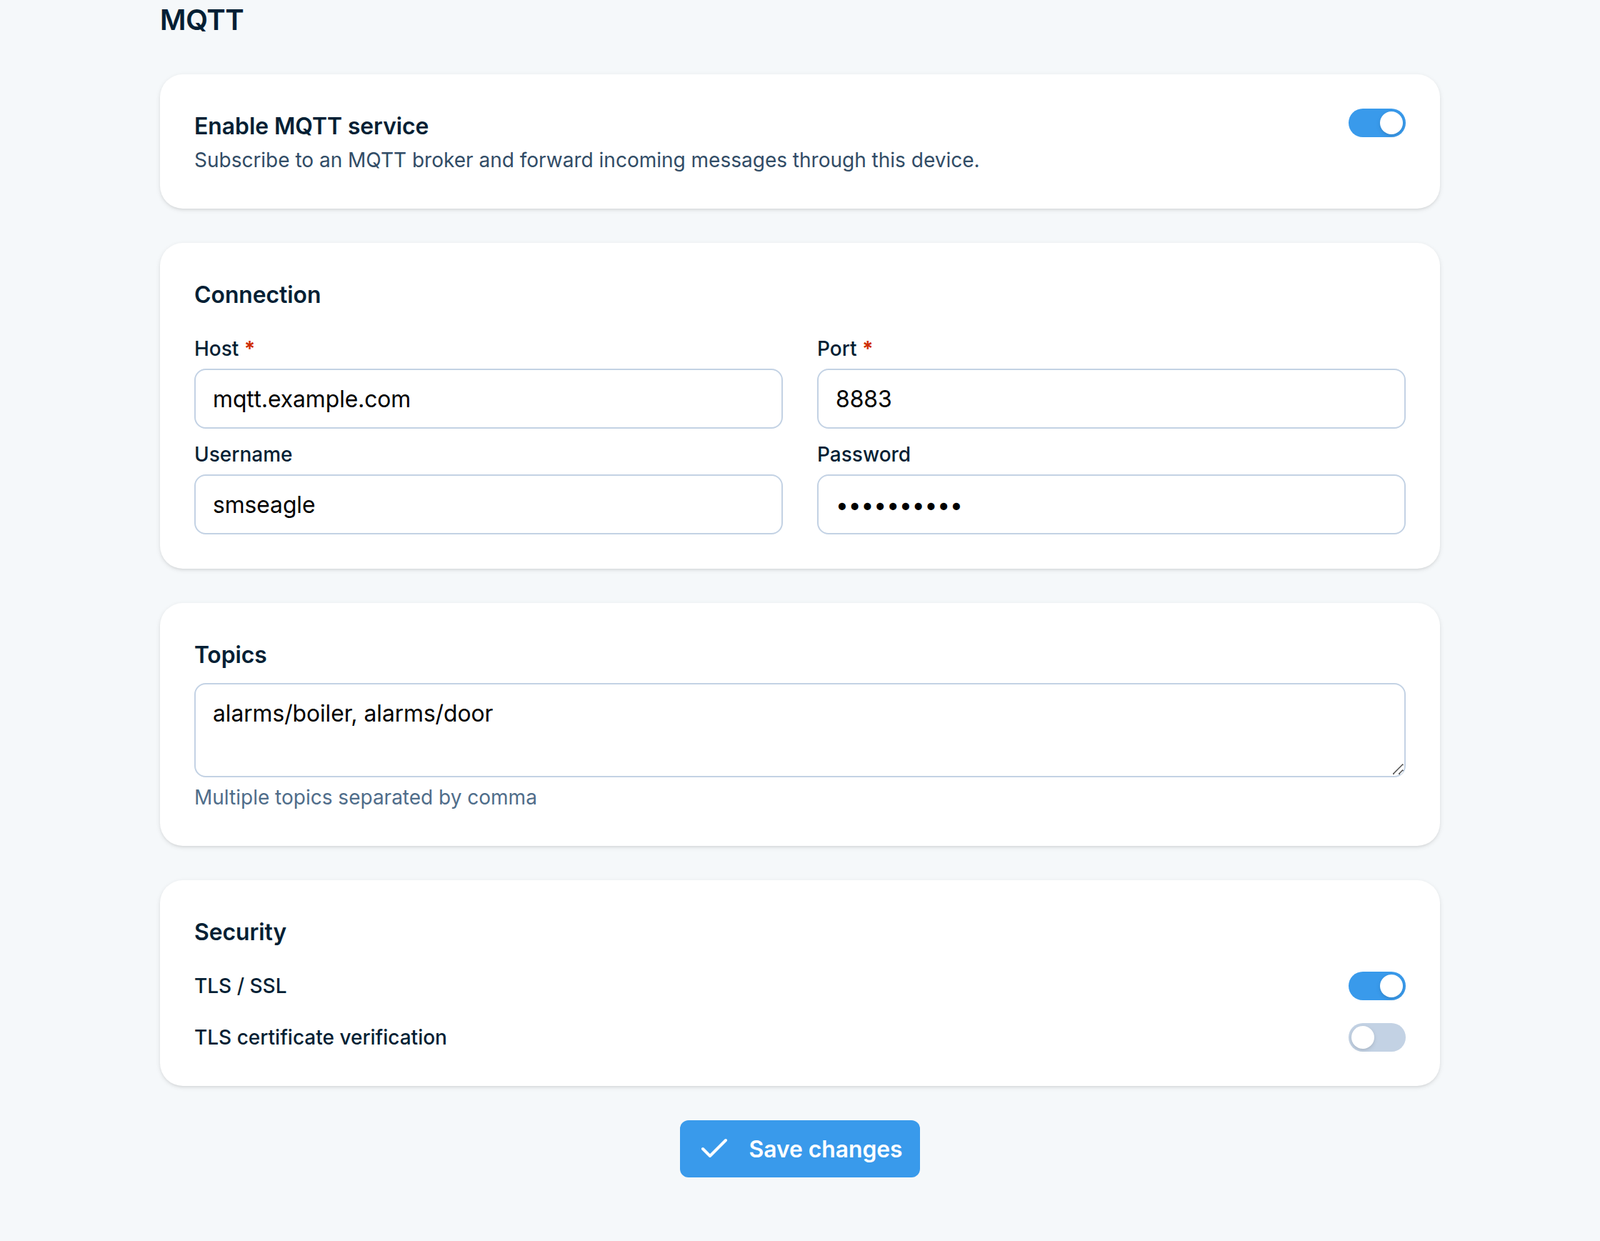
Turn on Enable MQTT service, then set:
Host and Port of the broker (both required).
Username and Password, if the broker requires them.
Topics - the topics the device subscribes to, separated by commas.
TLS / SSL - encrypts the connection to the broker. TLS certificate verification also checks the broker’s certificate, so leave it off only for a broker with a self-signed certificate.
Click Save changes.
A reboot is needed. After saving, SMSEagle asks you to reboot the device so the MQTT changes take effect. Until you do, the new settings are stored but not yet in use. Use System > Restart when you are ready.
Network
IP Settings
Settings > Global settings > Network > IP Settings (/settings/network/ip) shows the device’s MAC address (read-only) and lets you configure:
Get IP address from DHCP - toggle DHCP on, or off to set a static IP.
Hostname
Use proxy - route the device’s outgoing connections through an HTTP proxy.
IP address restriction - Allow, Deny, or Disabled, with a list of IP addresses the rule applies to. When restriction is active, all ports except 22 (SSH) are blocked for everyone not on the list.
Be careful with IP address restriction. A misconfigured allow-list can lock you out of the web interface from your own machine. Add your current IP first (the page offers an Add your IP address shortcut) before saving.
SSL
Settings > Global settings > Network > SSL (/settings/network/ssl) lets you replace the device’s default self-signed certificate with your own: upload a Certificate, its Private key, and optionally a Root CA certificate and Full chain. A separate switch, Forward HTTP to HTTPS, redirects plain HTTP requests to HTTPS.
Failover
Failover cluster provides device-level high availability: a second SMSEagle device stands by as a backup, ready to take over if the master device stops responding. This is different from modem failover, which switches between two SIM cards inside the same device - a failover cluster protects against the whole device going down.
Where to find it
Settings > Global settings > Network > Failover (/settings/network/failover).
Enabling failover cluster
Turn on Enable failover cluster. This requires two devices with matching failover configuration, one acting as master and the other as backup.
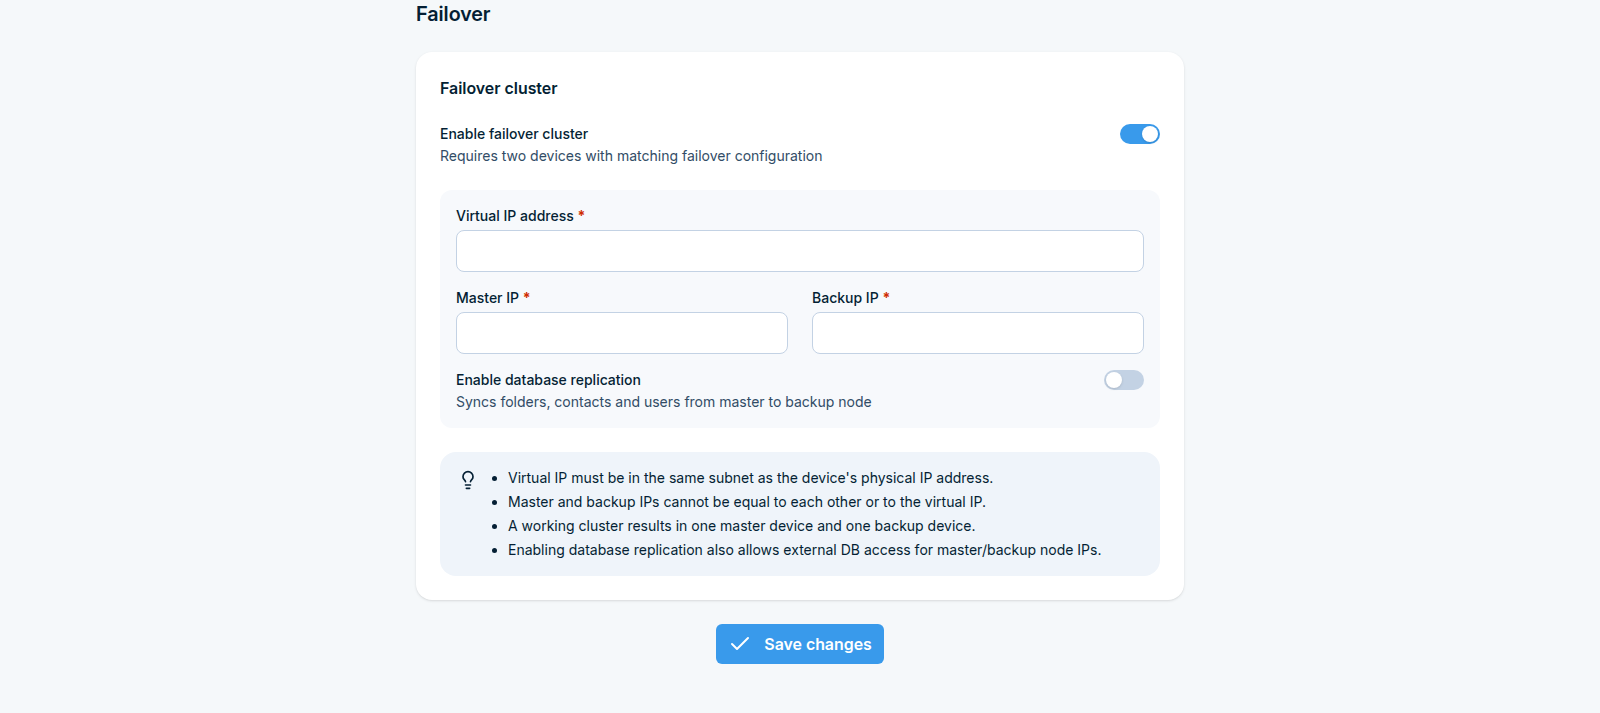
Set the same values on both devices:
Virtual IP address - the address your users and integrations connect to.
Master IP and Backup IP - the physical IP addresses of the two devices. Each device takes its role from its own address: the one whose IP matches Master IP becomes the master, the one matching Backup IP the backup. One of the two must therefore be the address of the device you are configuring.
Enable database replication - copies folders, contacts and users from the master to the backup node (see below).
Click Save changes.
A reboot is needed. After saving, SMSEagle asks you to reboot the device so the failover changes take effect. Until you do, the new settings are stored but not yet in use. Use System > Restart when you are ready.
Master/backup roles and virtual IP
The cluster is reached through a single virtual IP address, which always points at whichever device is currently active:
The virtual IP must be in the same subnet as each device’s own physical IP address.
The master IP, backup IP, and virtual IP must all be different from each other.
A working cluster always has exactly one master device and one backup device at any given time; if the master stops responding, the backup takes over the virtual IP.
Database replication and external access
Enabling failover cluster also enables database replication between the master and backup, so the backup device has an up-to-date copy of messages, contacts, and settings if it needs to take over. This same setting also allows external database access for the master and backup node IPs specifically, which is required for replication to work.
SNMP

The SNMP Agent lets external tools (an NMS, a MIB browser, or a plain snmpget/snmpwalk call) poll SMSEagle for its own metrics - signal strength, network name, folder message counts, system uptime, and more. This is the opposite direction from SNMP Traps: the agent is polled by an external tool, rather than SMSEagle pushing an alert to one.
Where to find it
Settings > Global settings > Network > SNMP (/settings/network/snmp).
Configuring the SNMP Agent
Enable SNMP daemon autostart so the agent starts automatically with the device, and set the SNMP community string used to authenticate read requests.
Once enabled, SMSEagle’s extension parameters (signal strength, network name, folder counters, uptime, and others) can be read from the device’s MIB tree using any standard SNMP tool, for example NET-SNMP’s snmpget/snmpwalk or a graphical MIB browser.
Available metrics
On top of the standard Linux host metrics, SMSEagle publishes its own metrics through
NET-SNMP-EXTEND-MIB. Each one can be read by its OID, or by name as
NET-SNMP-EXTEND-MIB::nsExtendOutputFull."<metric name>".
Metrics that describe a modem end in the modem number: 1 and 2. The tables show them for
modem 1. A metric returns -1 when its value cannot be read, for example when the modem is
switched off or the temperature sensor is not enabled.
Metric |
Returns |
|---|---|
|
Signal strength of the modem, in percent (0-100). |
|
Name of the mobile network the modem is registered to. |
|
|
|
SIM card status as reported by the modem: |
|
Network registration: |
|
SMS received by the modem today, since midnight. |
|
SMS sent by the modem today, since midnight. |
|
Unread messages in Inbox. A multipart message counts once. |
|
Messages waiting in Outbox, the sending queue. |
|
Messages sent in the last 24 hours. Each part of a multipart message counts separately. |
|
Messages sent in the last month, counted the same way. |
|
Messages that failed to send in the last 24 hours, because the modem could not send them or the network rejected them. |
|
Temperature from sensor 1, in °C. Same value as |
|
Temperature from sensor 1 to 4 ( |
|
Humidity from sensor 1, in %. |
Metric |
OID |
|---|---|
|
|
|
|
|
|
|
|
|
|
|
|
|
|
|
|
|
|
|
|
|
|
|
|
|
|
|
|
|
|
The OID of any metric is .1.3.6.1.4.1.8072.1.3.2.3.1.2, followed by the number of characters in the
metric name and the ASCII code of each character. For another modem, only the last number changes:
it is 48 plus the modem number, so GSM_Signal2 ends in .50.
If your SNMP tool does not know NET-SNMP-EXTEND-MIB names, load the MIB definition file.
Reading metrics
Replace public with your SNMP community and 192.0.2.10 with the device’s IP address.
Read one metric by OID:
snmpget -v 2c -c public 192.0.2.10 .1.3.6.1.4.1.8072.1.3.2.3.1.2.11.71.83.77.95.83.105.103.110.97.108.49
NET-SNMP-EXTEND-MIB::nsExtendOutputFull."GSM_Signal1" = STRING: 77
Read one metric by name:
snmpget -v 2c -c public 192.0.2.10 'NET-SNMP-EXTEND-MIB::nsExtendOutputFull."FolderOutbox_Total"'
NET-SNMP-EXTEND-MIB::nsExtendOutputFull."FolderOutbox_Total" = STRING: 0
List all SMSEagle metrics at once:
snmpwalk -v 2c -c public 192.0.2.10 .1.3.6.1.4.1.8072.1.3.2.3.1.2
What can be read from the network
Queries from the device itself (localhost) see the whole MIB tree. Queries from other hosts see a
restricted part of it: the SMSEagle metrics above, and from the standard MIBs the system group
(including uptime), network interfaces, storage, processors, memory, load and CPU usage. The process
list and other details are not exposed to the network.
The same SNMP community applies to both. After you change it, reboot the device for the new value to take effect.
Using SNMP v3
The page configures SNMP v1/v2c. For SNMP v3 with authentication and encryption, use the snmpv3
script over SSH:
Log in to the device over SSH as
root.Go to the SMSEagle directory:
cd /mnt/nand-user/smseagle/Add a read-only SNMP v3 user. It uses SHA for authentication and AES for encryption. Both passwords must be at least 8 characters long.
./snmpv3 add USERNAME AUTH_PASSWORD ENCRYPTION_PASSWORDOptionally, turn off SNMP v1/v2c access so that only SNMP v3 users can read the agent:
./snmpv3 disablev2./snmpv3 enablev2turns it back on, and./snmpv3 del USERNAMEremoves the user.
The script restarts the SNMP agent itself. A v3 query then looks like this:
snmpget -v 3 -l authPriv -u USERNAME -a SHA -A AUTH_PASSWORD -x AES -X ENCRYPTION_PASSWORD 192.0.2.10 .1.3.6.1.4.1.8072.1.3.2.3.1.2.11.71.83.77.95.83.105.103.110.97.108.49
Mobile Data
Settings > Global settings > Network > Mobile Data (/settings/network/mobile-data) controls a
mobile data connection over one of the device’s modems, for example as a backup internet source. It is
not required for sending or receiving SMS. Leave it off if you do not need it.
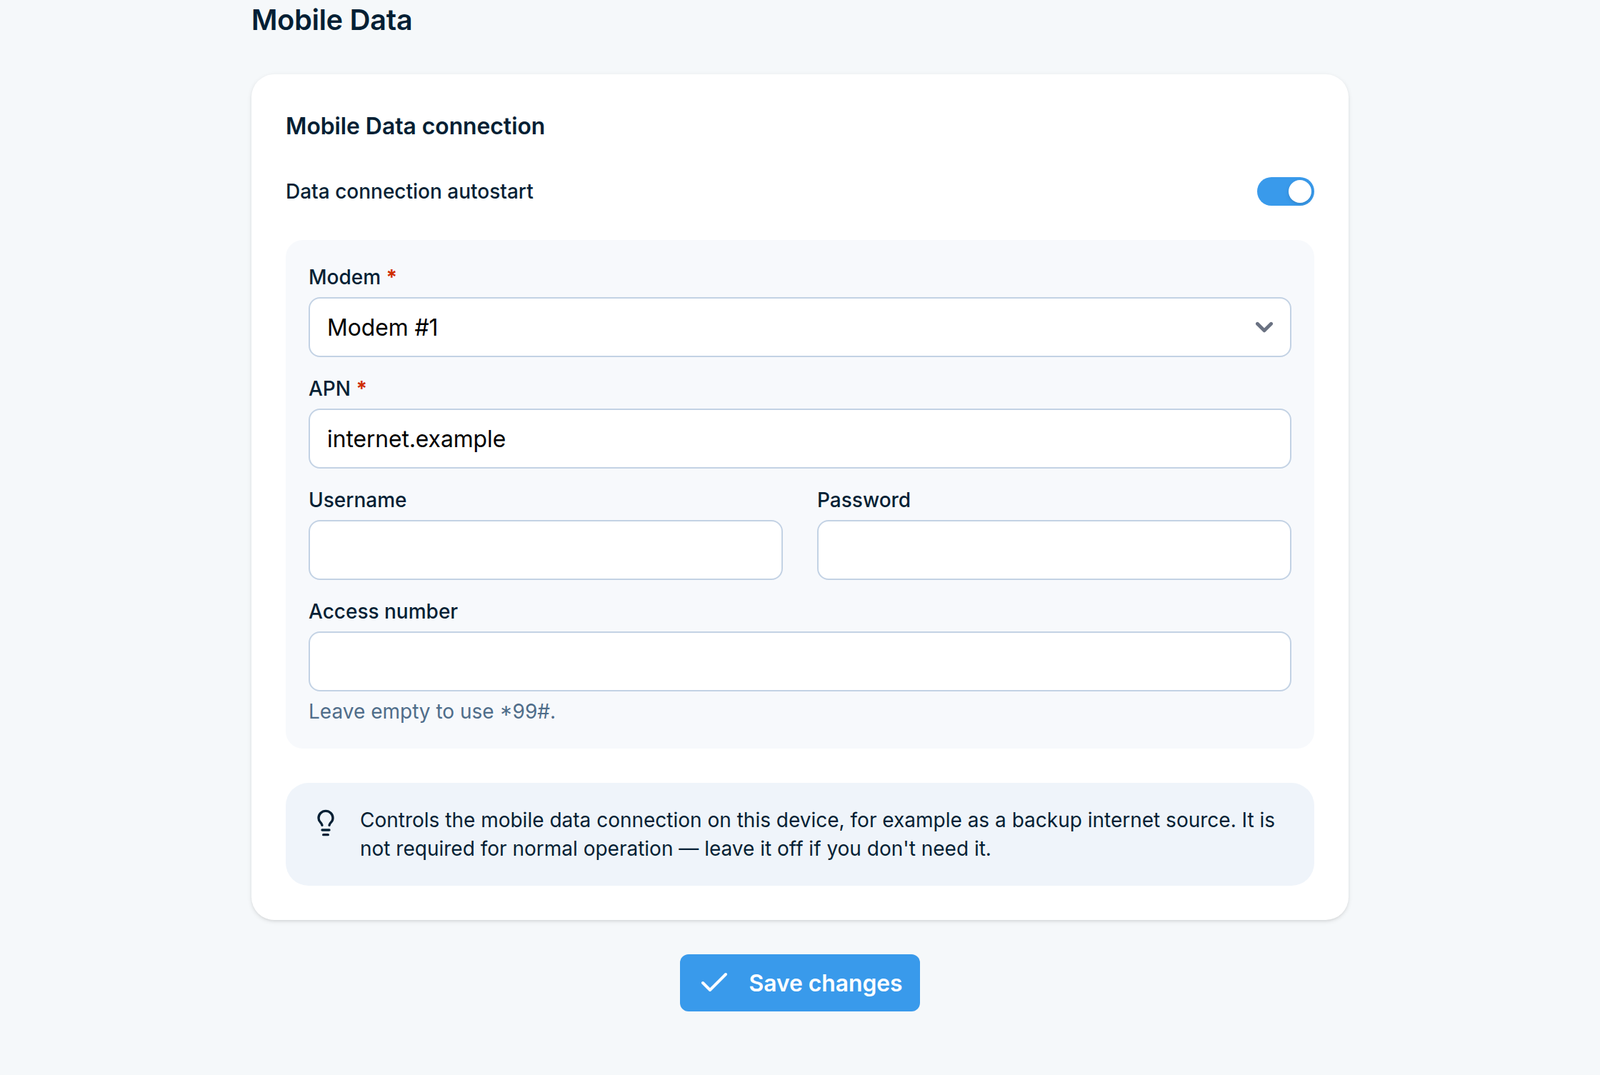
Turn on Data connection autostart, then set:
Modem - the modem whose SIM carries the data connection.
APN of the SIM’s operator (required), and Username and Password if the operator requires them.
Access number - leave it empty to use
*99#.
Click Save changes.
A reboot is needed. After saving, SMSEagle asks you to reboot the device so the mobile data changes take effect. Until you do, the new settings are stored but not yet in use. Use System > Restart when you are ready.
Application
Settings > Global settings > Application (/settings/application/) holds device-wide behavior that does not fit under a single channel or feature, grouped into four sections:
Regional
Language (device-wide default) and Country dial code (used when a phone number is entered without one).
Security
Force MFA - For all users, For new users, or Do not force (same effect as the wizard’s device-wide MFA setting, see MFA).
Password complexity verification - require the password rules (length, mixed case, number, special character) for every user.
Access to DB for external applications - enables direct PostgreSQL access for external applications, disabled by default. Full connection details and example SQL are covered separately in Advanced, since that is a power-user topic on its own.
Access and visibility
Inbox content visibility - For all users, Only for admins, or Only messages from the modems assigned to the user (modems are assigned per user in System > Users).
Email inbox content visibility - For all users or Only for admins.
Reporting module accessible for - All users or Only admins.
API and integrations
Save API logs - logs every API v1 and v2 call (method, path and parameters) to
/var/log/smseagle/api.log. Access tokens are masked and message text is left out. The file is not shown in the log browser under System > Logs, but Download logs on that page includes it. Turn it on while you set up or debug an integration.Forward 3CX messages as unicode - messages that 3CX sends to SMSEagle through the API v2 3CX endpoint go out as Unicode SMS instead of the standard SMS alphabet. Turn it on when 3CX users send national characters.
LDAP
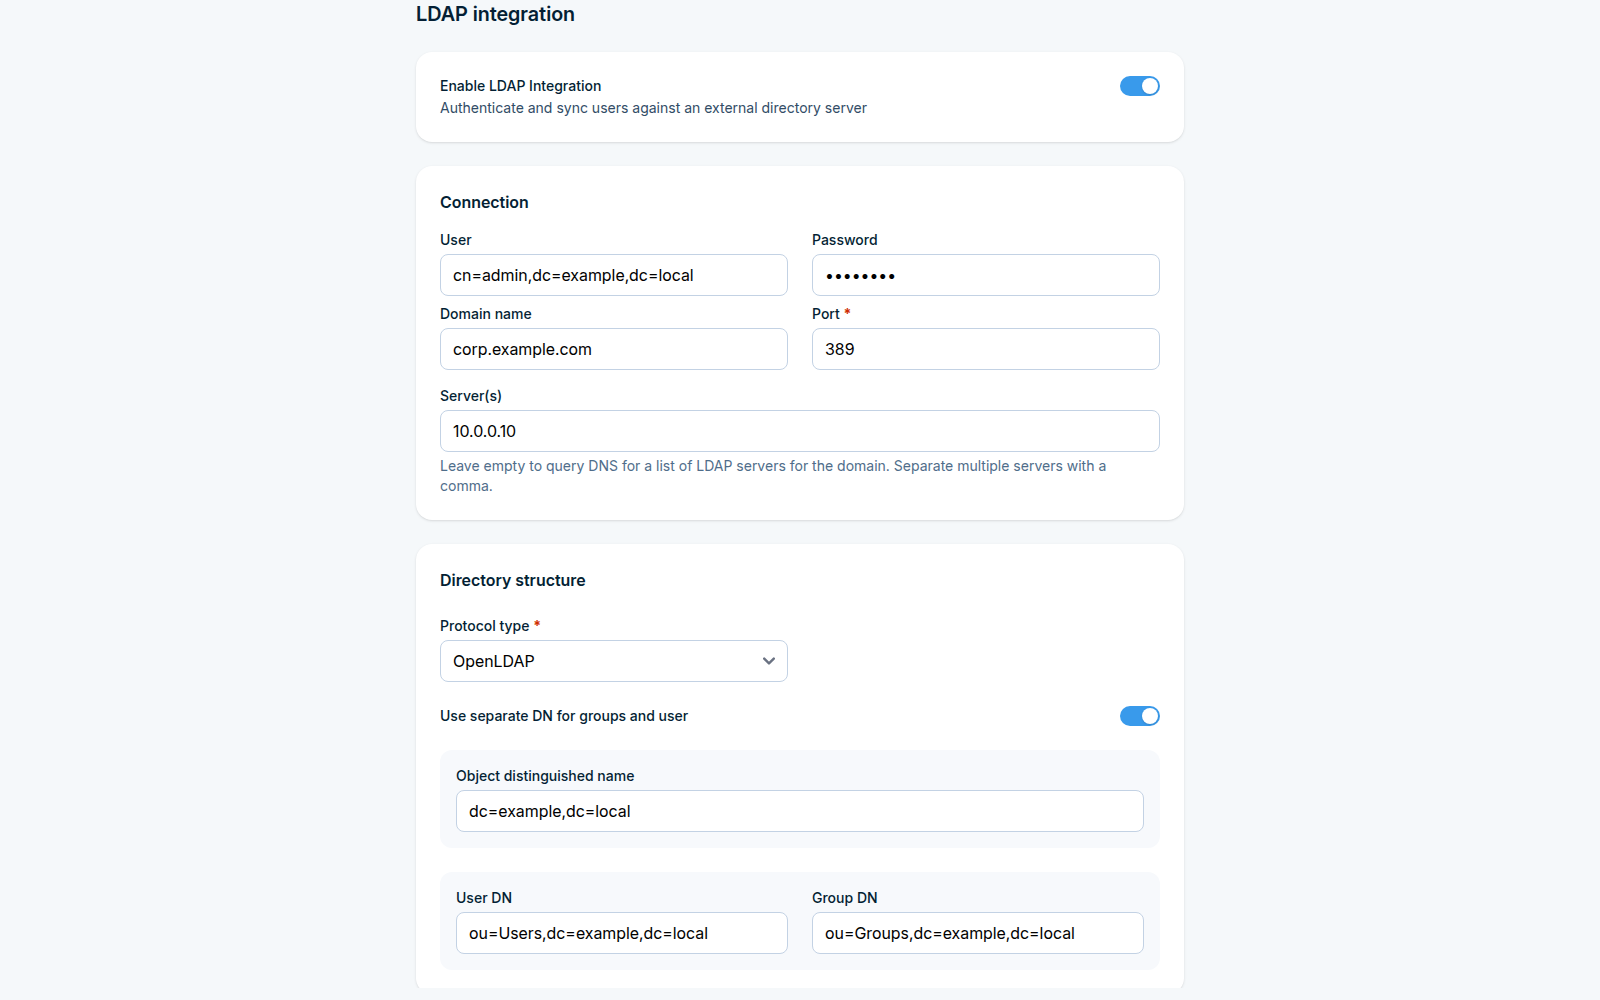
What this feature does
LDAP integration connects SMSEagle to your company directory, such as Active Directory or OpenLDAP. It does two separate jobs, and you can use either or both:
Job |
What it gives you |
|---|---|
Contacts |
The Phonebook is filled from the directory, so you send messages to the same people and groups your company already maintains, without typing numbers twice. |
Authentication |
Users sign in to SMSEagle with their directory account, and their permission level is decided by their directory group membership. |
Typical uses: keeping the Phonebook in step with staff changes automatically, and letting people use their existing company password instead of a separate SMSEagle one.
Before you start
Collect this from whoever administers the directory:
The domain name and the port (389 for plain LDAP, usually 636 with SSL).
A service account (user and password) that may read the directory.
The distinguished name of the branch holding your users, for example
ou=Users,dc=company,dc=local, and the branch holding groups if it is different.Which attribute holds the phone number you want to text.
If you want directory sign-in: the names of the groups whose members should become SMSEagle administrators and regular users.
Step 1: Open the LDAP page
In the sidebar, go to Settings > Global settings > LDAP.
The page starts with a single switch, Enable LDAP Integration. Until you turn it on, nothing else is shown.

With the integration off, the page shows nothing but the switch
Step 2: Enable the integration
Turn Enable LDAP Integration on. Four sections appear: Connection, Directory structure, Attributes and security and Sync and access.
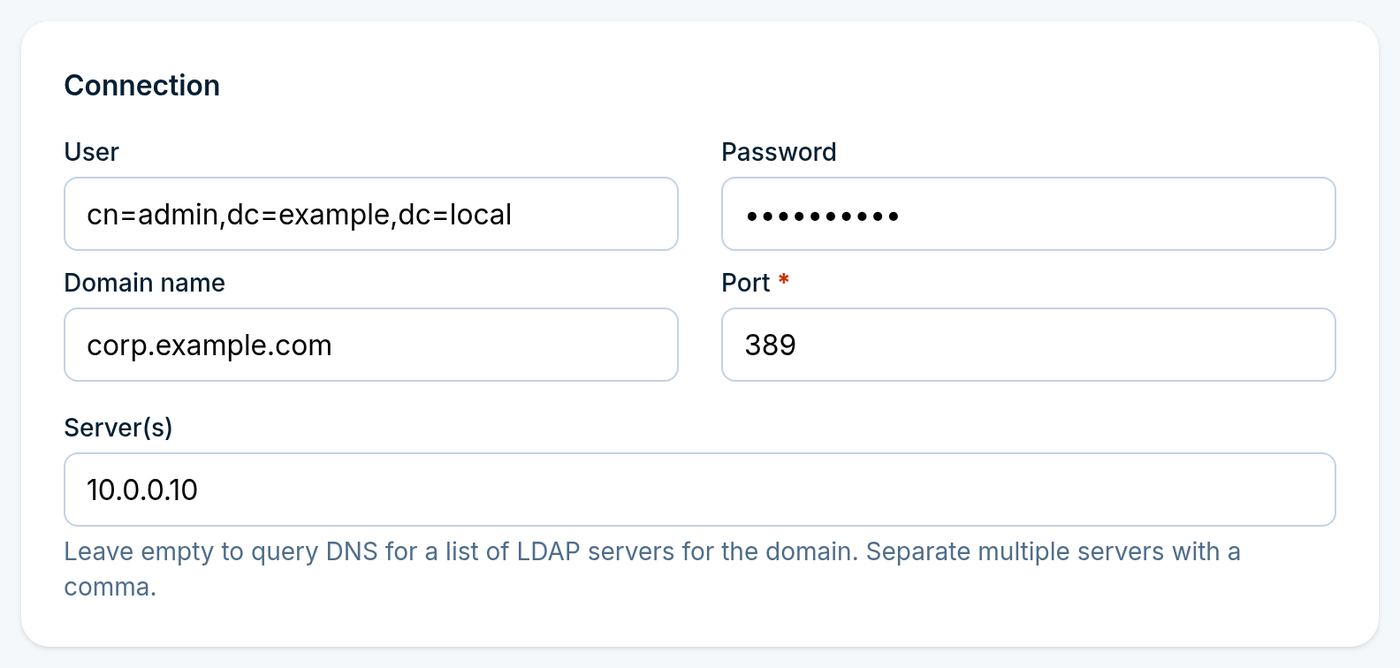
Step 3: Connection
Field |
What to enter |
|---|---|
User |
The service account used to read the directory. |
Password |
Its password. The field is shown empty when you come back to the page; leave it empty to keep the stored password. |
Domain name |
The directory domain, for example |
Port |
|
Server(s) |
Specific servers, separated by commas, for example |
Step 4: Directory structure
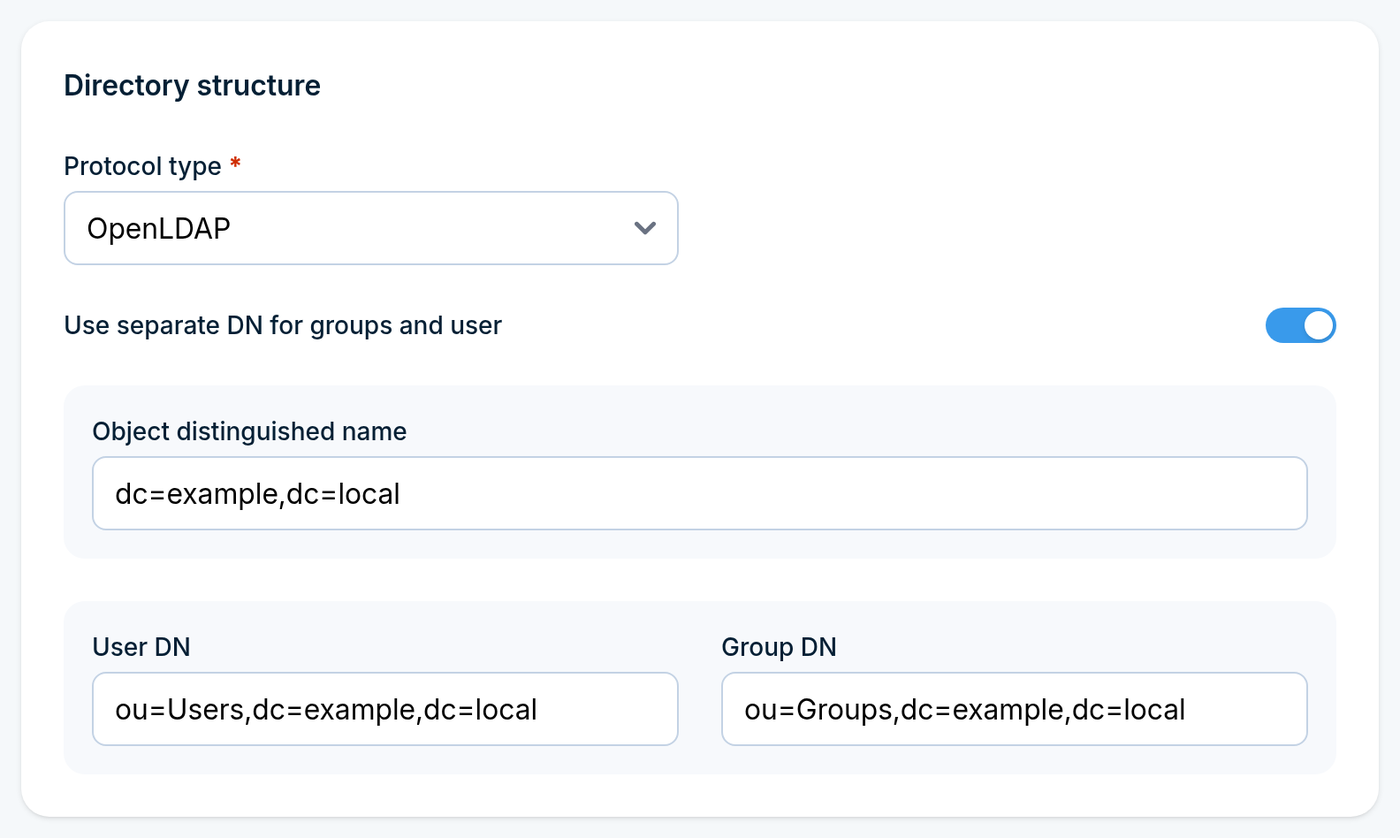
Protocol type Choose Active Directory or OpenLDAP, matching your server.
Use separate DN for groups and user Leave this off if users and groups live under the same branch. One field is then shown:
Object distinguished name, for example
ou=Users,dc=smseagle,dc=local.
Turn it on if they live in different branches. Object distinguished name stays, and two more fields appear below it:
User DN, for example
ou=Users,dc=smseagle,dc=localGroup DN, for example
ou=Groups,dc=smseagle,dc=local
Step 5: Attributes and security
AD phone attribute Which directory attribute holds the number SMSEagle should text: Telephone number, Mobile number, Home number, Pager number, Fax number, IP phone number, or Custom parameter.
Choosing Custom parameter reveals Custom attribute name, where you type the attribute
yourself, for example otherMobile. Only plain attribute names are accepted; punctuation such as
< > / \ : ; , . + ' " & = is rejected.
Use SSL Turn this on to encrypt the connection to the directory. Remember to set the matching Port in the Connection section.
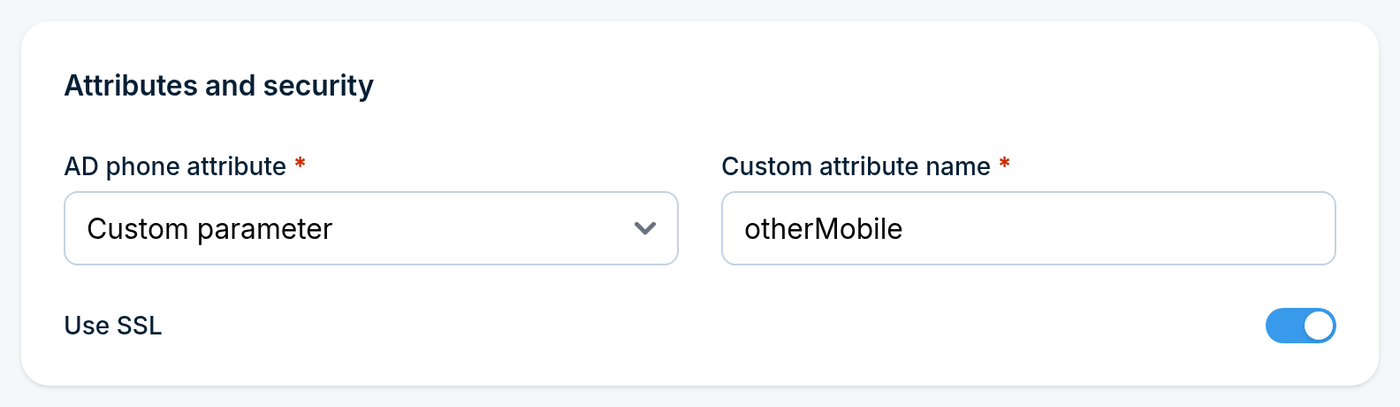
Attributes and security, with Custom parameter selected and SSL turned on
Step 6: Sync and access
Contacts and group fetch method
Option |
What happens |
|---|---|
Fetch from LDAP server |
Contacts and groups are read from the directory every time they are needed. Always current, but every lookup depends on the directory being reachable. |
Store offline (sync manually/periodically) |
A copy is kept on the device. Messaging keeps working when the directory is unreachable, at the cost of the copy being slightly stale. |
If you chose Store offline, Synchronize automatically appears: Never, Every hour, Every day, Every week or Every month. Never means the copy is only refreshed when you trigger a sync yourself.
Last synchronization below the fetch method is read-only, and shows when the offline copy was last refreshed. It reads Unknown until the first sync runs.
Allow authentication to SMSEagle via LDAP Turn this on to let people sign in with their directory account. Four more fields appear:
Admin group name in LDAP - members of this group sign in as administrators.
User group name in LDAP - members of this group sign in as regular users.
Require phone numbers - only directory accounts that have a number in the chosen phone attribute may sign in. Off by default.
LDAP as default login method - preselects LDAP instead of Local in the sign-in form’s authentication type, so directory users do not have to change it every time.
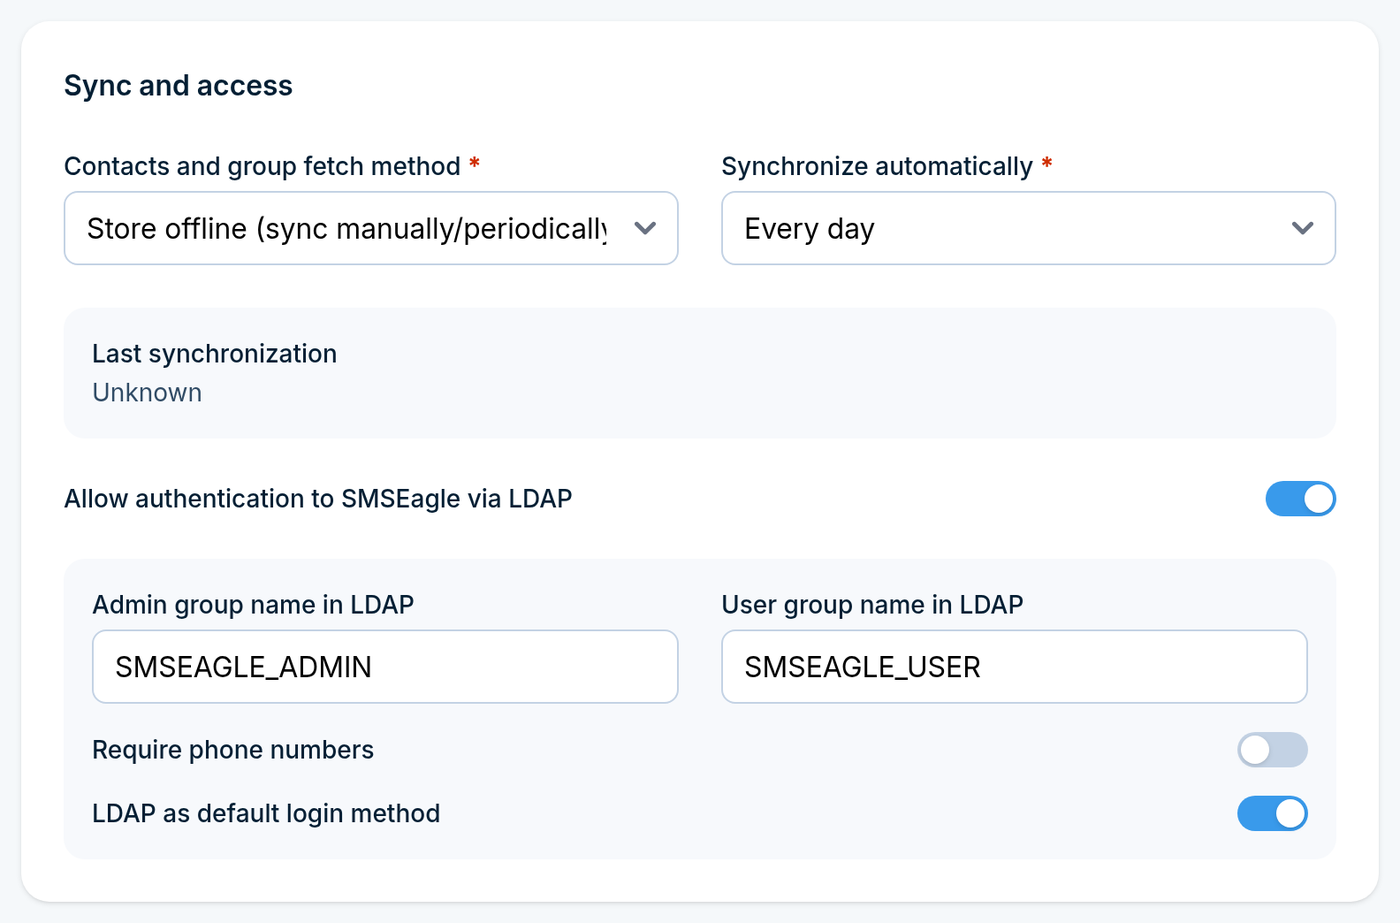
Sync and access, with offline storage and directory sign-in enabled
Check the group names before you rely on them. A member of neither group cannot sign in, and a typo in the admin group name is only noticed when nobody can administer the device. Keep at least one local SMSEagle administrator account working until you have verified a directory sign-in.
Step 7: Save and test
Click Save changes at the bottom of the page.
Then click Test connection. The device connects to the directory with the settings you just saved and reports either that the connection was established, or what went wrong.
Save first, then test. The test uses the stored settings, not what is currently on screen, so testing before saving checks the previous configuration. The note next to the button says the same.

Date / Time
Settings > Global settings > Date / Time (/settings/datetime/) shows the current system date and time (read-only), and lets you set:
Time zone
NTP time synchronization - when enabled, reveals NTP server address. Also offered during the Configuration Wizard.